Overview
Private Events
Control who can register, what guests see before they confirm, and whether you need to approve each attendee. Personal RSVP links, hidden venue details, and approval workflows for events that require discretion.
Three Levels of Private
Section titled “Three Levels of Private”“Private event” means different things depending on who you ask. Most people mean one of three things, and each one requires a different setup in Gatsby.
-
Control who registers.
Only people on your guest list can RSVP. This is the default.
-
Control what people see.
Confirmed guests get the address. Everyone else sees a general location.
-
Approve each attendee.
Registrations land in a queue. Nobody gets confirmed until you say so.
Most events only need the first. Some need the first and second. A few need all three. Figure out which question you’re answering before you start configuring.
Controlling Who Can Register
Section titled “Controlling Who Can Register”Every guest you add to an event gets a unique RSVP link tied to their contact profile. When they click it, their name and information are pre-filled. There’s no public URL unless you create one. If someone isn’t on your list, they don’t have a way in.
How personal links work
When a guest clicks their link, a few things happen automatically.
Identity is known immediately
The link is tied to their contact profile. Gatsby knows who clicked, when they clicked, and what they did. No ambiguity about which John Smith just registered.
Information is pre-filled
Name, email, and any other known fields are already populated. Your guest confirms rather than types.
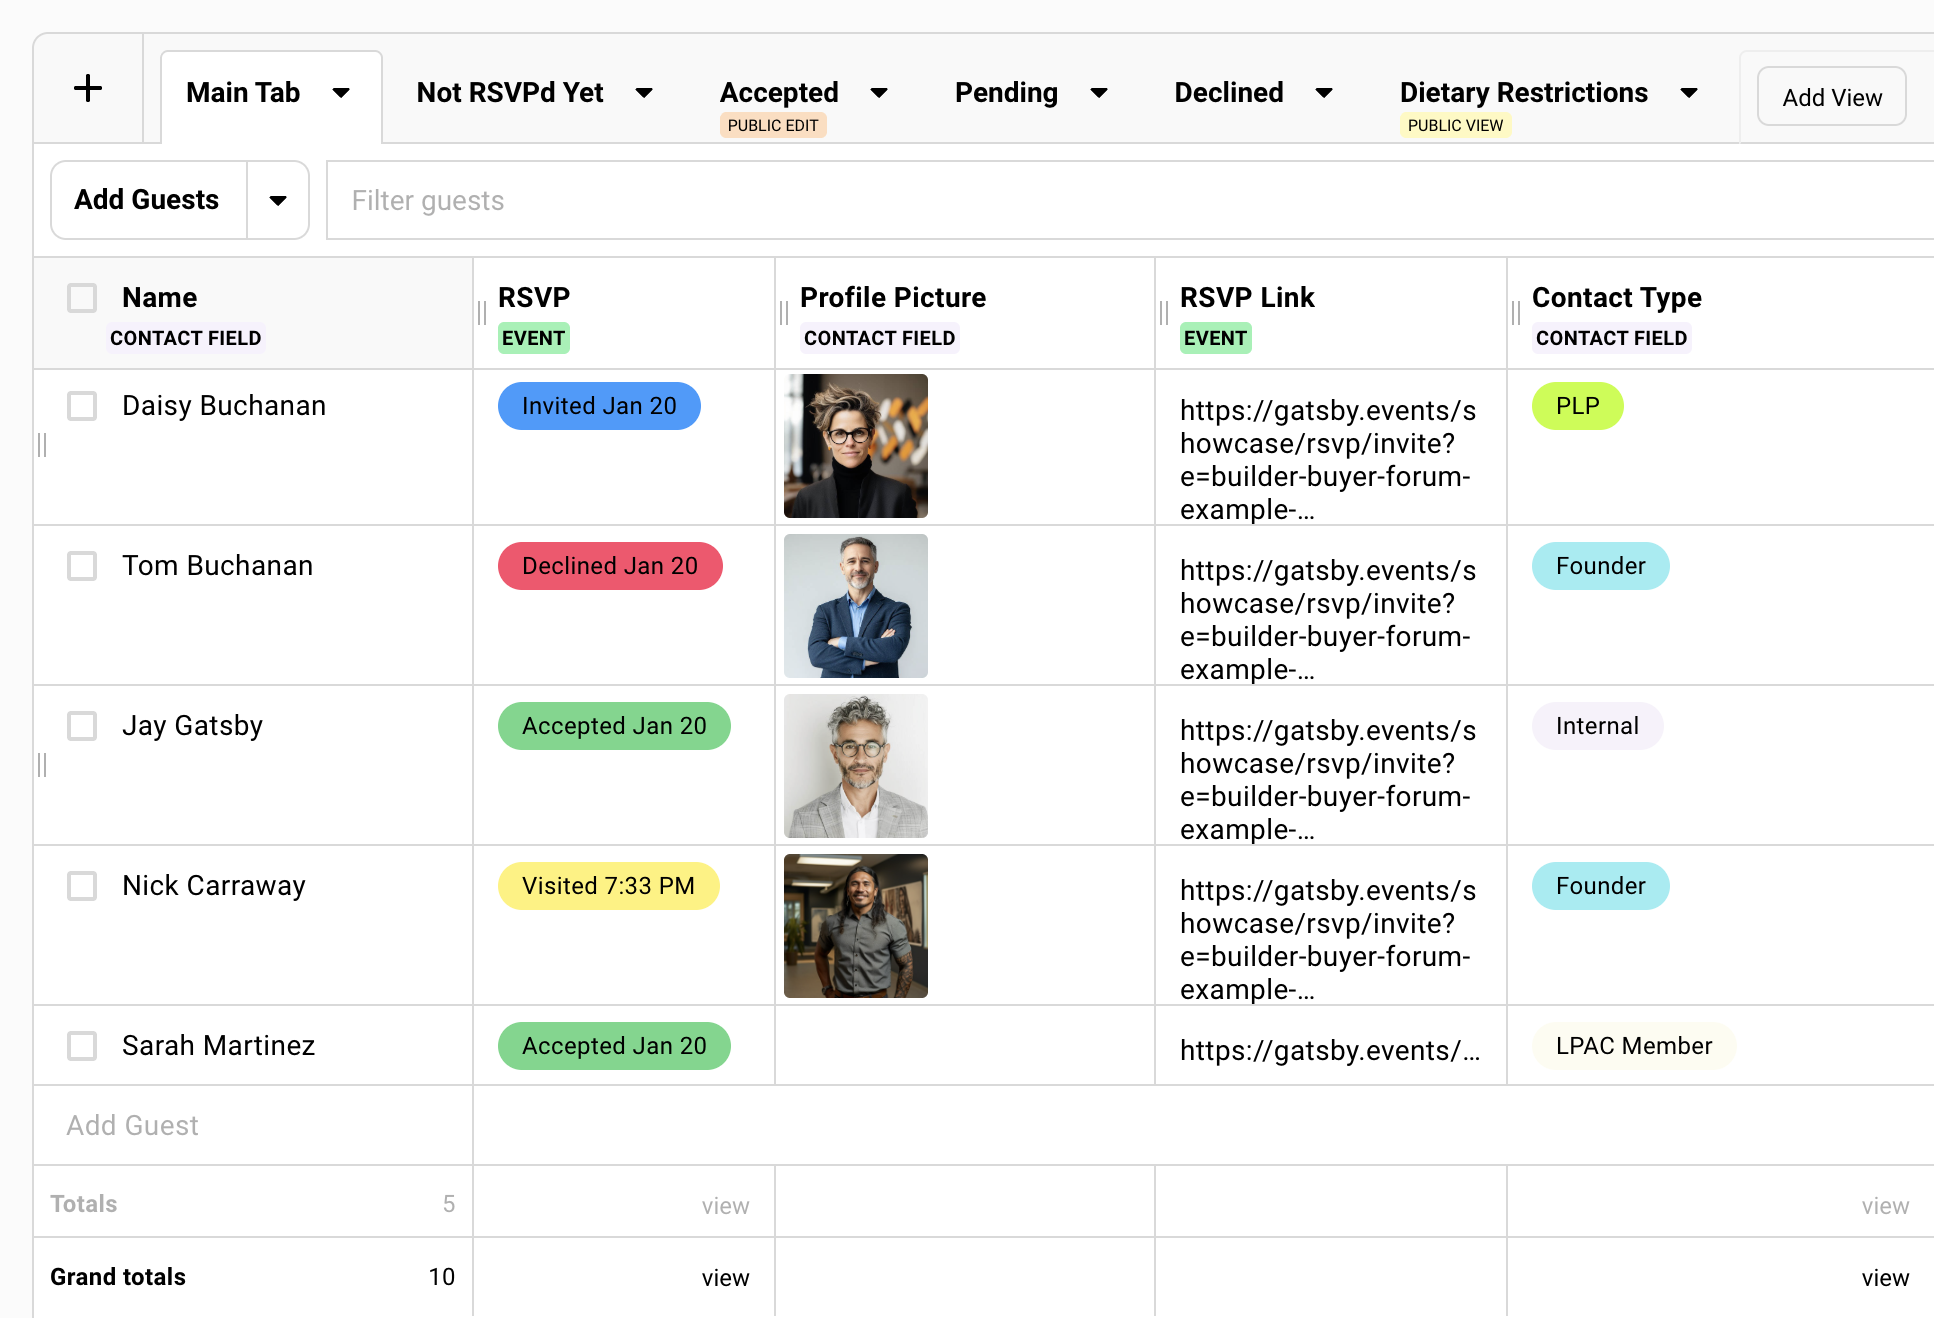
RSVP status updates to “Visited”
Before they even register, you can see they opened the link. Filter your guest list by “Visited” to find people who looked but haven’t committed.
Registration is attributed
When they complete the form, the response ties directly to their contact profile in Gatsby. Their history follows them to future events.
What happens if a guest forwards their link
The link opens for whoever clicks it. They can see whatever’s on your landing page. But the link still belongs to the original guest. If the forwarded person tries to register, they’re submitting the original guest’s RSVP, not creating their own.
This actually works well for one scenario: an executive assistant opening the link on behalf of their boss and completing the registration. It stays attributed to the right person.
For everything else, it creates confusion. Include a line in your invitation like: “This invitation is unique to you. If you’d like to bring a colleague, reply to this email and we’ll send them their own.”
You can also toggle on a setting that displays whose registration the link belongs to, which helps if someone opens a forwarded link and realizes it’s not theirs.
Setting up your guest list and sending invitations
-
Add contacts to your event. Import them, add individually, or pull from an existing list.
-
Go to the Campaigns tab and create a new draft.
-
Write your invitation. Use the + menu to insert the RSVP link merge field. This generates a unique link for each recipient.
-
Select your recipients and send.
Each guest receives their own link. Track who opened, who clicked, and who registered from your guest list.
Following up with non-responders
Filter your guest list by Invited to find people who haven’t clicked their link. Filter by Visited to find people who clicked but didn’t register. Send a follow-up campaign to either group. Two clicks.
Controlling What Guests See
Section titled “Controlling What Guests See”You can’t prevent someone from screenshotting a page or telling a friend what they read. What you can control is whether your venue address appears on a page that anyone with a forwarded link could see.
The approach is straightforward: remove the specific address from your landing page and put it in your confirmation email instead.
How to hide the venue address
On your landing page:
-
Go to Landing Page Templates in your event.
-
Edit your active template.
-
Find the location block and replace the specific address with something general. “SoMa, San Francisco” or “Details provided upon confirmation.”
In your confirmation email:
-
Go to Email Settings under the RSVP tool.
-
Edit the confirmation email content.
-
Add the full venue address, directions, parking instructions, and any attachments like agendas or briefing materials.
The confirmation email only goes to guests who register through their personal link. If you’re using the approval workflow, it only goes to guests you’ve approved.
What about the calendar invite?
The calendar invite pulls the location from your event settings. If you want that to stay vague too, set your event location to the general version.
You can update it closer to the event date and send calendar updates to confirmed guests only.
A note about confirmation emails and SendGrid
Confirmation emails require SendGrid. If your team is using Gmail or Outlook for campaigns, your account admin needs to configure SendGrid separately for notification emails.
Notification email setupIf you trust everyone on your guest list and the venue isn’t sensitive, skip all of this. Put the full address on the landing page. Personal links still restrict who can register regardless of what’s visible.

Approving Each Attendee
Section titled “Approving Each Attendee”Waitlist mode turns registration into a two-step process. Guests register, but instead of getting confirmed immediately, they land in a queue. You review each one and decide who gets in.
This adds friction. Your guests register and then wait. Don’t use it unless the vetting step is genuinely necessary.
When this makes sense
-
You’re running an apply-to-attend event and need to vet each person.
-
You’re accepting registrations from a public link but want to screen who actually gets confirmed.
-
You have a carefully curated guest list but want to verify each registration before sharing the venue.
-
You have hard capacity constraints and want to hand-pick who fills the remaining spots.
How to set up waitlist mode
-
Set your event’s Registration Mode to “Waitlist” in the RSVP tool.
-
Configure your waitlist email. This is what guests receive when they register. It should set expectations: their registration is received, you’ll follow up with confirmation.
-
As registrations come in, review them on your guest list. You can see survey responses, contact history, and any other information you’ve collected.
-
When you’re ready to approve someone, change their status to Accepted.
-
You can then choose to send the confirmation email with venue details, calendar invite, (and whatever else you’ve included), or follow-up with a campaign email.
Until you approve them, they don’t get the confirmation. If you’ve hidden venue details from the landing page, they have no way to see the address.
Common Scenarios
Section titled “Common Scenarios”Here’s how the three levels combine in practice.
Standard invite-only dinner
Personal links only. Full venue details on the landing page. You trust the guest list and want a simple experience. This is the default.
Dinner at a private residence
Personal links plus hidden address. Landing page says the neighborhood or city. Confirmation email includes the actual address, gate code, and parking instructions. Guests who forward their link can see the event exists but not where it is.
Apply-to-attend conference session
Public link with waitlist mode. Anyone can apply. You review each registration and approve selectively. Confirmation email includes the venue and session details. People who don’t get approved never see the logistics.
High-security investor meeting
Personal links, hidden address, and waitlist mode. Only people on your list can register. Each registration is reviewed before confirmation. Venue details are delivered only after approval. Maximum control at every step.
Common Questions
Section titled “Common Questions” Can I hide things besides the venue address?
You control everything on the landing page. Remove speaker names, agenda details, attendee lists, whatever you want. Put sensitive details only in the confirmation email.
Do guests need a Gatsby account?
No. They click their link, see their pre-filled information, and register. No login, no account creation.
Can I modify the guest list after sending invitations?
Yes. Add new contacts and send them a separate invitation campaign. Each new guest gets their own personal link. Remove people if needed.
How do I know if someone viewed the page but didn't register?
Their status shows “Visited.” Filter your guest list by this status to see everyone who clicked but didn’t complete registration.
Can an assistant register on behalf of their executive?
Yes. The assistant opens the personal link, sees the pre-filled info, and completes the registration. It stays attributed to the right person. The confirmation email also goes to any executive assistant email associated with that contact profile.