Overview
Running Events with Multiple Sessions
Set up a single registration flow where guests pick which sessions they'll attend. Each session gets its own guest list, capacity limits, and calendar invite.
Your Summit Has Six Sessions. Now What?
Section titled “Your Summit Has Six Sessions. Now What?”You’re running a two-day summit with a mix of dinners, breakouts, keynotes, and optional add-ons. Guests aren’t attending all of it. They need to pick.
Gatsby handles this through a single registration event where guests RSVP and select their sessions. Each session is its own event behind the scenes, with its own guest list, capacity settings, seating chart, and calendar invite. Guests register once. You get a clean list for every session.
When you need this setup
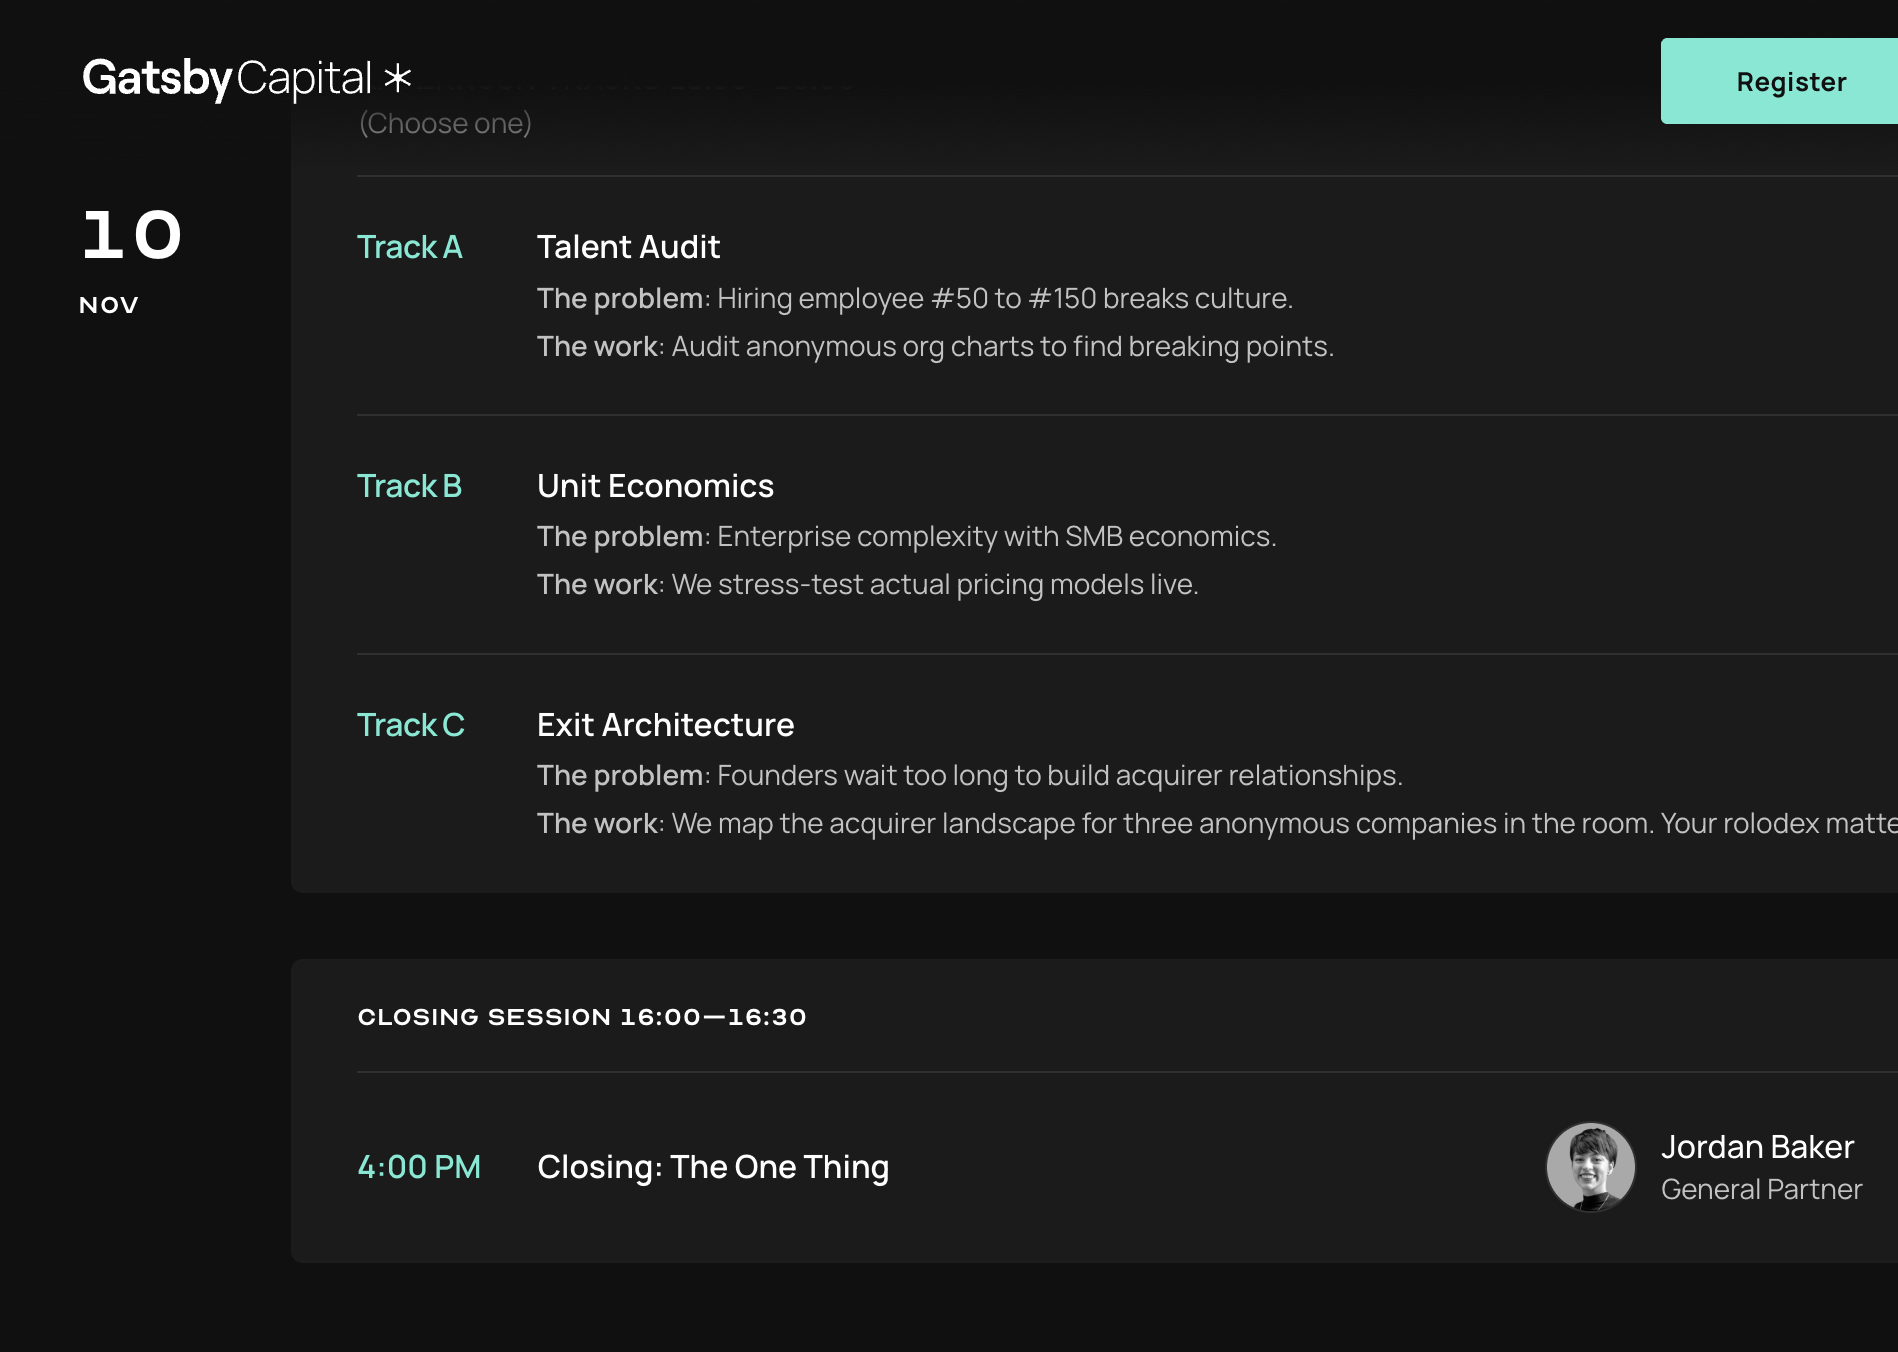
Any time guests are choosing between sessions, tracks, or sub-events within a larger event. Annual meetings with optional dinners and breakout discussions. Multi-day summits where not everyone attends everything. Conferences with capacity-limited workshops that need automatic waitlisting.
If everyone’s attending the same thing, you don’t need this.
What guests see
They get one invitation email. They click through to your landing page, register, and check the sessions they want.
Next, you choose. But, here’s what we recommend:
They get a confirmation email from the main event (no calendar invite) plus a separate confirmation with a calendar invite for each session they picked. Their calendar shows exactly what they chose. If they change their mind later, they click the same original link and update their registration and session selection.
What you get on the back end
A scoped guest list for every session.
Everyone who selected “Reception Dinner” is on the Reception Dinner guest list. Build your seating chart from that list. Hand your caterer a headcount from that list.
Capacity and waitlists per session.
Set the wine tasting to 40. When it fills, guest 41 gets waitlisted. Each session runs independently.
One view of all attendees.
Your registration event’s guest list shows everyone who registered. Survey response columns show which sessions each guest picked. Add columns from session events (via “Other Events/Lists” in the Columns drawer) to see per-session RSVP status.
Calendar invites that match.
Each session sends its own invite with the correct date, time, and location. No one gets calendar blocks for sessions they didn’t pick.
Create the Registration Event
Section titled “Create the Registration Event”This is where you do a full event setup. You make a landing page, add guests, and invite them.
Steps to create the registration event
-
Go to Events and Lists.
-
Click Create Event.
-
Name your event clearly (like “Summit 2027”).
-
Set an Internal Name that identifies this as the registration hub (like “[Registration] Summit 2027”).
-
Set the general date, time, and location. Guests won’t see these details. They’re for your own organization.
This is your registration hub. You send invitations from here, guests land here, and your main attendee list lives here.
Create Your Session Events
Section titled “Create Your Session Events”Each session becomes its own event. This is what gives you per-session guest lists, capacity settings, and separate calendar invites.
Steps to create session events
-
Go to Events and Lists. Click Create Event.
-
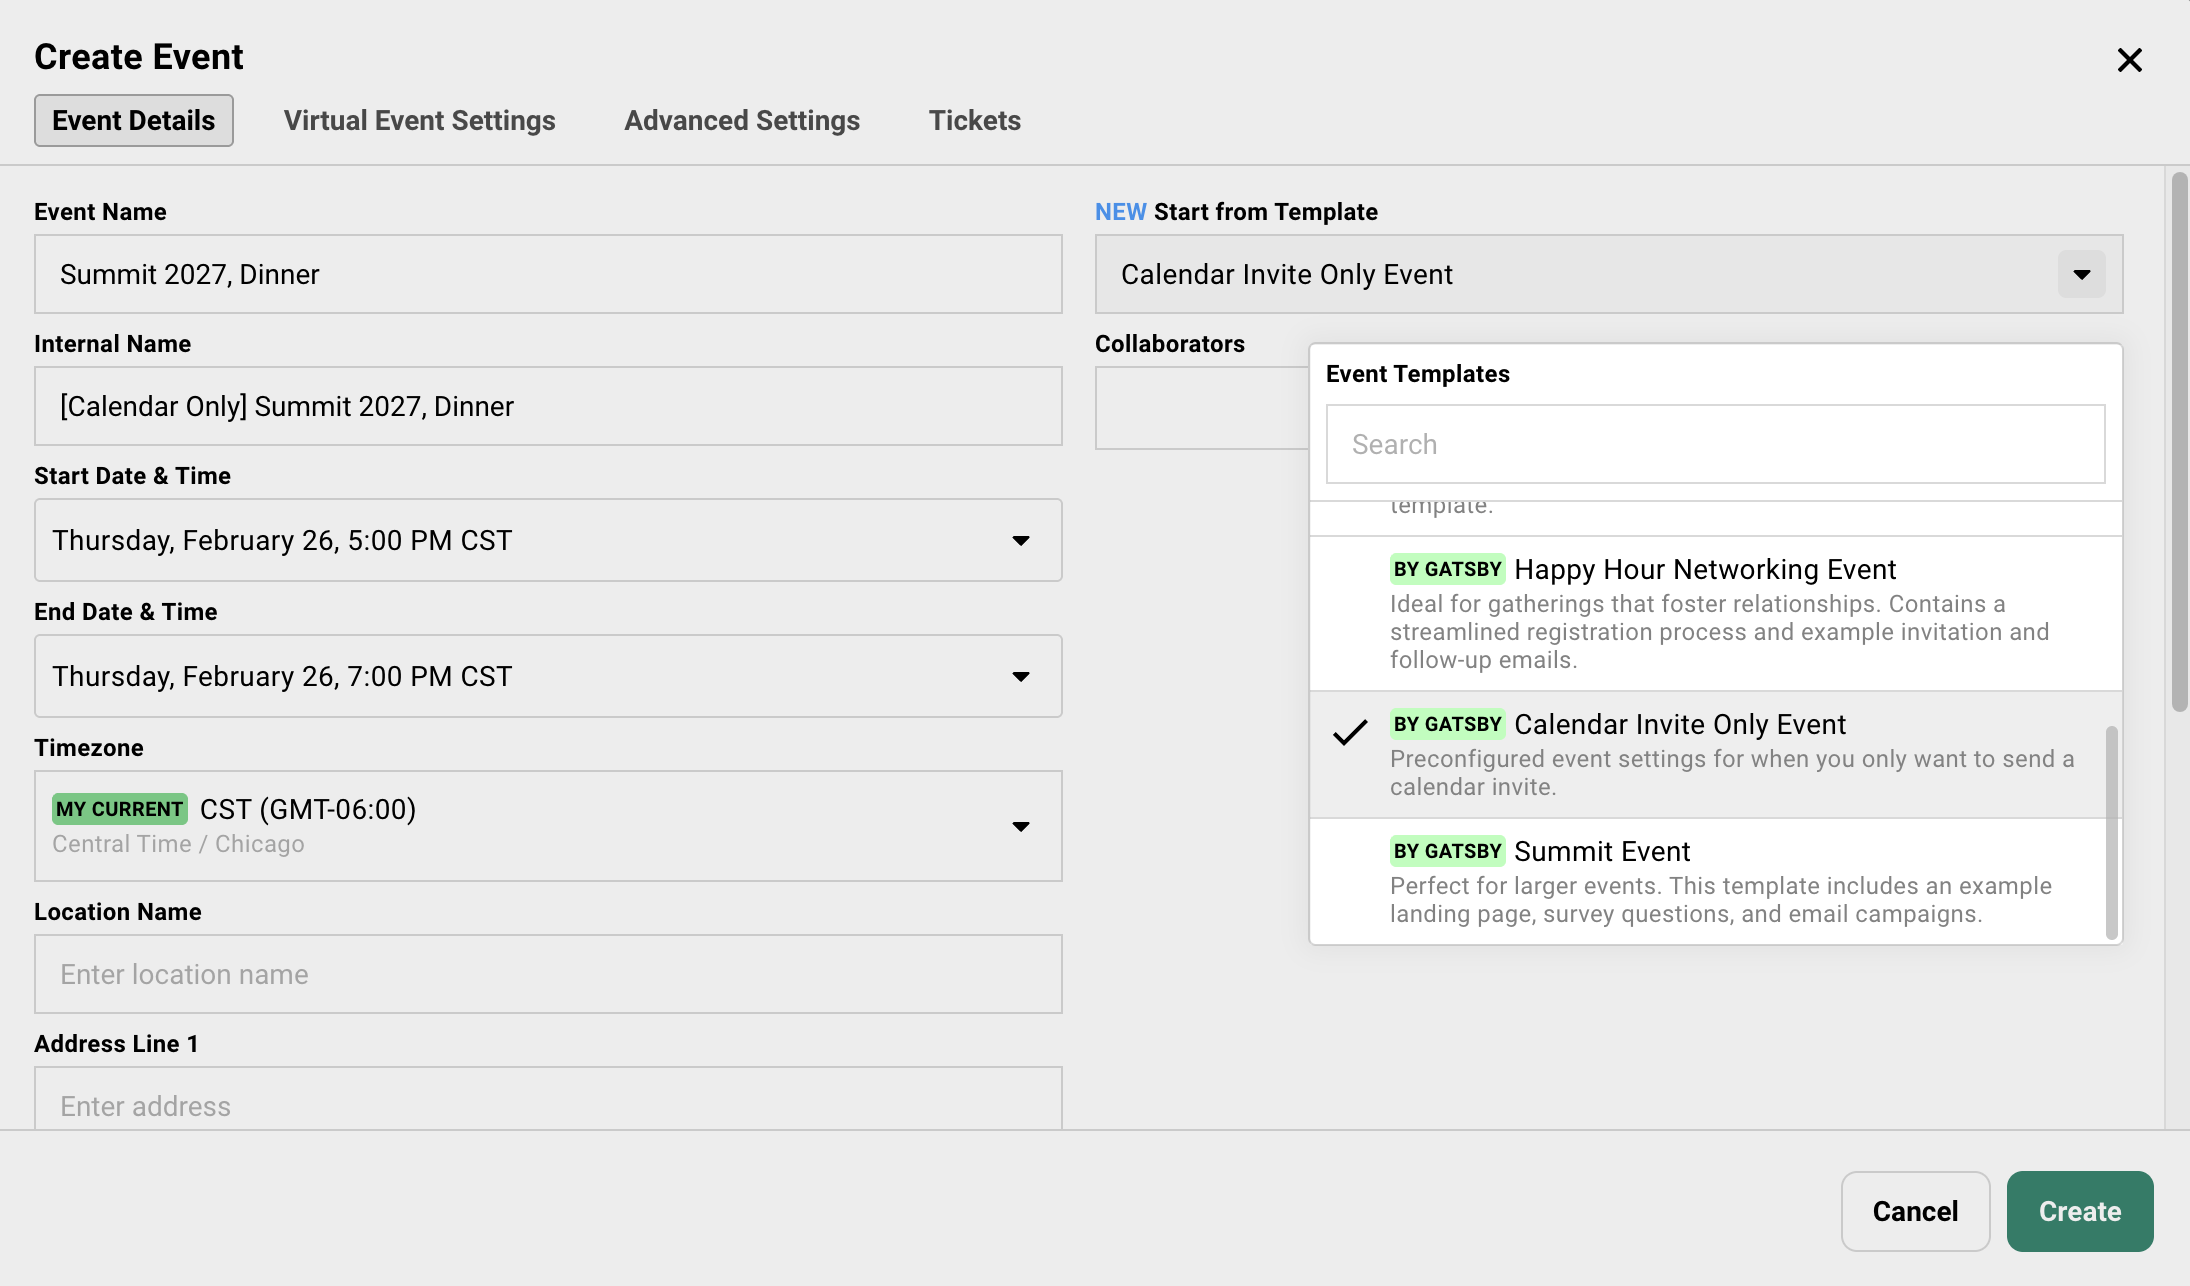
Name it with the session name (like “Summit 2027, Reception Dinner” or “Summit 2027, Monday Workshop”).
-
Add something like “Calendar Only” or “Sub-Event” to the internal name for clarity (like “[Calendar Only] Summit 2027 Dinner”).
-
Select the Calendar Invite Only Event template from the dropdown.
This template streamlines settings by removing the
{rsvpLink}from confirmation emails and calendar invites. -
Set the specific date, time, and location for this session. This is what appears on the calendar invite guests receive.
-
Click Create, then repeat for each session.
What the Calendar Invite Only template does
This template removes the RSVP link from emails. Guests never visit these events directly.
These events don’t need landing pages, campaigns, or uploaded guest lists.
They exist to hold session-specific settings (capacity, location, time) and send calendar invites.
Everything else flows through the registration event.
Setting capacity and waitlists on sessions
Open any session event and go to its event settings. Set your capacity limit there.
When that session fills up through registration, additional guests are automatically waitlisted on that session’s guest list. Your other sessions aren’t affected.
Connect Sessions to Your Registration Flow
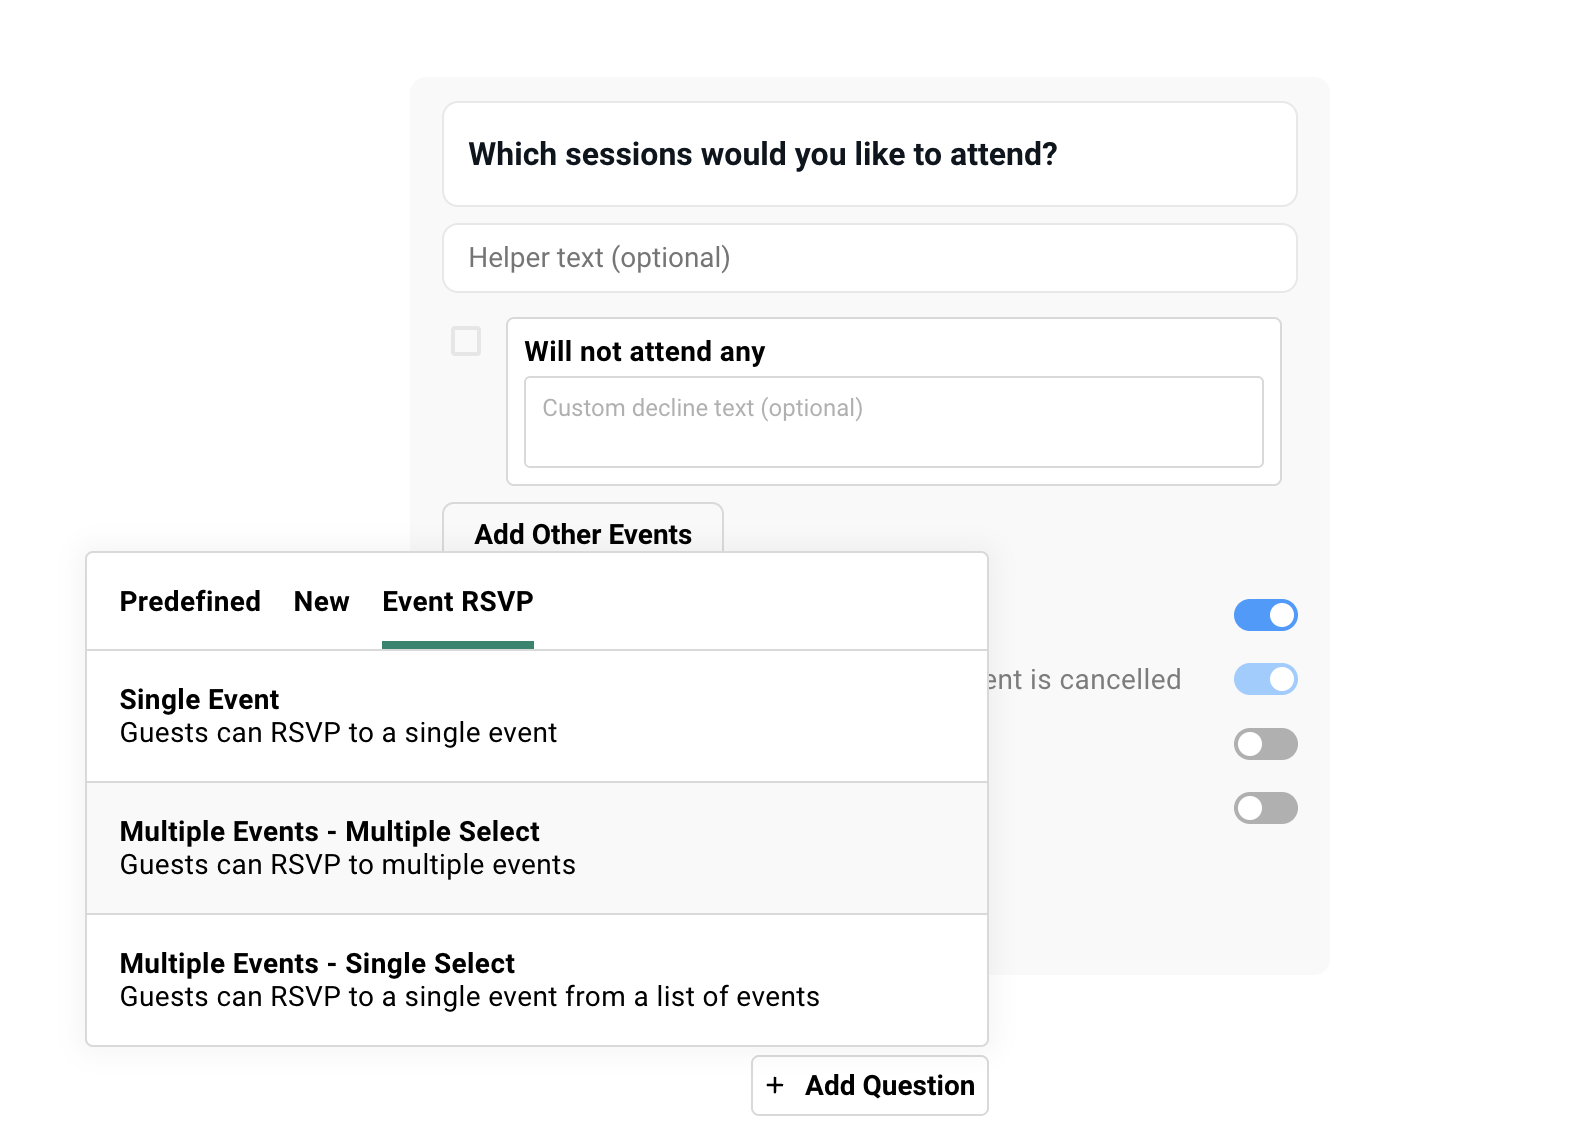
Section titled “Connect Sessions to Your Registration Flow”Back in your registration event, add a survey question that lists your sessions. When a guest checks a box, they’re added to that session’s guest list and receive its calendar invite.
Steps to add the session selection question
-
In the registration event, go to RSVP » Surveys.
-
Add a new question.
-
Under Event RSVP, choose Multiple Events - Multiple Select.
-
Change the heading to something guests will understand (like “Which sessions will you attend?”).
-
Click Add Other Events and select your session events.
-
Keep Send confirmation email from child event turned ON.
(The label says “child event” because Gatsby uses that term internally for linked events.) This is what triggers the calendar invite for each session a guest selects.
The Send confirmation email from child event toggle is critical. Without it, guests won’t receive calendar invites for the sessions they select. The “child event” label refers to the session events you linked in the question.
Registration Event Email
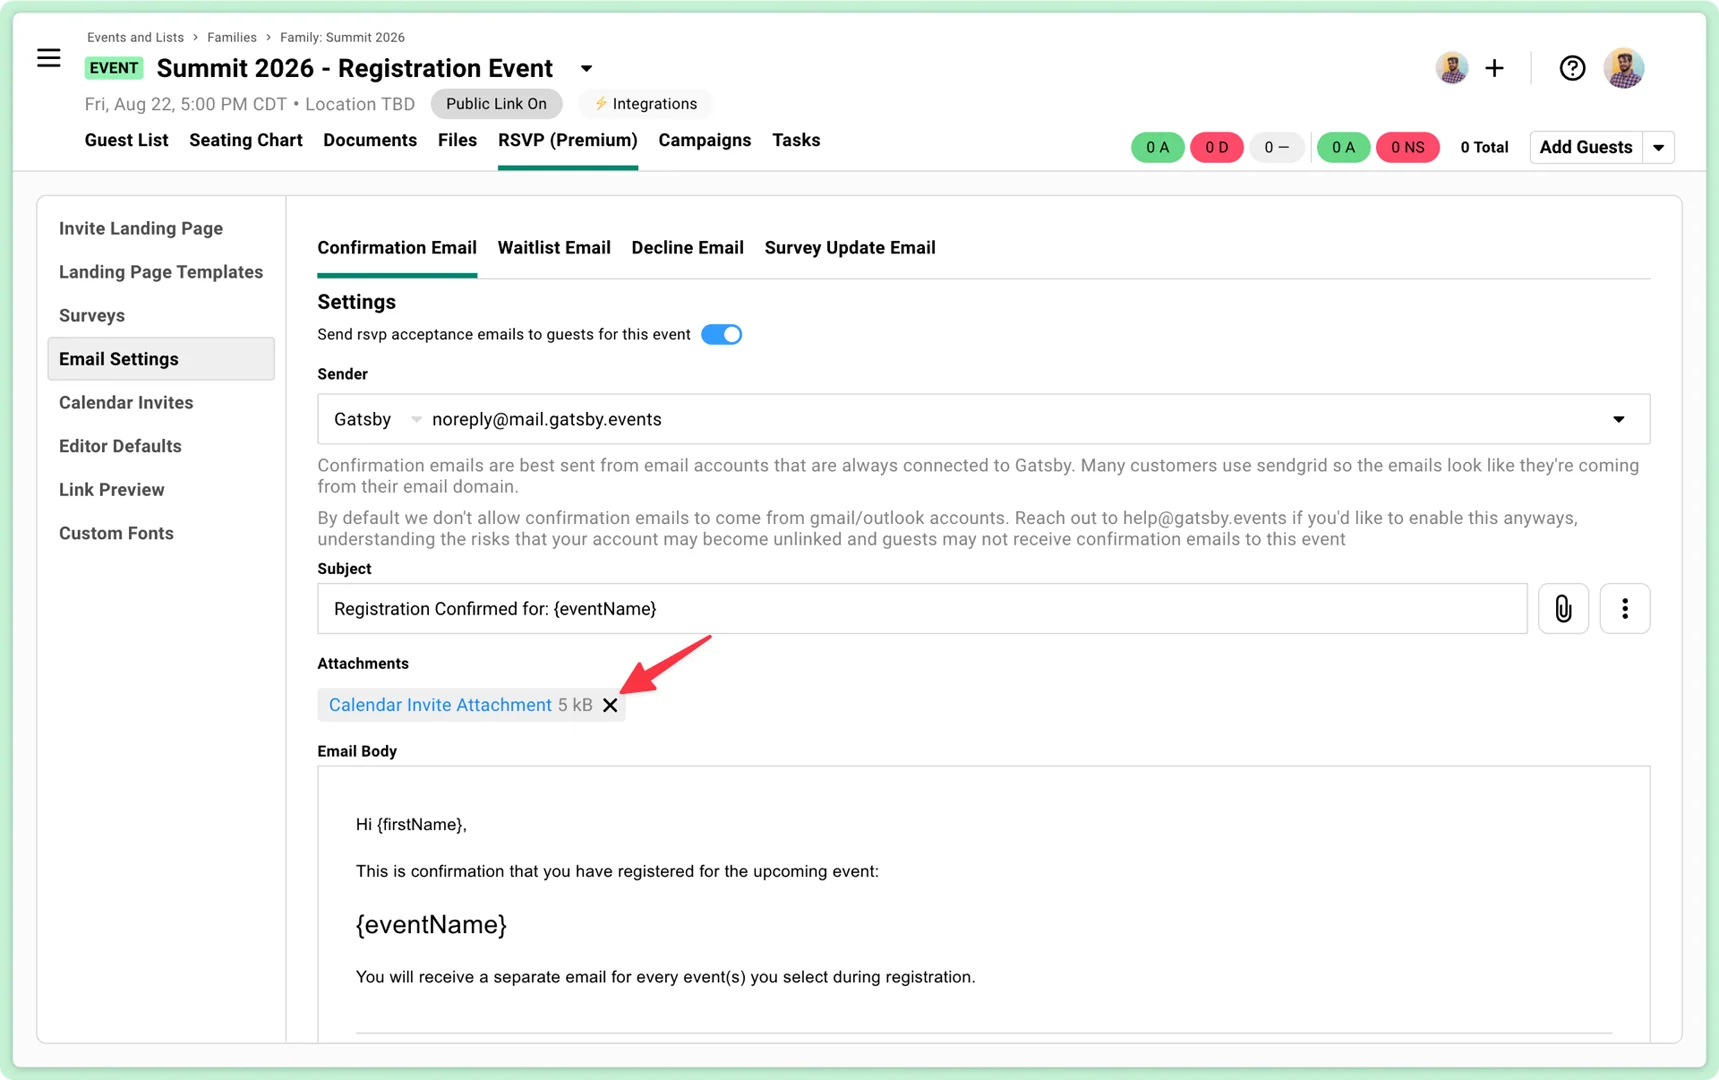
Section titled “Registration Event Email”This email confirms their overall RSVP and provides them a link to edit their registration. It should not include a calendar invite.
Steps to configure registration event email
-
Go to RSVP » Email Settings in the registration event.
-
Click the X next to Calendar Invite Attachment to remove it.
-
Keep the confirmation email enabled. Guests need their RSVP link to update their selections later.
-
Optional: Add a line like “You’ll receive separate calendar invites for each session you selected.”
Session Event Emails
Section titled “Session Event Emails”Each session event sends its own confirmation with a calendar invite attached. Remove the RSVP links from these emails so guests manage everything through the registration event.
Steps to configure session event emails
-
In each session event, go to RSVP » Email Settings.
-
Verify the calendar invite is attached. (It should be by default.)
-
Remove any
{rsvpLink}merge tags from the email body. -
Under RSVP » Calendar Invite, remove the
{rsvpLink}from the calendar invite description field. -
Add guidance like: “To update your registration, use your original invitation link.”
-
Repeat for each session event.
Why remove the RSVP link from session emails
You want one place where guests manage their registration: the main registration event. If they click an RSVP link from a session email, they land on an empty page with nothing useful. Point them back to the original registration link instead.
After Setup
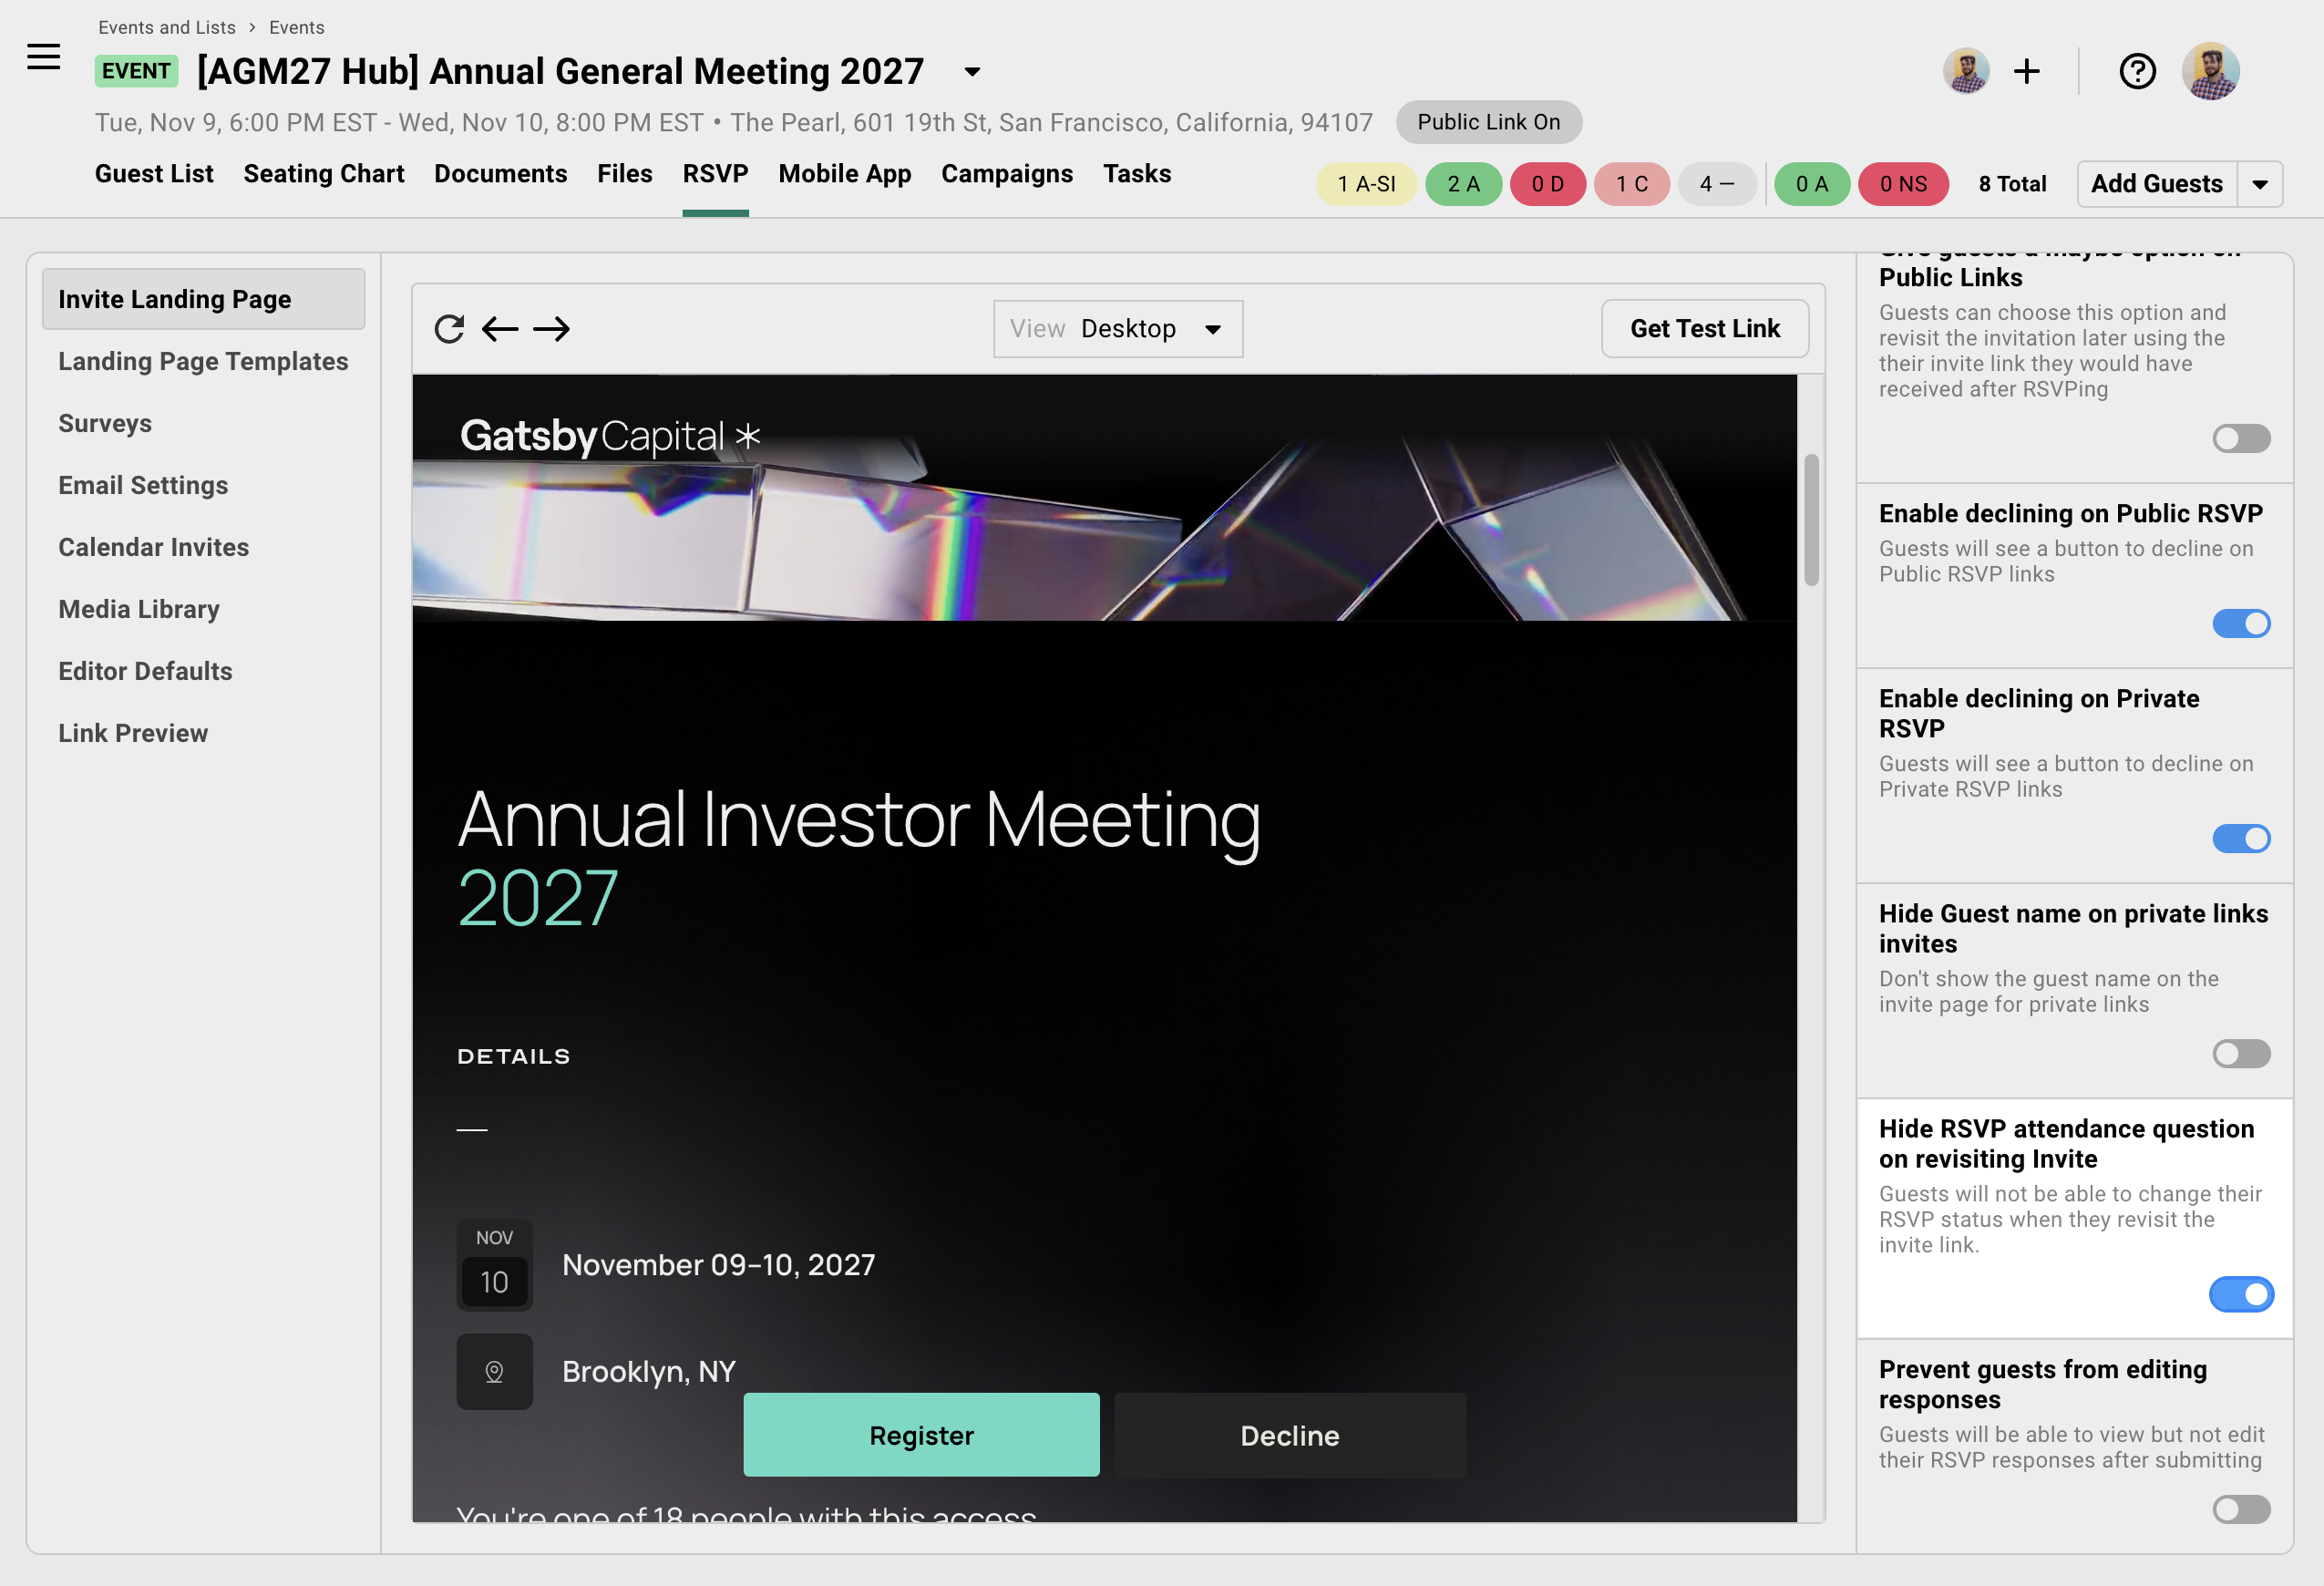
Section titled “After Setup” Cleaning up the revisit flow
When guests return to update their session picks, you don’t want them seeing a “Will you attend?” question about the registration event. They already said yes.
-
In your registration event, go to RSVP » Invite Landing Page.
-
Scroll down on the settings panel.
-
Toggle ON Hide RSVP attendance question on revisiting invite.
Returning guests now only see your session selection survey question and can de-select options to cancel their registration on the separate session events.
Showing different sessions to different guests
Need a board-only dinner or a speaker green room? You’ll need separate session selection questions for each guest segment.
One thing to know: the Only show question if… condition controls the visibility of the entire survey question. You can’t show or hide individual sessions within a single question. To give different guests different session options, create multiple questions.
Example: Your summit has 8 sessions. Six are open to everyone. Two (board dinner, executive briefing) are VIP-only.
-
Create your first Multiple Events - Multiple Select question. Add the 6 open sessions. Leave the visibility condition blank so every guest sees it.
-
Create a second Multiple Events - Multiple Select question. Add the 2 VIP-only sessions. Set Only show question if… to a condition like “Guest Type = VIP.”
-
Customize the heading on each question so guests know what they’re looking at (like “Which sessions will you attend?” for the open sessions and “VIP Sessions” for the restricted ones).
VIP guests see both questions during registration. Everyone else sees only the first. Works well for board member dinners, speaker-only prep sessions, sponsor-exclusive events, or executive tracks.
When different audiences need different landing pages
Your 400-person conference has a VIP dinner the night before. VIPs should see it on the landing page agenda. Your general audience shouldn’t. Gatsby has one landing page per event and no conditional logic on page content. So different landing pages means different registration events.
Since the session events in this setup are standalone (not linked as children), this is straightforward.
-
Create a new event for the second audience (like “Summit 2027 - VIP Registration”).
-
Design its landing page with the VIP-specific agenda and content.
-
Add a Multiple Events - Multiple Select survey question pointing to the same session events. (Plus any VIP-only sessions.)
-
Enable Send confirmation email from child event on that question.
-
Configure confirmation emails the same way as your primary registration event.
-
Upload your VIP guest list to this event and send invitations from here.
Each registration event maintains its own separate guest list. Guests don’t bleed between them. If you need a combined view of all registrants across both, see the reporting section below.
If you were using Event Families here (parent-child links), connecting the same session events to multiple registration events would cause guests to bubble up into all parents. Keeping events standalone and linking only through survey questions avoids that problem entirely.
Tracking Everyone in One Place
Section titled “Tracking Everyone in One Place”Your registration event’s guest list already shows every registrant. The session selection survey response is stored as a column, so you can see which sessions each guest picked directly from the guest list.
For per-session detail, open the Columns drawer and add columns from your session events using the Other Events/Lists source. This gives you a column per session showing each guest’s RSVP status (Accepted, Waitlisted, etc.) without leaving the registration event.
Optional: Overview list for multiple registration events
If you’re running separate registration events for different audiences (VIP and general, for example) and want one combined view, create a Gatsby List and use Families to link the registration events.
-
Go to Events and Lists » Families.
-
Click Create Family.
-
Click Add Parent » Create New List. Name it something like “Summit 2027 - All Registrants.”
-
Click Add Child and link each of your registration events.
-
Guests from all linked registration events automatically appear in the overview list.
-
Add columns from session events (via “Other Events/Lists”) to see per-session RSVP status across everyone.
This is the only place in this setup where Families come into play. It’s optional. It’s for reporting only. It doesn’t affect the registration flow or guest experience.
Common Questions
Section titled “Common Questions” When should I use this vs. a single event?
Are guests choosing between sessions that happen at different times and need separate calendar entries? If yes, this is your setup.
If everyone’s attending the same thing and needs one calendar block, a single event is all you need.
Why can't I just send multiple calendar invites from one event?
Gatsby sends one calendar invite per event. That’s a deliberate constraint.
Separate events mean each session gets its own guest list, its own capacity settings, its own seating chart. The calendar invite is just one benefit of the structure. The per-session operational tools are the bigger win.
Will this create duplicate guests?
No. A guest appears once in your registration event regardless of how many sessions they pick. The survey response column shows which sessions they selected.
In each session event, they also appear once.
Can I set different capacities for different sessions?
Yes. Each session event has its own capacity and waitlist settings.
A workshop capped at 30 will waitlist the 31st person while your 200-person keynote still has room. These run independently.
What if I add a new session after registration is open?
Create the new session event, then add it to your survey question.
Guests who return to update their registration will see it.
Already-registered guests won’t see it unless they revisit. Send a campaign letting them know about the new session with a link back to their registration.
Can I use the seating chart for individual sessions?
Yes. Each session event has its own guest list, which means its own seating chart. You’re building the dinner seating chart from the 60 people who selected dinner, not from your full 400-person attendee list.
Do I need to use Families for this setup?
No. The session selection survey question works between any events. You don’t need parent-child relationships for the core registration flow to work.
Families are useful if you want consolidated reporting across multiple registration events (like combining VIP and general attendee lists into one overview). But they’re optional. See the “Tracking Everyone in One Place” section above.
Can different guest segments see different landing pages?
Yes. Create a separate registration event for each audience, each with its own landing page design. Add the same session selection survey question pointing to the same session events. Each registration event keeps its own guest list.
See “When different audiences need different landing pages” above for the full walkthrough.