Overview
Post-Event Workflows
Mark attendance, merge duplicates, send follow-ups, and save what worked. The work after the event is what makes the next one better.
Why Post-Event Matters
Section titled “Why Post-Event Matters”Your team knows who showed up, who didn’t, and what was said. That knowledge fades fast. The work you do this week is what separates a good event from a pattern of good events.
Finalize attendance data.
Verify check-ins and mark no-shows while the details are fresh.
Clean up contacts.
Merge duplicates from public registration. One person, one profile.
Send follow-ups.
Thank-you emails from relationship owners. Surveys on a separate list.
Export and report.
Get data into your CRM. See how this event compared to your others.
Save what worked.
Email, landing page, and event templates so next time starts mostly done.
Capture guest context.
Interaction notes from your team before conversations fade.
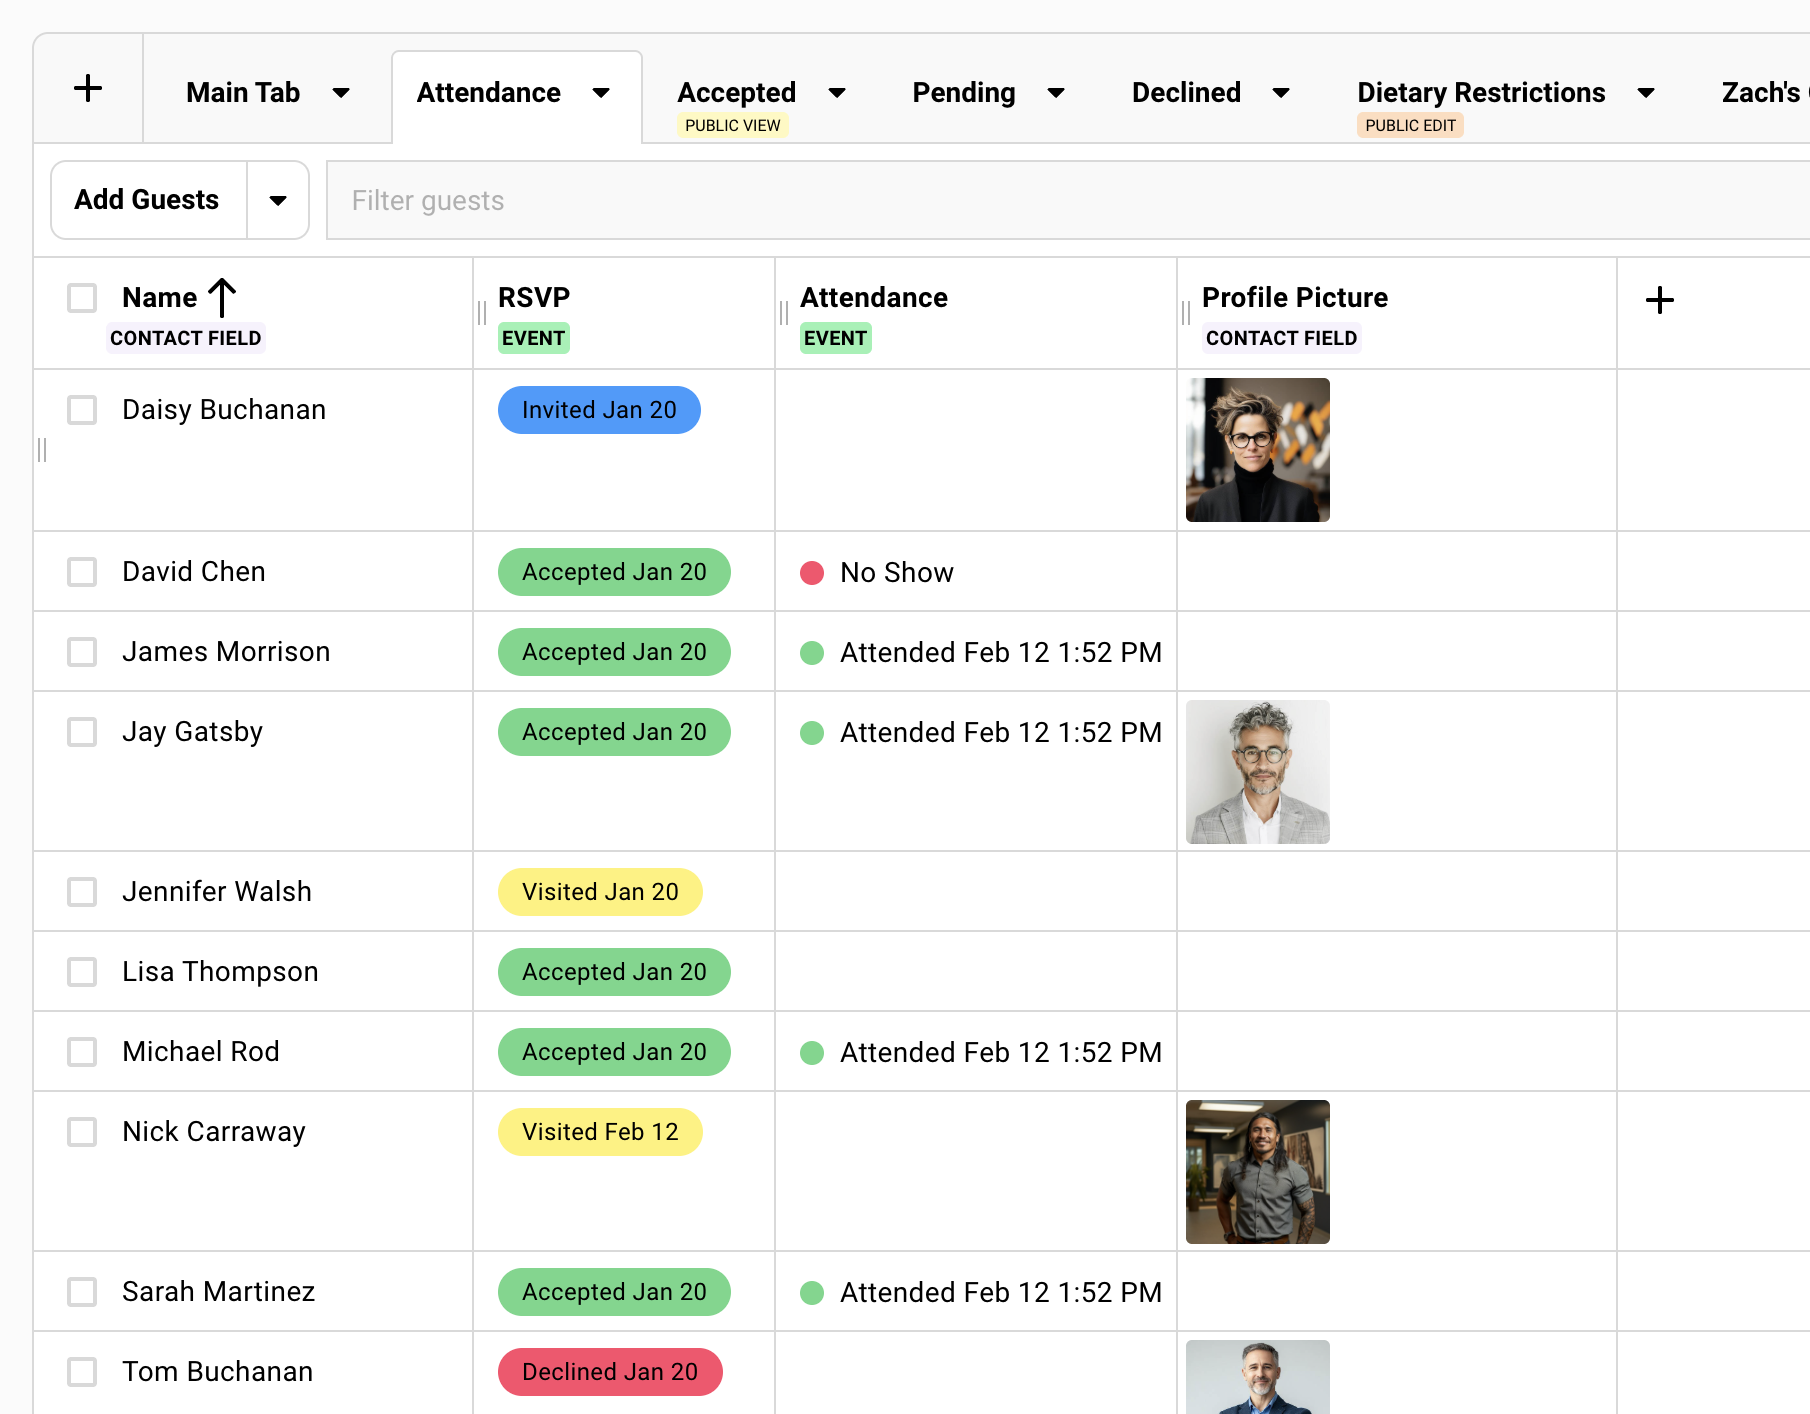
Reviewing Attendance Records
Section titled “Reviewing Attendance Records” How to view attendance data
-
Open your guest list.
-
Click the Columns drawer.
-
Enable the Attendance column.
-
The column shows status (Attended, No-Show, blank) with timestamps.
What to check
Accepted but no check-in
Filter by RSVP = Accepted and Attendance = blank. Could be a no-show. Could be a missed check-in. Verify before marking.
Attendance timestamps
The Attendance column shows when each guest checked in. A timestamp hours before doors opened suggests a test check-in. Review for anything that looks off.
What about declines who showed up?
Sometimes guests who declined your invite still show up. Whether you update these declined RSVPs to Accepted is up to you. Depends on how your team uses the data. Gatsby doesn’t enforce a rule here.
Marking No-Shows
Section titled “Marking No-Shows”Your team already knows who attended and who didn’t. You have the check-in data. Marking no-shows makes that information explicit for future reference.
Mark no-shows when you want your team to know for certain that someone didn’t attend. Not just infer it from a blank field.
Why mark no-shows explicitly
Explicit no-show labels matter when:
- Your CRM tracks attendance history and you want complete, unambiguous records
- Teams follow up differently with guests who attended vs. confirmed no-shows
- You plan future invite lists based on clear attendance patterns
- Future teams will reference this event and need clarity, not guesswork
For virtual events or when the distinction doesn’t affect your workflow, skip it. No harm done.
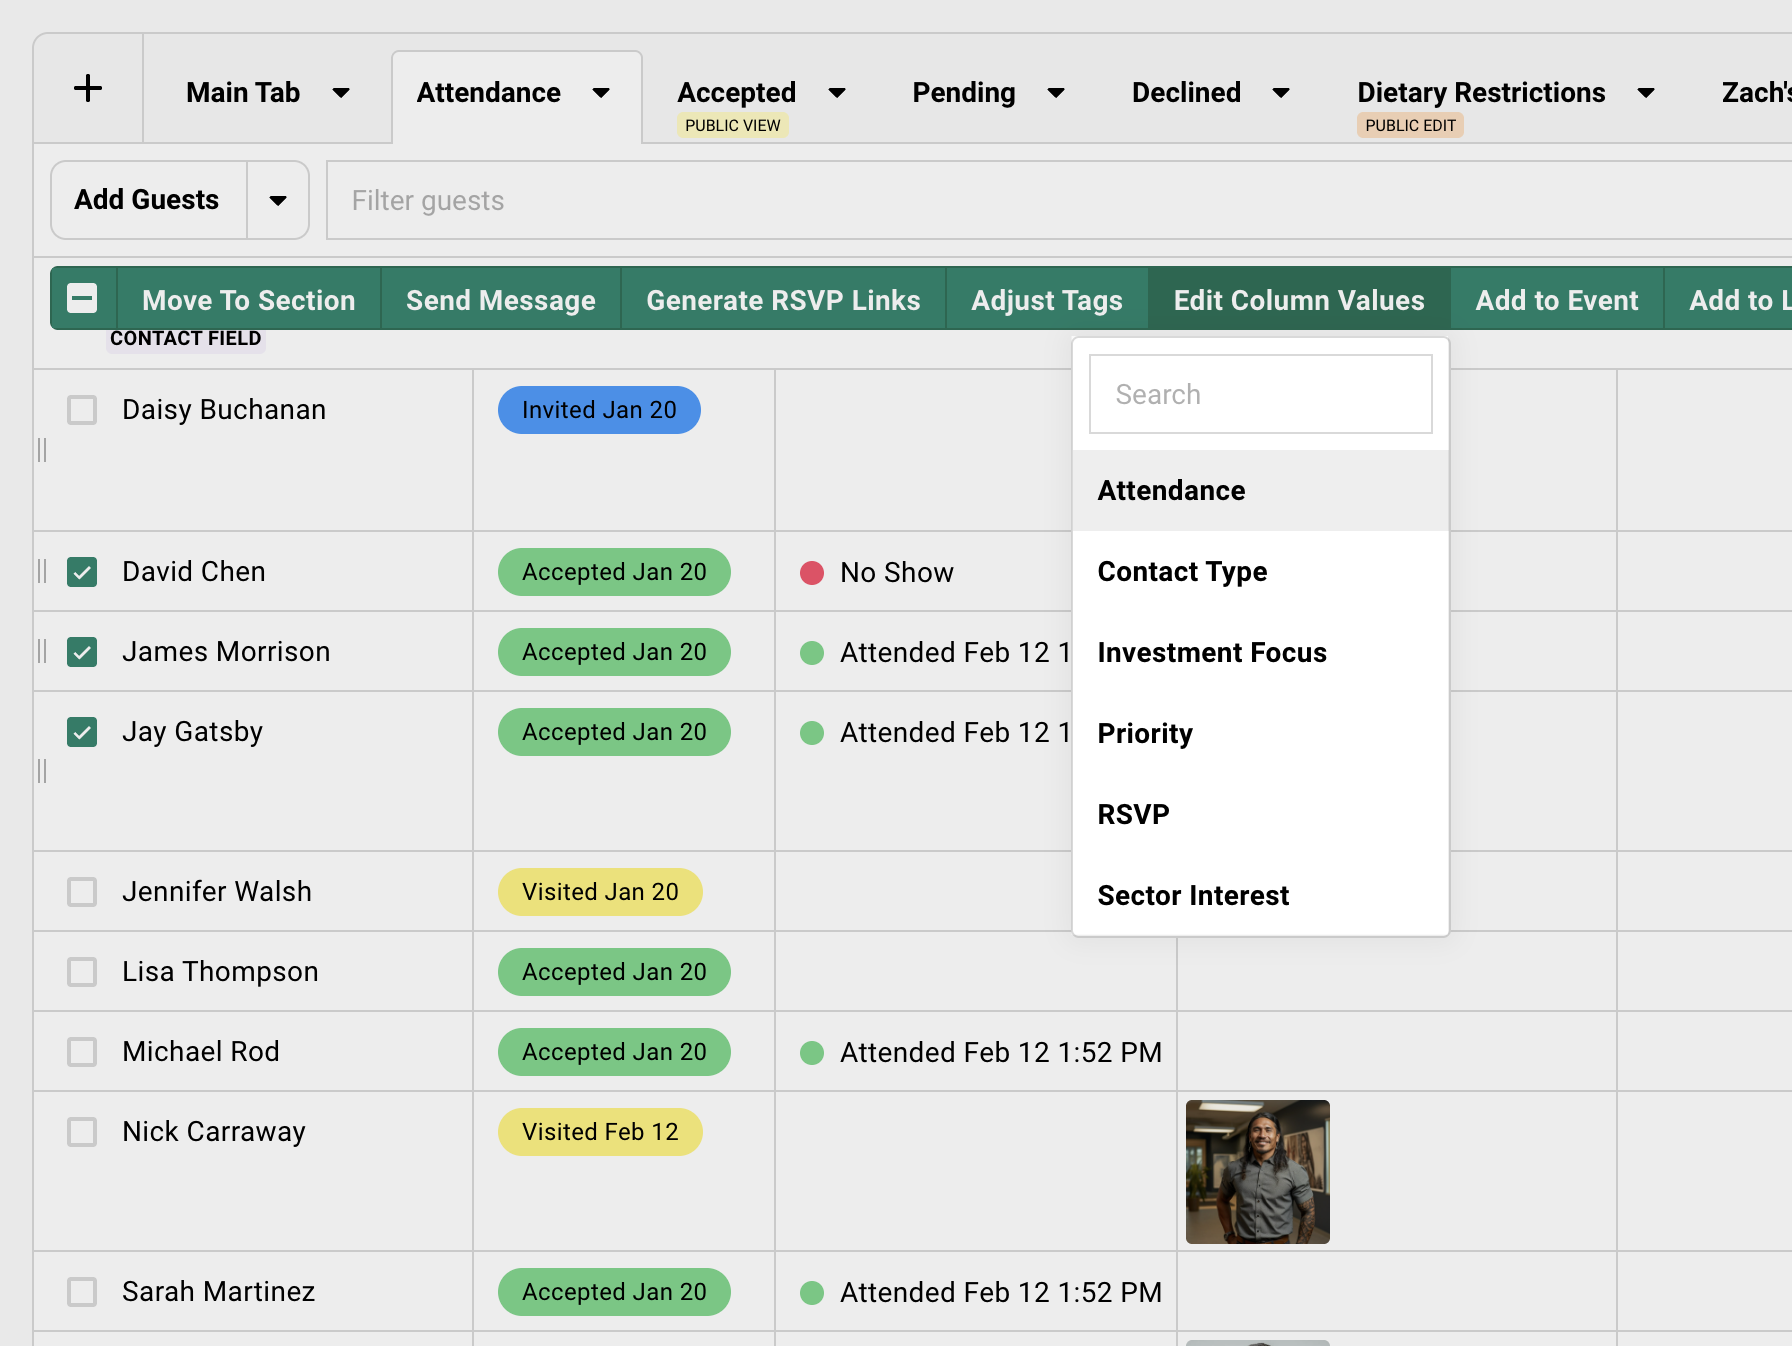
The bulk workflow
-
Open your guest list and enable the Attendance column in the columns drawer.
-
Filter by RSVP Status = Accepted and Attendance = blank.
-
Select all filtered guests using the checkbox in the header row.
-
Click Edit Column Values in the action bar.
-
Set Attendance to No-Show.
-
Apply. Done.
Two filters, one bulk edit.
Finding Duplicates
Section titled “Finding Duplicates”Gatsby can generate a list of potential duplicates by matching similar names with different email addresses.
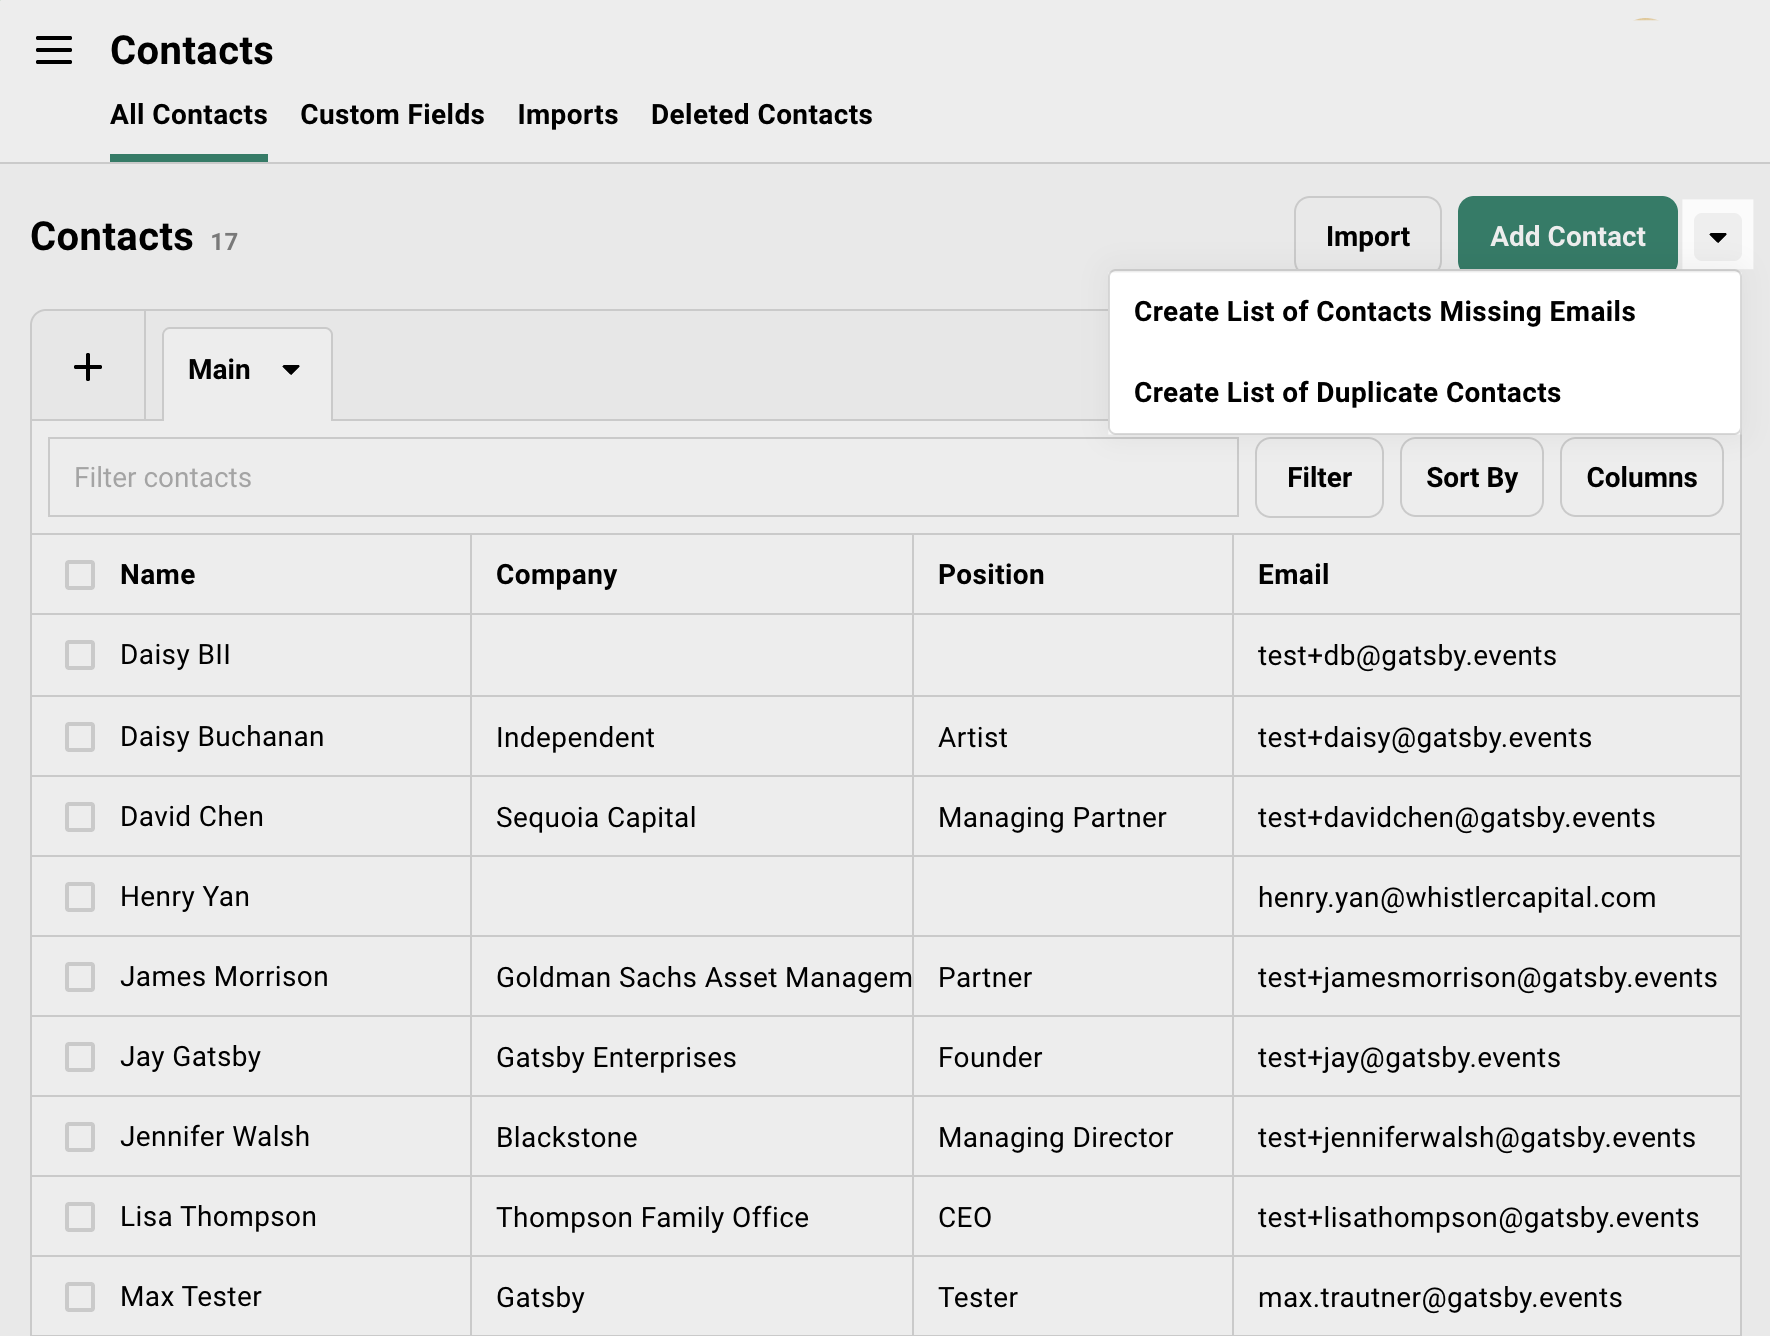
Creating a duplicate list
-
Go to Contacts in the main navigation.
-
Click the dropdown next to Add Contact.
-
Choose Create list of duplicate contacts from the dropdown.
-
Gatsby scans for contacts with similar names and different emails.
-
The list appears in your Events and Lists area showing potential duplicates.
What you will see
Pairs of contacts with similar names and different email addresses. “John Smith (john@company.com)” next to “John Smith (johnsmith@gmail.com).”
Review each pair before merging. Similar names are not always the same person. “Sarah Chen” at one company might not be the “Sarah Chen” at another.
Merging Contacts
Section titled “Merging Contacts”When you merge, one contact becomes the primary. The other contact’s email becomes a secondary address on the merged profile. Future deduplication checks against both addresses.
Before you merge
If you want RSVP history from both contacts on the merged profile, add both contacts to the same event(s) first.
Without this step, the “losing” contact’s event history will not transfer.
The merge process
-
Select the contact you want to merge away (the “losing” contact).
-
Choose Merge from the actions menu.
-
Select the contact you want to keep (the “winning” contact).
-
Confirm the merge.
-
The losing contact’s email moves to the “Other emails” field on the winning contact.
Choosing the primary email
If the guest registered with an email you prefer as primary, you can swap it after merging.
-
Open the merged contact profile.
-
Find the email addresses section.
-
Swap the primary and “other” emails.
Future communications use the primary email by default.

Sending Thank-You Emails
Section titled “Sending Thank-You Emails”Filter by Attended, select all, send message. The mechanics are simple. The details make it memorable.
The basic workflow
-
Open your guest list.
-
Filter by Attendance = Attended.
-
Select the filtered guests.
-
Click Send Message in the action bar.
-
Compose your thank-you and send.
Same campaign tool as invitations. Different filter.
Adding personal notes
Use custom fields to include personalized follow-up without sending 50 individual emails.
-
Create a custom event-level column like “Follow-up Note” on your guest list. Your team can edit these directly in the event.
-
Share a filtered view with your team or relationship owners.
-
They fill in personal notes for their guests.
-
Once complete, export the column data and import it back to a custom field on the contact profile using a CSV.
One campaign, 50 personal emails. The guest who discussed their new fund gets a note about their new fund. The guest who mentioned their daughter’s graduation gets a note about that.
Process note: To use custom columns in email merges, transfer the data to a custom field first. Export needs only name, email, and the column. On import, map to the appropriate custom field.
When to send from a partner account
The thank-you from the relationship owner matters more than the thank-you from the events team.
The email comes from the partner’s actual account. Replies go to them. They integrate their email directly, emails you send in Gatsby appear in their sent folder.
Post-Event Surveys
Section titled “Post-Event Surveys”You could repurpose the event landing page for a survey. But you would lose your registration history and confuse guests who return.
A separate list keeps post-event operations clean. Survey data stays organized. Your event records remain intact.
Why use a list instead of the event
Preserves registration history
Your event is in a past state. To repurpose the event, you’ll need to push the date/time back and reset RSVP status to get better tracking… that means losing some critical info.
No calendar invite confusion
Lists do not send calendar invites. Events do. A survey should not land on anyone’s calendar.
Cleaner data organization
Survey responses live in their own place. Event data stays where it is. You can pull survey columns into your event view when needed.
The workflow
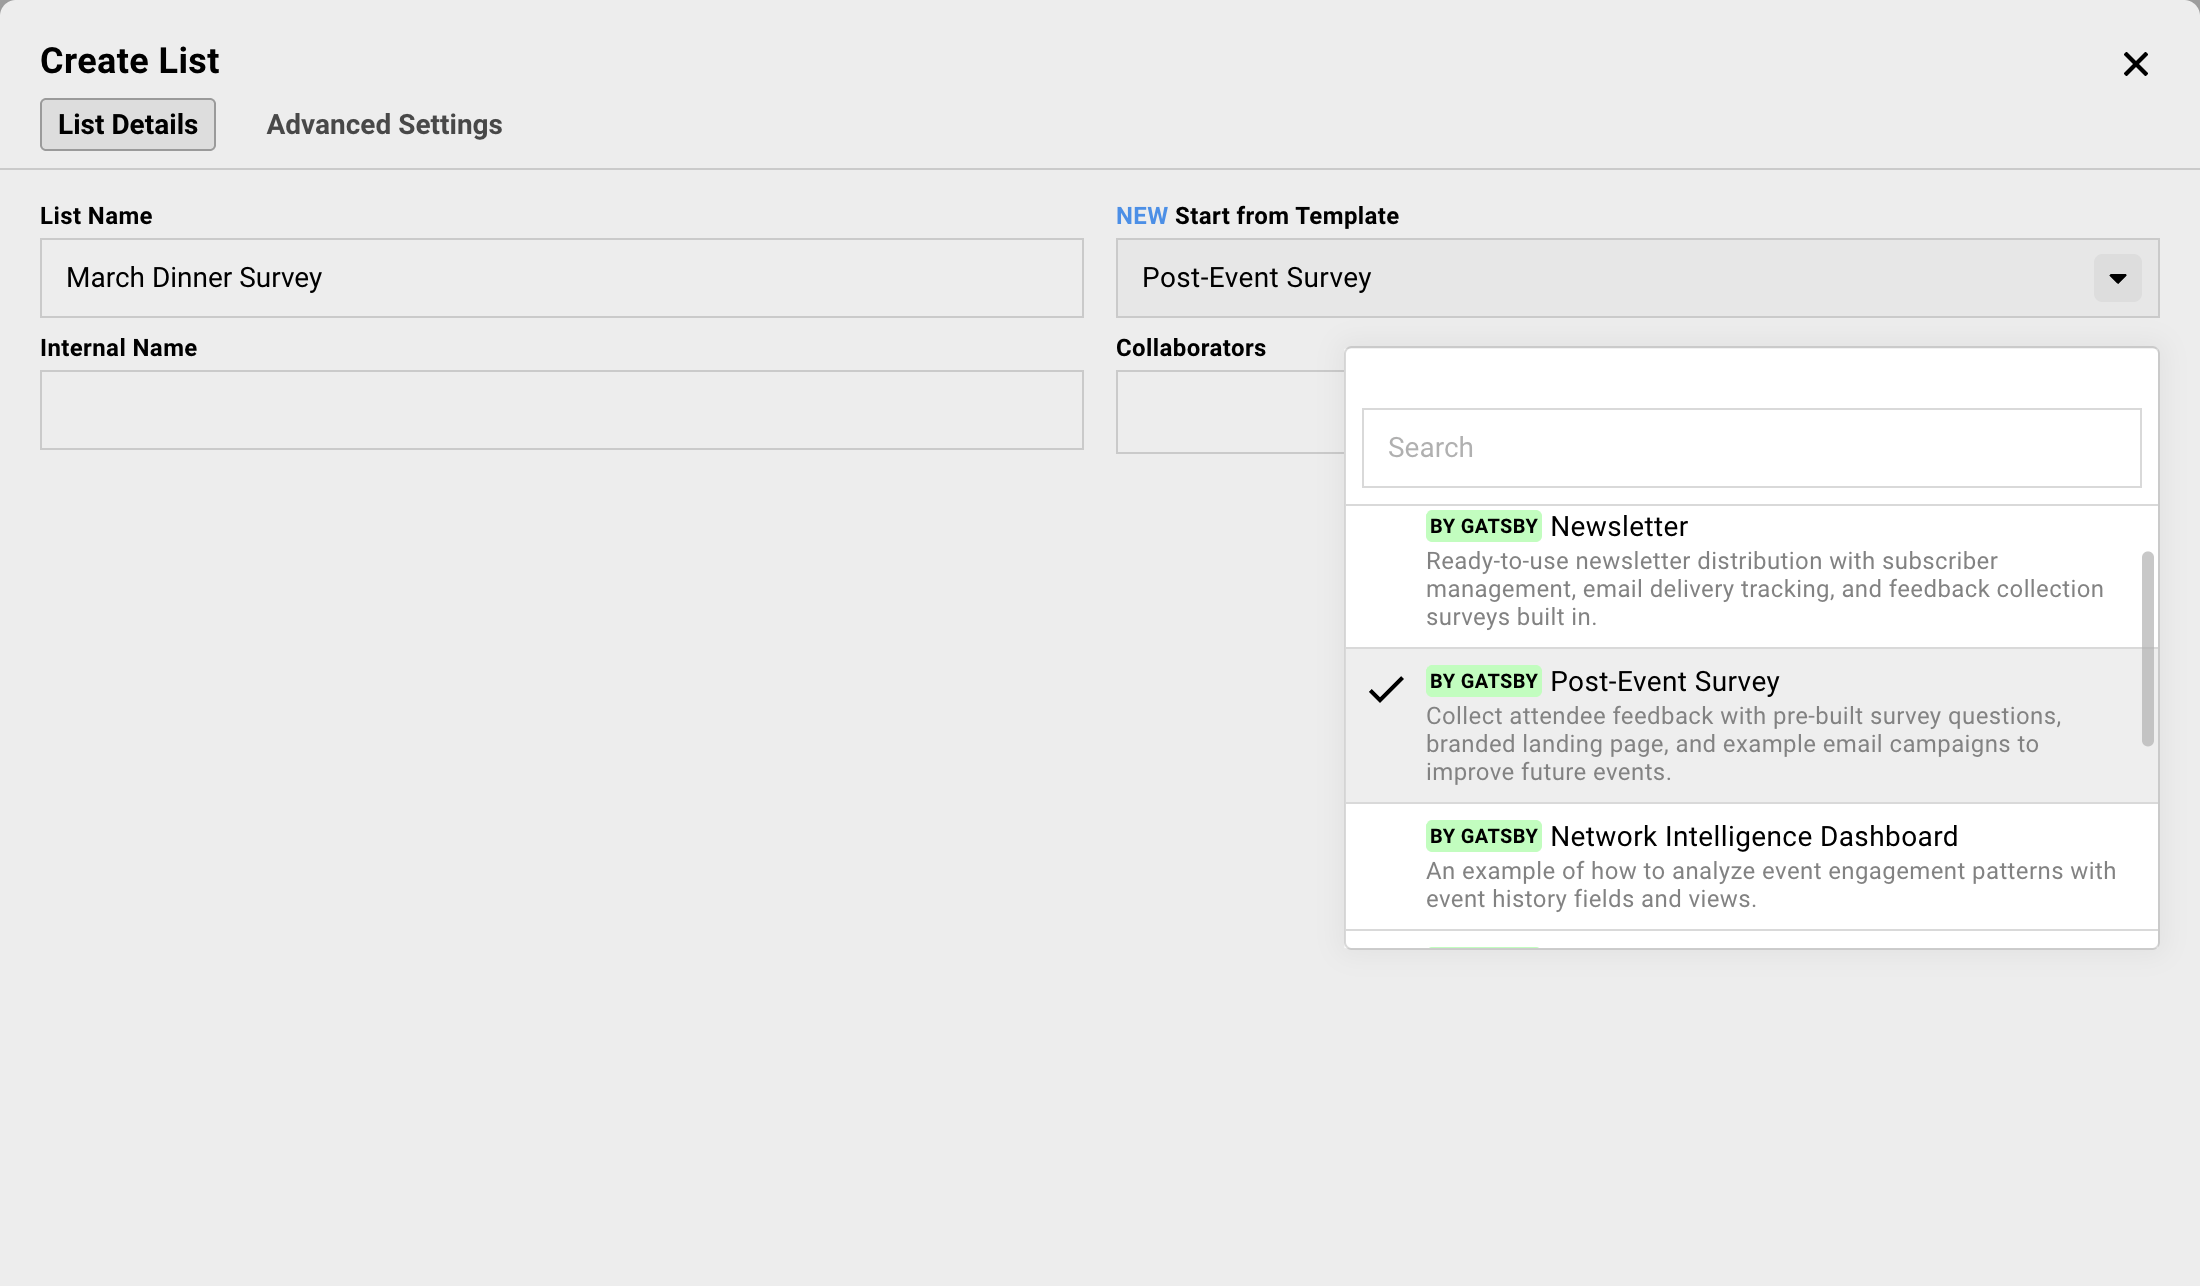
-
Create a new list. Name it something clear like “March Dinner Survey.”
-
Go to the Landing Page tool and build your form using the Survey section.
Use the “Skip to survey” option so you don’t need to actually design a landing page.
-
Add attended guests from your event to the list.
-
Send a campaign email from the List with each guests’ unique survey link.
Guests click, complete the survey, done. Their responses live on the list.
Pulling survey data back into the event
Want to see survey responses alongside event data?
-
Open your event’s guest list.
-
Go to the Columns drawer.
-
Add Fields » Other Events/Lists
Find your survey List and add it to this dialog box.
-
Select the survey response columns from your survey list.
Survey data appears next to attendance data. Export includes everything.
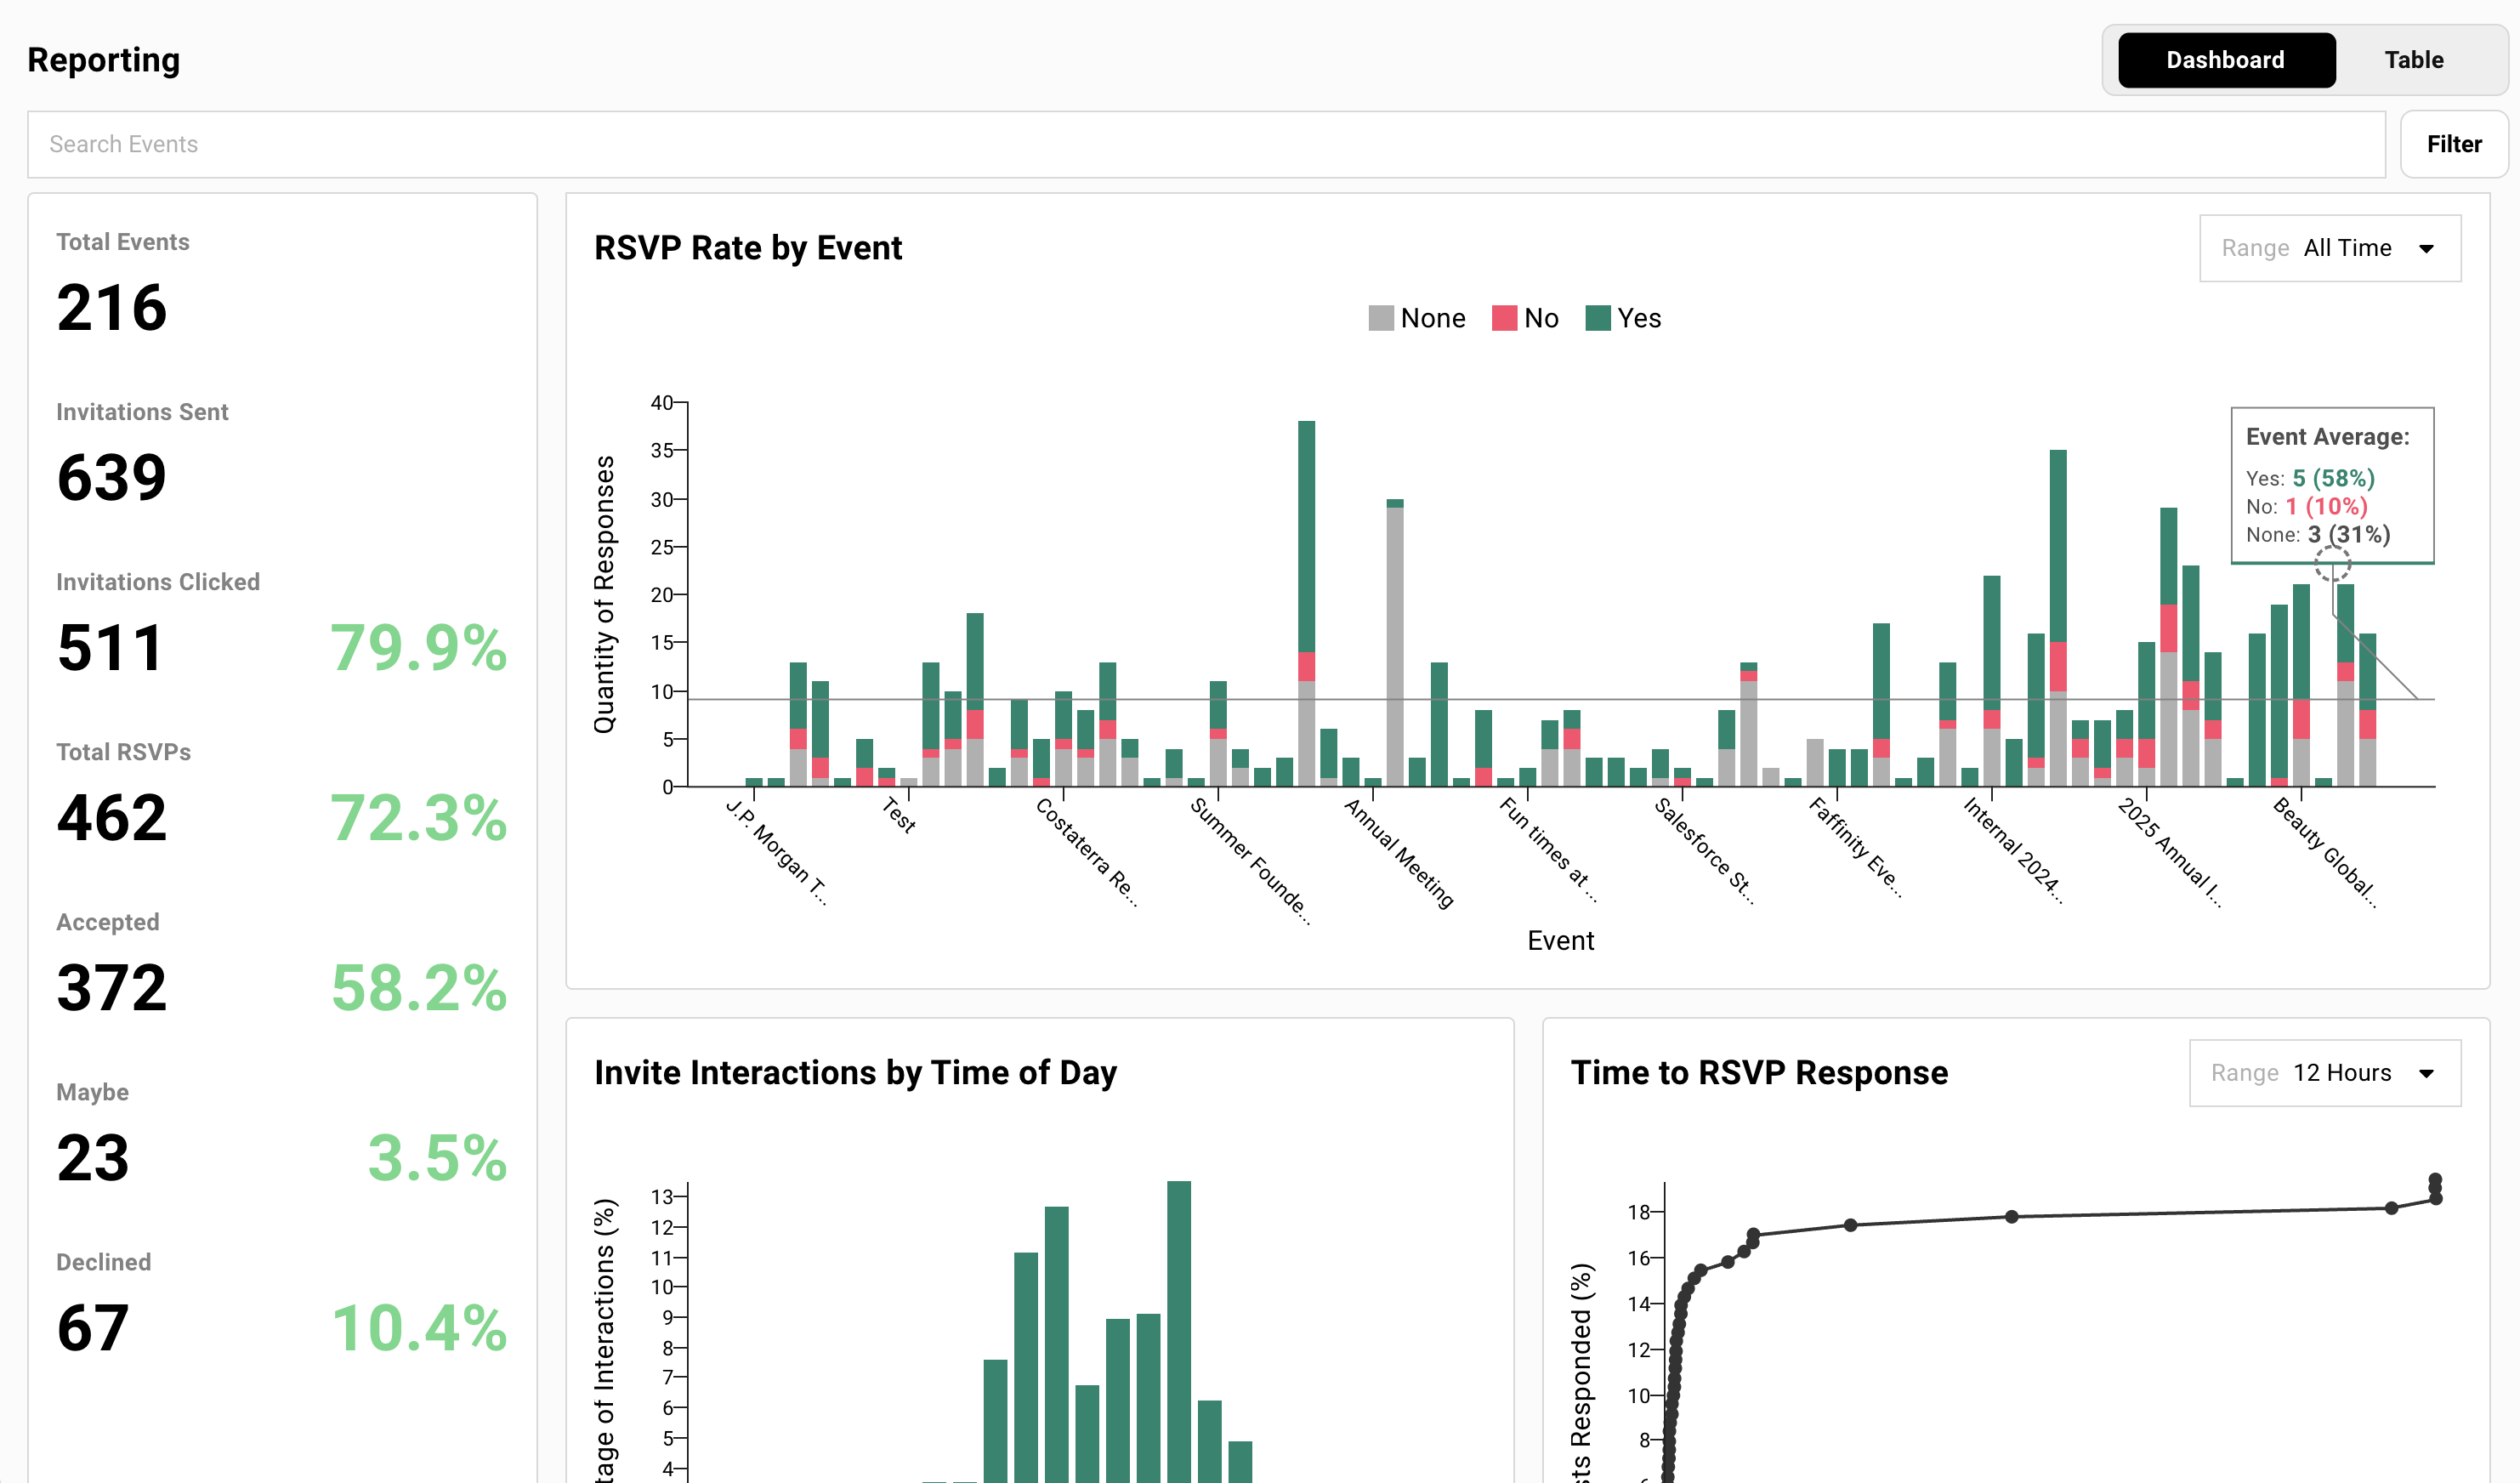
Exporting and Reporting
Section titled “Exporting and Reporting”Before you archive the event, get the data out. Stakeholders want spreadsheets. Your CRM needs updates.
The Reporting tool shows how this event compared to your others.
Exporting guest data
-
Open your guest list.
-
Configure the view with the columns you want to export.
-
Select all guests.
-
Click More Options then Export to CSV.
What you see is what you export. If a column is not visible, it is not in the export. Configure your view first.
CRM sync options
Native integrations
Salesforce, Affinity, and Altvia connect directly. Attendance and RSVP data sync automatically based on your configuration.
Webhooks and Zapier
For HubSpot, Attio, or custom systems. Events fire when RSVPs change, guests check in, or contacts update. Build the workflow that fits your stack.
API
For custom integrations. Full access to guest data, attendance records, and contact profiles.
The Reporting tab
The Reporting tab shows trends across events. RSVP rates, attendance rates, best times to send invites.
Filter by event tags to compare similar events. Your Q1 dinners vs. your Q2 dinners. Conference sessions vs. networking events.
Table view gives granular metrics. Dashboard view shows the big picture.
Capturing What Worked
Section titled “Capturing What Worked”Six months from now, you will not remember what made this event work. The email subject line that outperformed. The landing page layout that converted. The survey question that got actual responses.
Save them now or reinvent them later.
Saving email templates
-
Open the campaign that performed well.
-
Click the three-dot menu next to the subject line.
-
Select Save as Global Template.
-
Name it clearly. “Q1 Dinner Invitation” or “High-Performing Follow-Up.”
The template appears in your campaign library for all future events.
Saving landing page templates
-
Go to Landing Page Templates in your event.
-
Find the design you want to save.
-
Duplicate it to your global template library.
Available across all future events. Start from what worked instead of starting from scratch.
Saving the entire event as a template
For recurring events, save the whole thing.
-
Open the event you want to replicate.
-
Use the dropdown option next to the event name at the top » “Save as Template”.
-
Choose the options to want to carry over and save this event as a template.
Your event template can include settings, survey questions, email templates, and landing page designs. Your next quarterly dinner starts 80% done.
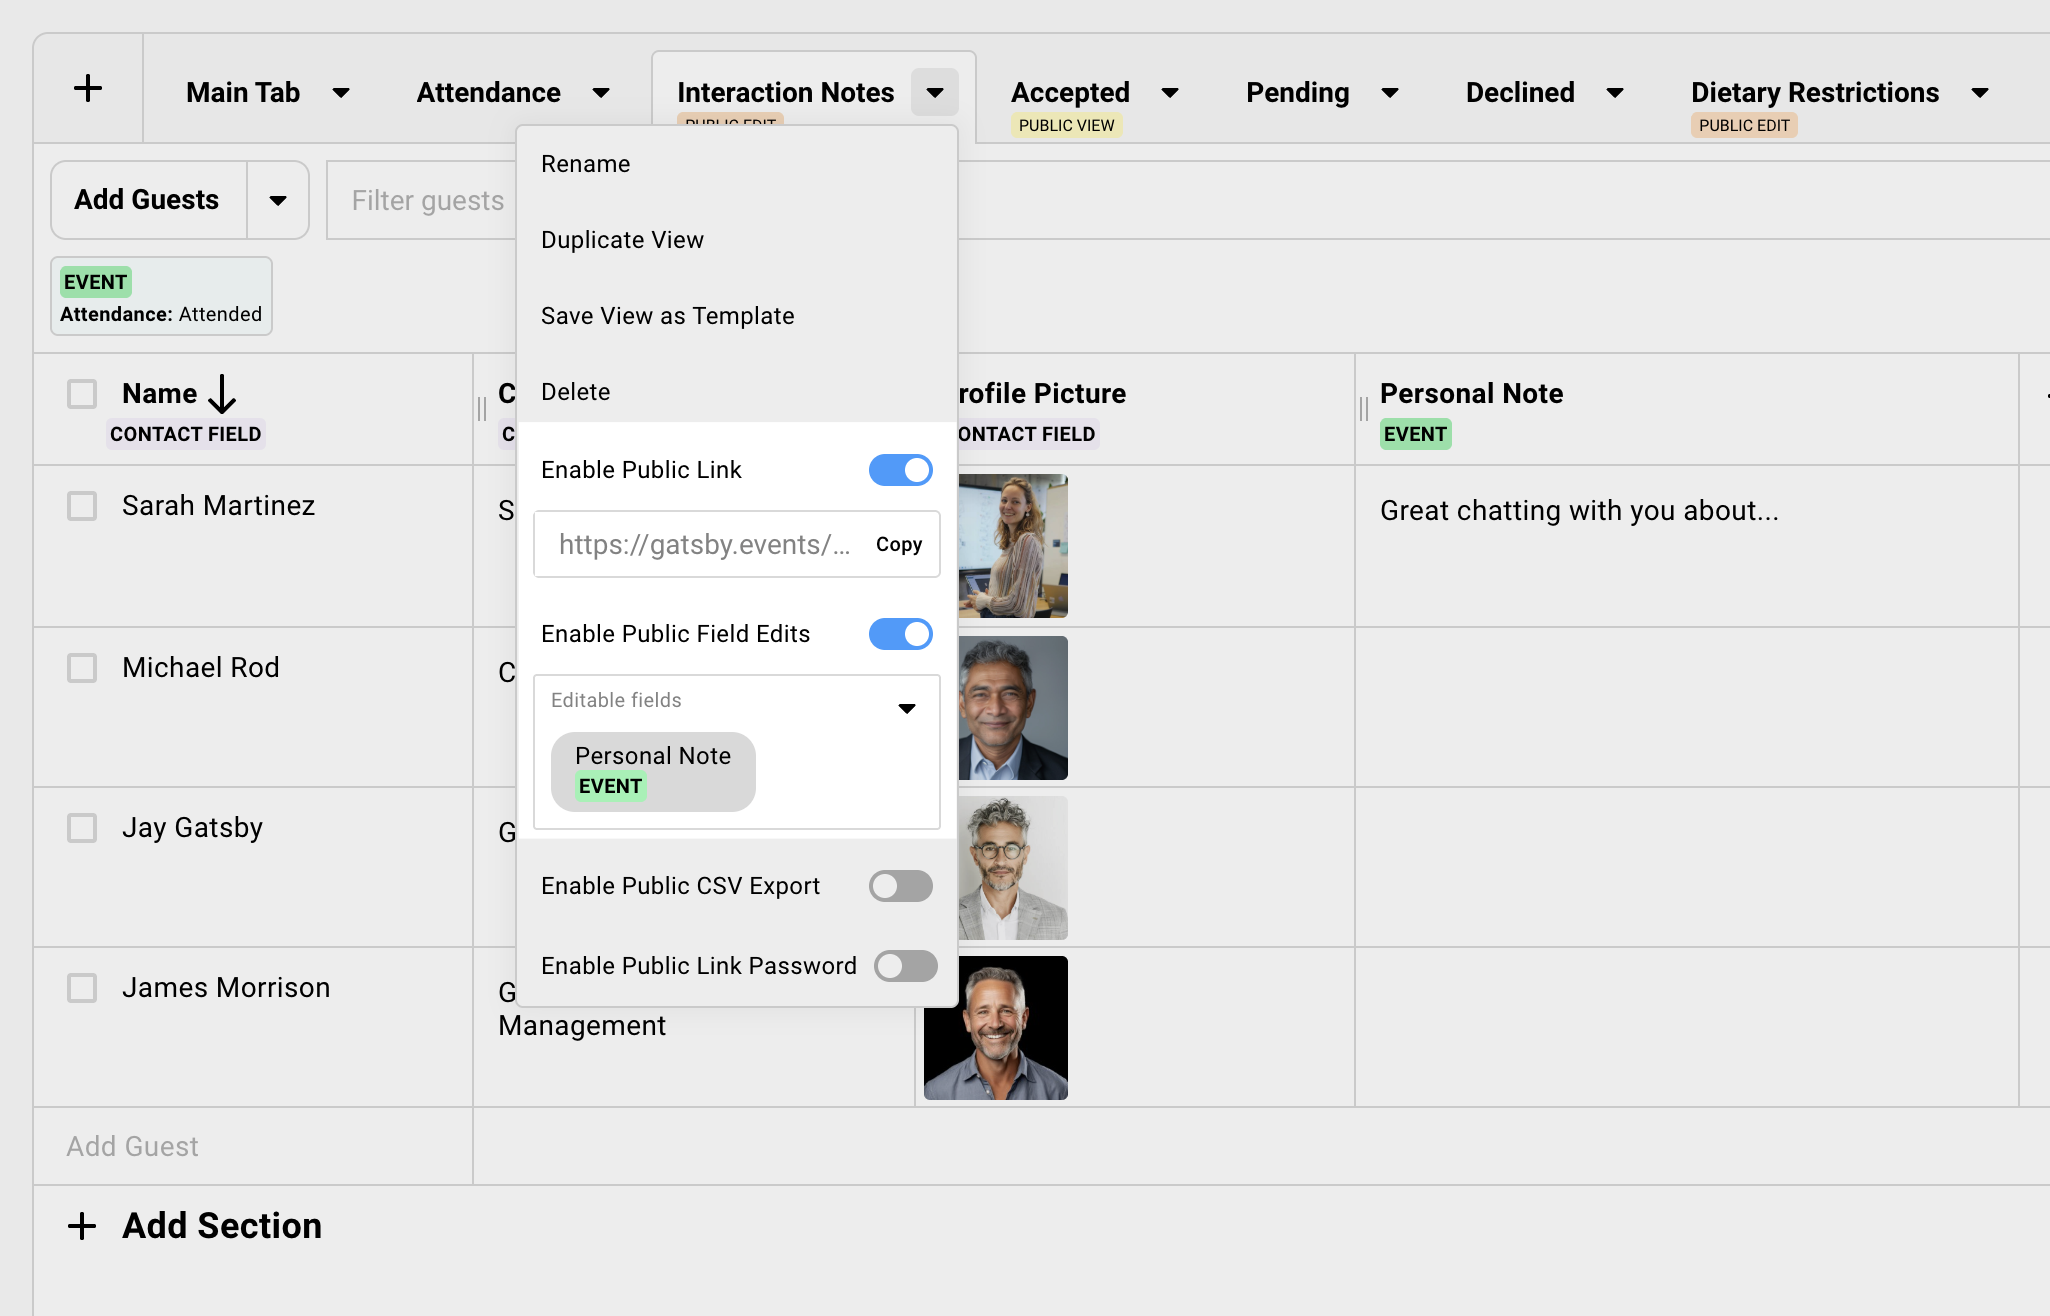
Building Guest Profiles
Section titled “Building Guest Profiles”Your team interacted with guests all night. Notes live in their heads, not your system. A week later, the details fade. Two weeks later, they are gone.
Capture interaction notes while they are fresh. The context carries forward to the next event.
Setting up an interaction notes column
-
Create a custom event-level column on your guest list. Name it “Interaction Notes” or “Post-Event Notes.” Use text type.
-
Enable the public link for your guest list.
-
Enable editing on the public link and select this notes column as editable.
-
Share the public link with your team.
-
Team members add notes without logging into Gatsby.
Where to save this data: You have options.
If your team does this continually across events, you can leave notes at the event level or in a custom field. Click into a guest profile, see all their events, and reference the notes column from each event. If it’s saved as a custom field, these notes are visible in their guest profile.
If you want notes accessible across any event, export the column and import it back to a custom field using a CSV. Export needs only name, email, and the notes column. On import, choose what to map to which custom field in Gatsby. Clean up the data before importing.
What to capture
- Key conversation topics
- Follow-up requests (“Send me that article”)
- Relationship context (“Mentioned new role starting in Q2”)
- Anything useful for the next interaction
You do not need a transcript. A few sentences is enough.
Common Questions
Section titled “Common Questions” Do I have to mark no-shows?
No. Some teams skip it. But if you sync to a CRM or want accurate attendance history, the few minutes are worth it.
Can I send the thank-you email from the same campaign tool as invitations?
Yes. Same workflow. Filter by Attended instead of your invite list.
What if I use a CRM integration?
Attendance and RSVP data sync automatically based on your configuration. You may still want to mark no-shows manually, clean duplicates, and capture interaction notes. Those benefit from human judgment.