Overview
Guest Lists and Events
Your guest list is the center of every event. One list per event, multiple views of that list. Real-time updates. No more spreadsheet chaos.
Your guest list serves five people with five different needs. How does one list do that?
Your caterer needs dietary restrictions. Your venue needs a headcount. Your board member wants to know who else is coming. Three different people, three different cuts of the same list.
Purpose-Built Views
Configure each tab for a different audience. The catering view shows dietary info. The check-in view shows what matters at the door. Same data, different cuts.
Shareable Without Exporting
Send a password-protected link with live data. The recipient sees exactly what you’ve configured. No login required.
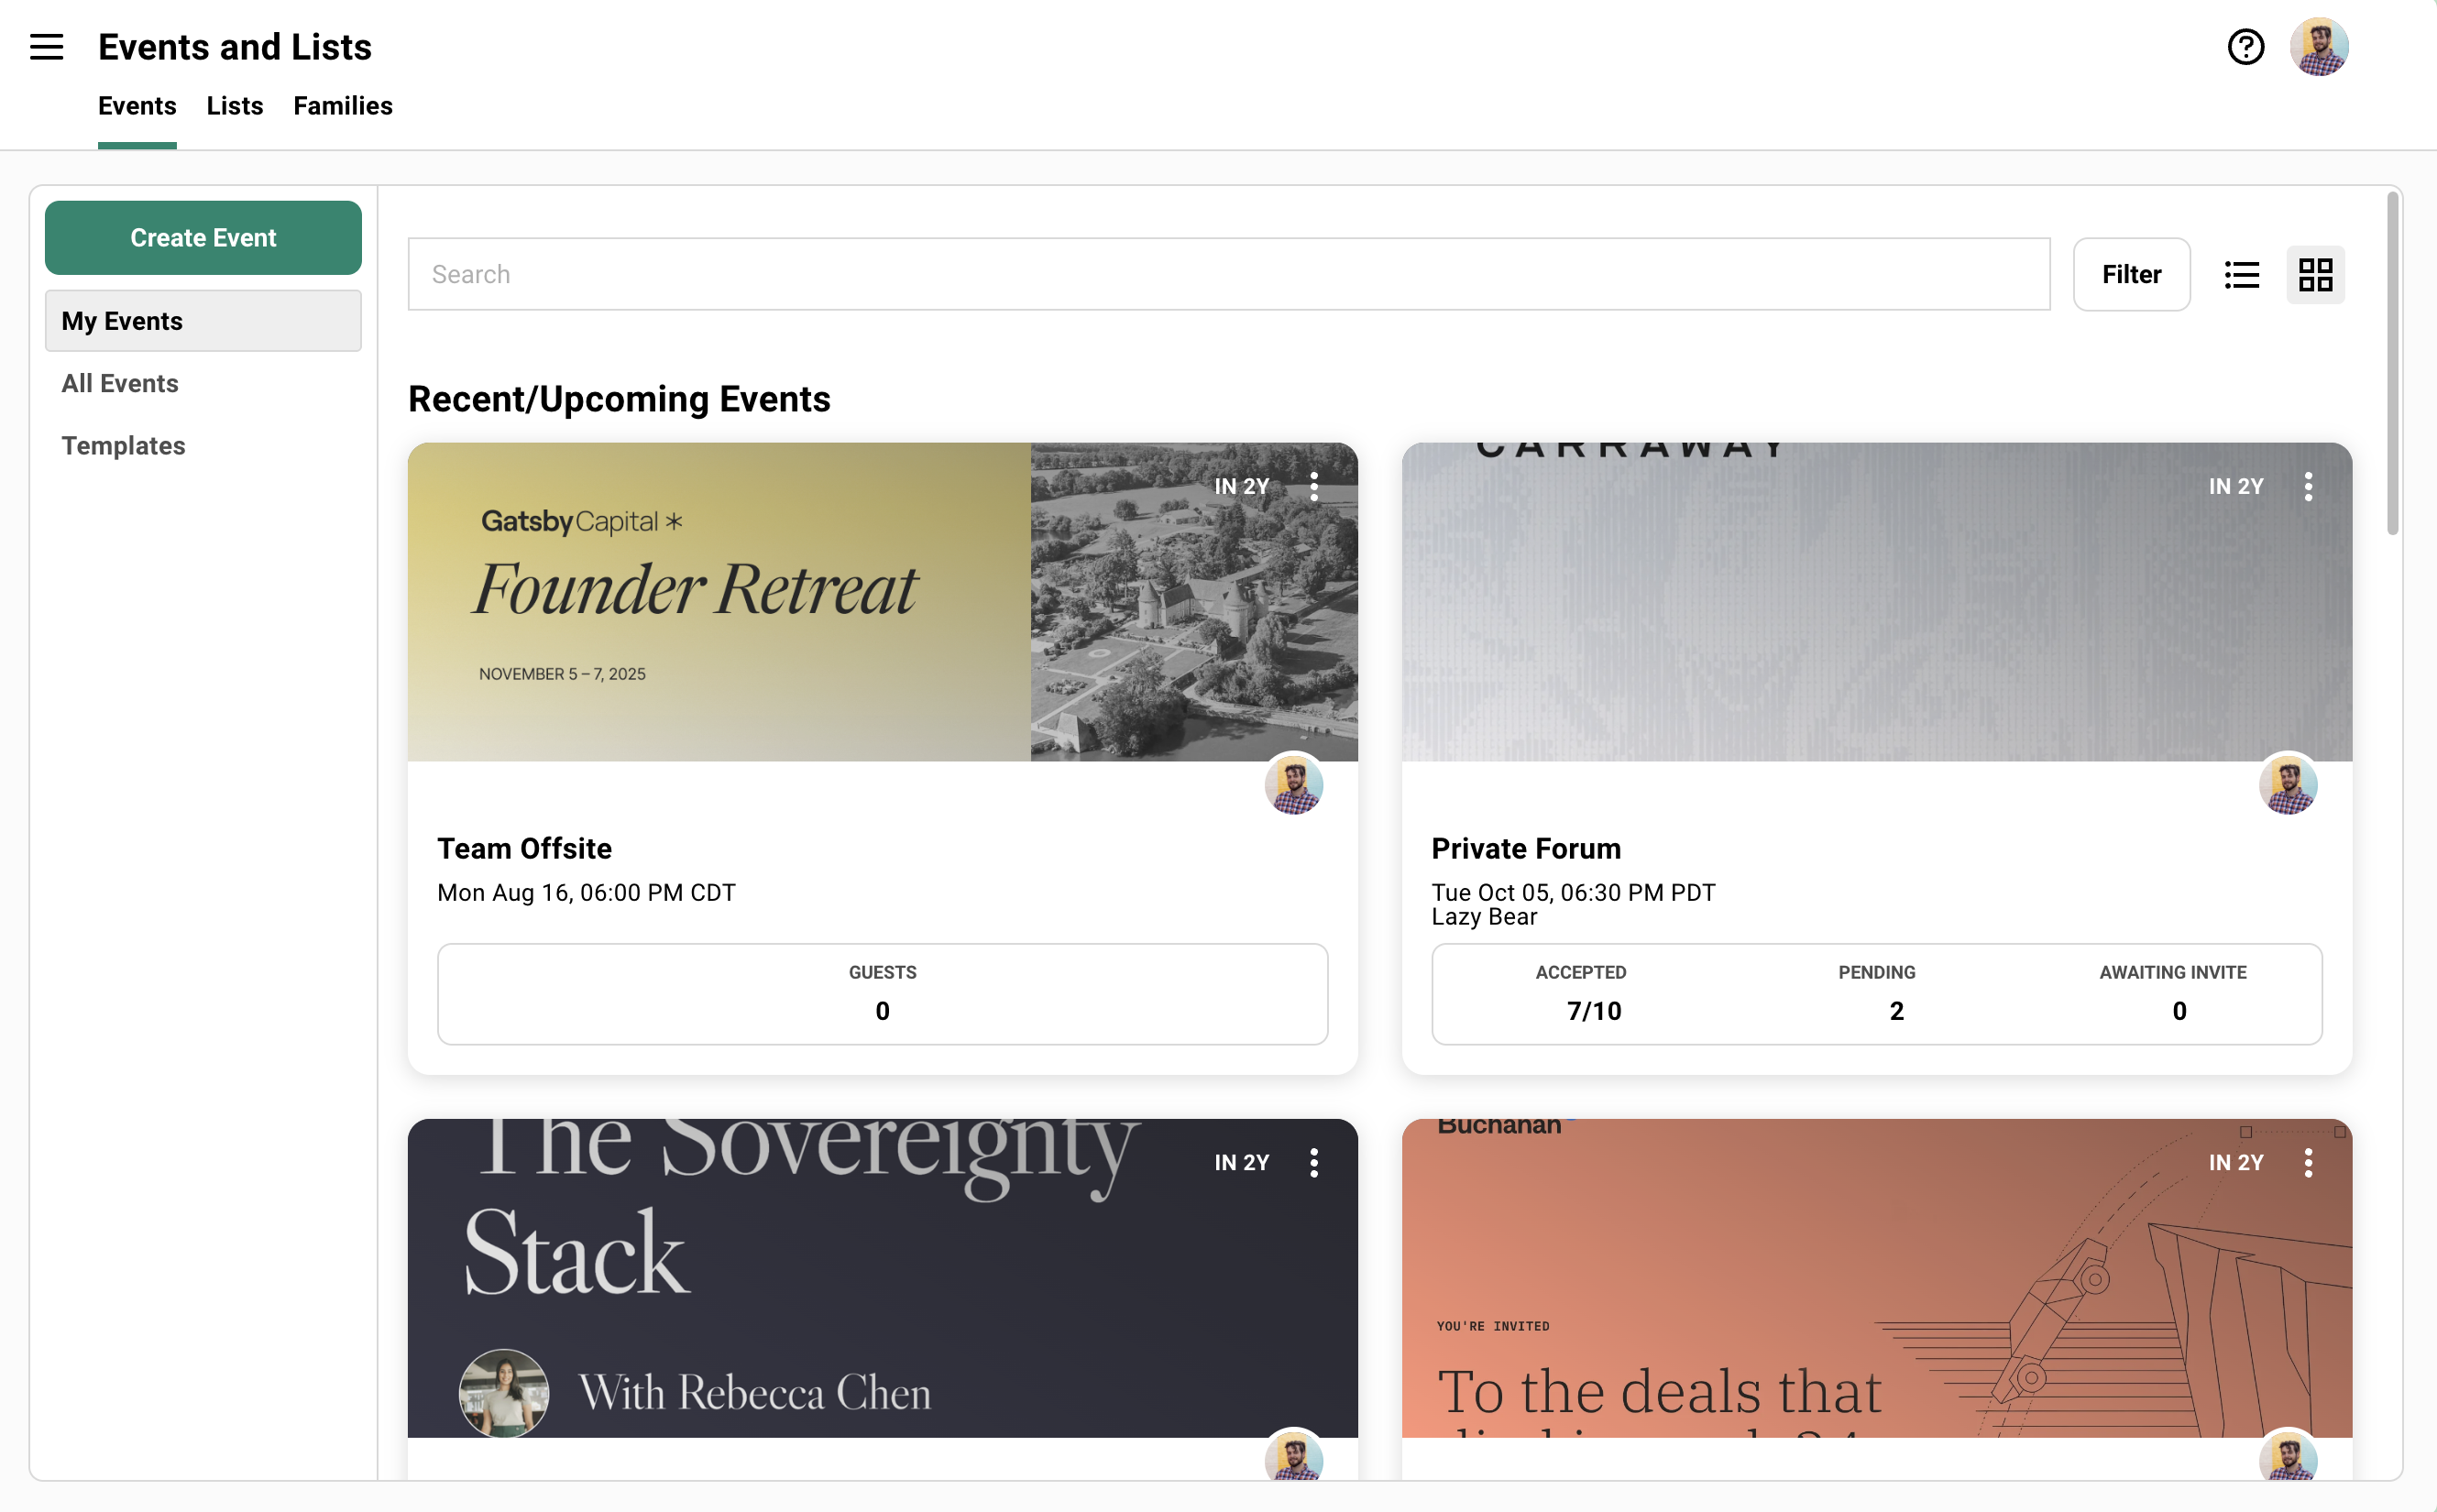
Your Events Dashboard
Section titled “Your Events Dashboard”Your events live on the Events dashboard. My Events shows events you created or collaborate on. All Events shows everything your team is running.
Creating an Event
Click Create Event to open the dialog. Three tabs organize your options.
Event Details
- Event name (required)
- Date and time
- Timezone (pick one near your event location)
- Physical location
- Template selection
- Collaborators
Virtual Event Settings
- Add a virtual meeting link to calendar invites (overwrites physical location)
Advanced Settings
- Enable parent-child event linking
- Select parent or child events
Only the event name is required. Everything else can be added later.
Start from a template. Gatsby provides pre-built templates, and your team can save custom ones. Templates carry over settings, landing page designs, and email templates.
Duplicating an Event
Running the same dinner quarterly?
Click the three-dot menu on any event card. Select Duplicate.
Choose what to copy:
- Guests
- Guest list settings
- Registration settings
- Landing page design
- Survey questions
- Seating charts
Adjust the details. The structure carries forward.
Editing Event Details
Open your event. Click the dropdown arrow next to the event name. Select Edit Details.
You can change the name, date, time, location, timezone, and collaborators.
Changes sync to your calendar invite.
If guests already have the invite, you can send an update immediately or hold it for later.
Adding Guests
Section titled “Adding Guests”Add guests manually before sending invitations. Or enable a public registration link and let people add themselves. Either way, everyone ends up on the same list.
Methods for Adding Guests
Click Add Guests from your guest list.
Search and add
Find existing contacts by name. Add them one at a time.
From other events
Pull in everyone from a previous event. Your March dinner attendees become your June dinner invitees.
From lists
Add contacts from your contact lists. Your “Bay Area LPs” list becomes your San Francisco event guest list in one click.
By tag
Add all contacts with a specific tag. Everyone tagged “Q1 Prospects” lands on your list at once.
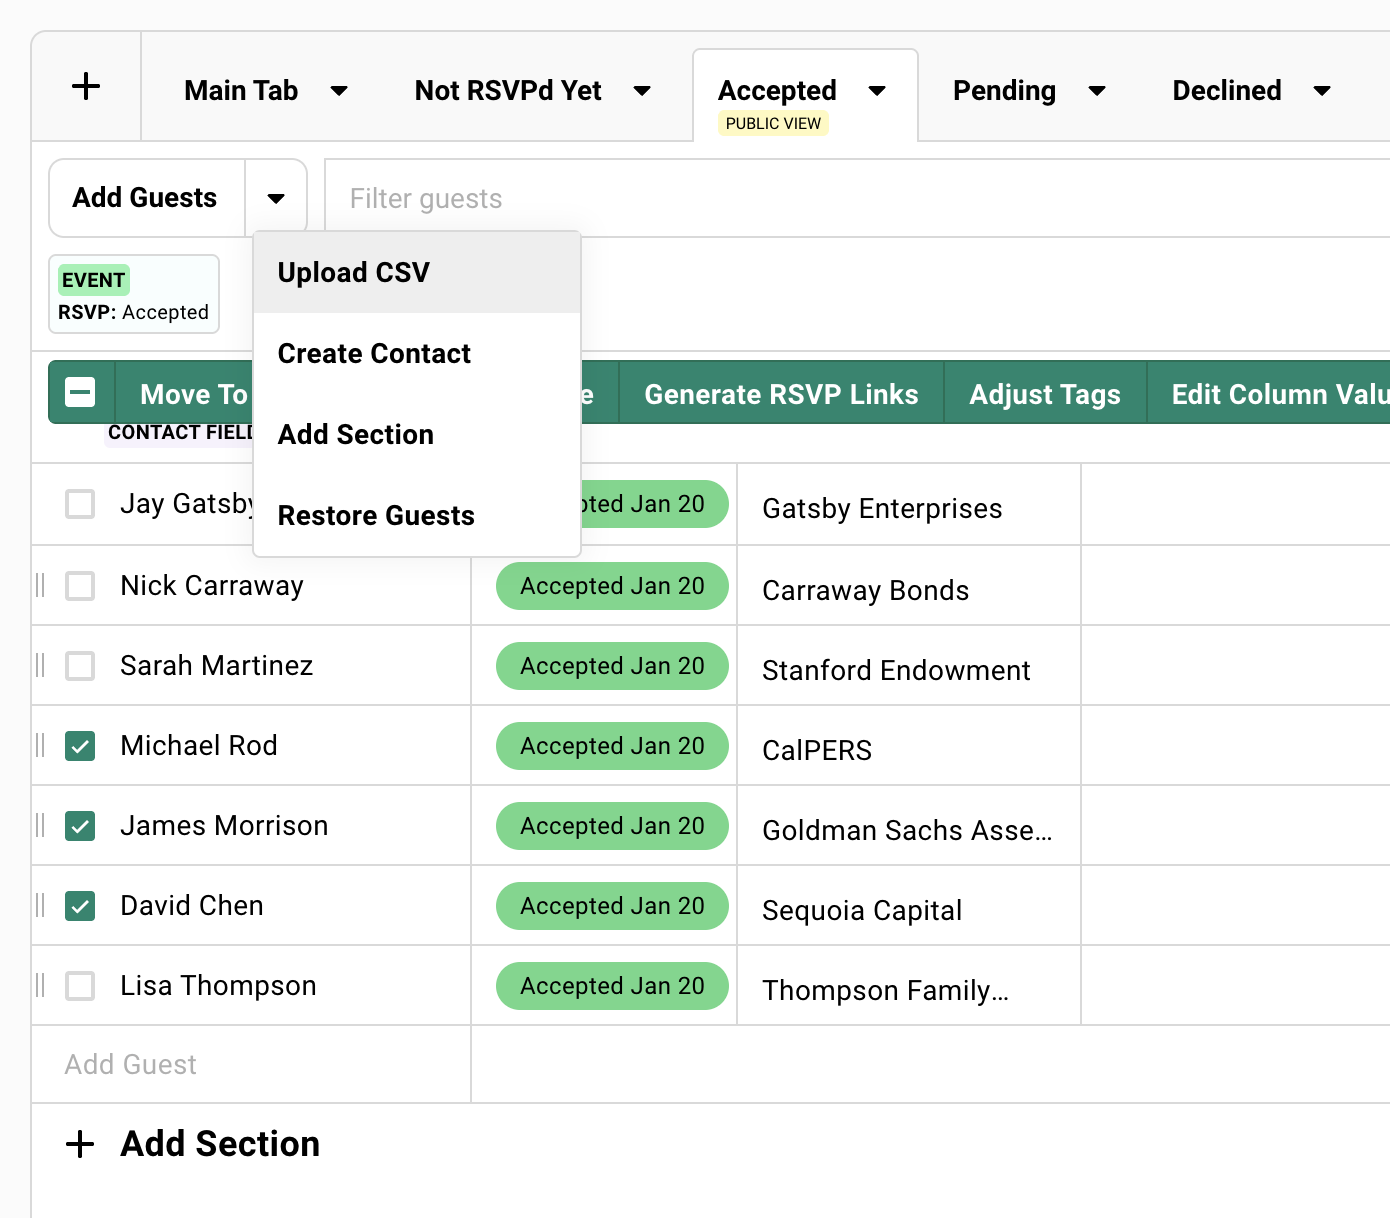
The dropdown arrow next to Add Guests reveals more options:
- Upload CSV: Bulk import from a spreadsheet.
- Create contact: Add someone new to your database.
- Restore deleted guests: Bring back guests you removed.
Gatsby events are private by default. Invites are non-transferable. You can enable a public registration link anytime to let people register on their own.
Guest Actions
Section titled “Guest Actions”This is where bulk operations save hours.
Move fifty people to a new invitation wave. Send a follow-up to everyone who hasn’t responded. Tag all your VIPs at once. Update a custom field across your entire list.
Selecting Multiple Guests
Select a range:
Click the first guest. Hold Shift. Click the last guest. Everyone in between gets selected.
Other methods:
- Click the checkbox at the top to select all visible guests
- Click individual checkboxes
- Click a section header to select everyone in that section
Available Actions
Select guests and a green action bar appears.
Move to Section
Organize guests into sections. Wave 1 invites. Internal team. Speakers.
Send Message
Start a draft or choose an existing campaign. Selected guests become recipients.
Generate RSVP Links
Create unique personal links for off-platform sending and testing the registration experience.
Adjust Tags
Add or remove tags. Tags persist on the contact across all events.
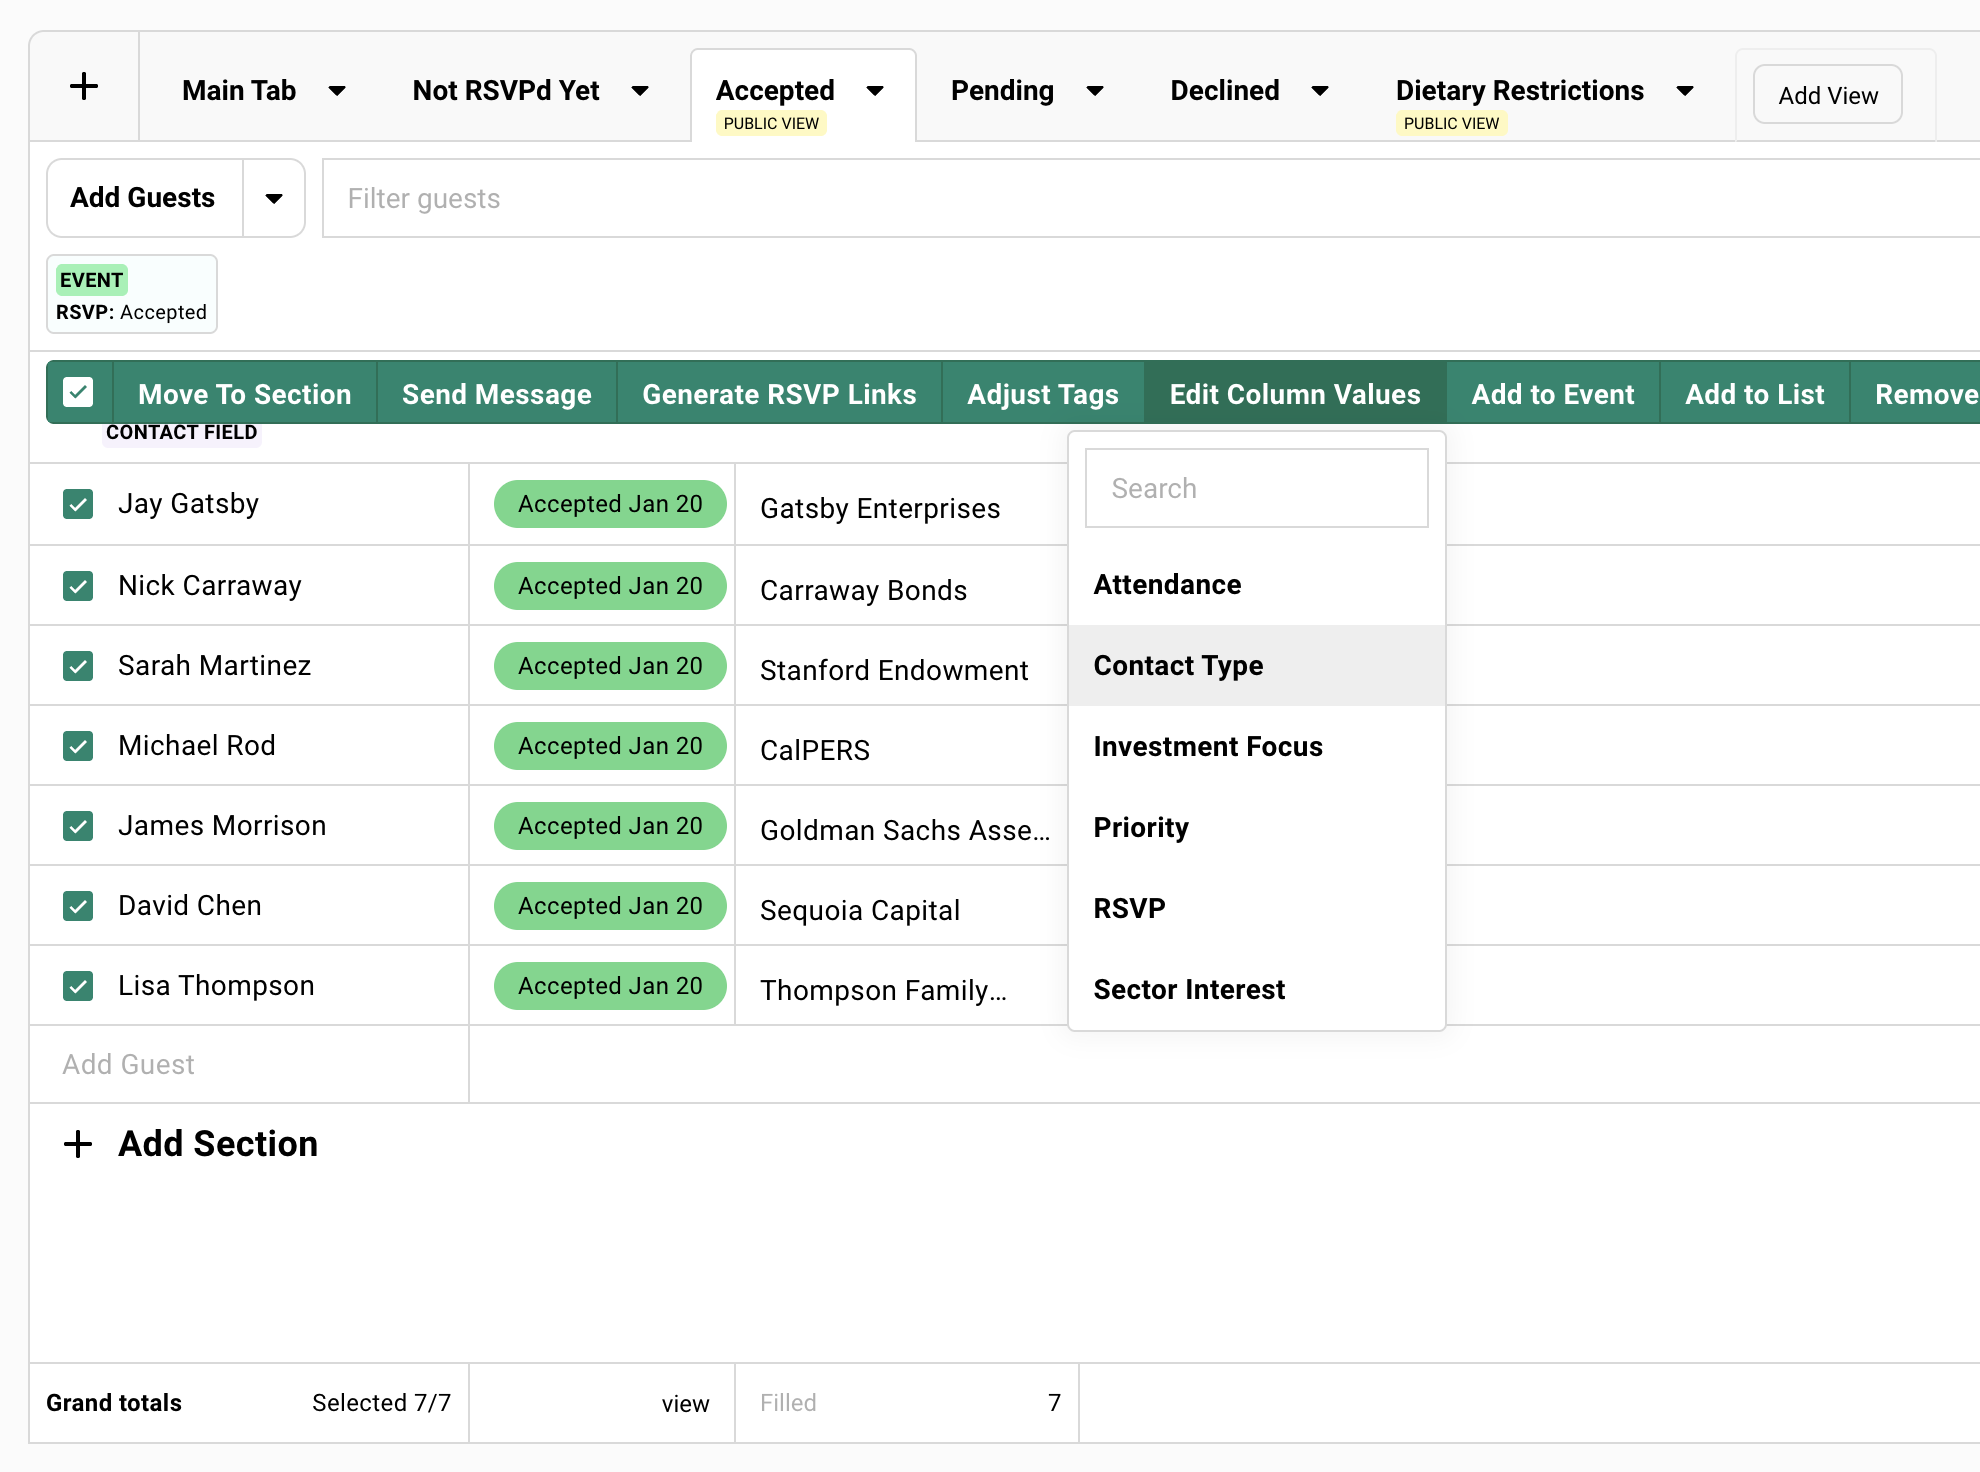
Edit Column Values
Update custom fields, RSVP status, or attendance for everyone selected.
Useful for updating custom field values and approving waitlisted guests in bulk.
Add to Event
Add these guests to another event.
Add to List
Add guests to a contact list. Useful for post-event workflows.
Remove
Remove guests from this event. The contact stays in your database.
More Options:
- Export: Download selected guests as a spreadsheet.
- Copy Emails: Copy addresses to clipboard.
- Merge Contacts: Combine duplicates into one profile.
- Create Contact Method Group: Create a new way to email guests using alternate email columns. See Contact Method Groups for details.
RSVP Status
Section titled “RSVP Status”Guests move through statuses as they interact with your event.
The lifecycle:
Invited → Visited → Accepted / Declined / Maybe / Waitlist
RSVP Status Reference
| Status | Meaning |
|---|---|
| Blank | Not invited. Hasn’t registered. |
| Invited | Received a campaign with an RSVP link. |
| Visited | Clicked the link. Viewed your landing page. |
| Accepted | Confirmed attendance. |
| Declined | Confirmed not attending. |
| Maybe | Treated similar as Accepted. Follow-up recommended. |
| Waitlist | Registered for waitlist. |
| Canceled | Guest Accepted, but later declined. |
| Accepted - Survey Incomplete | Clicked accept but didn’t finish required questions. |
| Bounced | Email bounced. |
| Failed | Email failed to send. |
| Blocked | Previous bounce detected. |
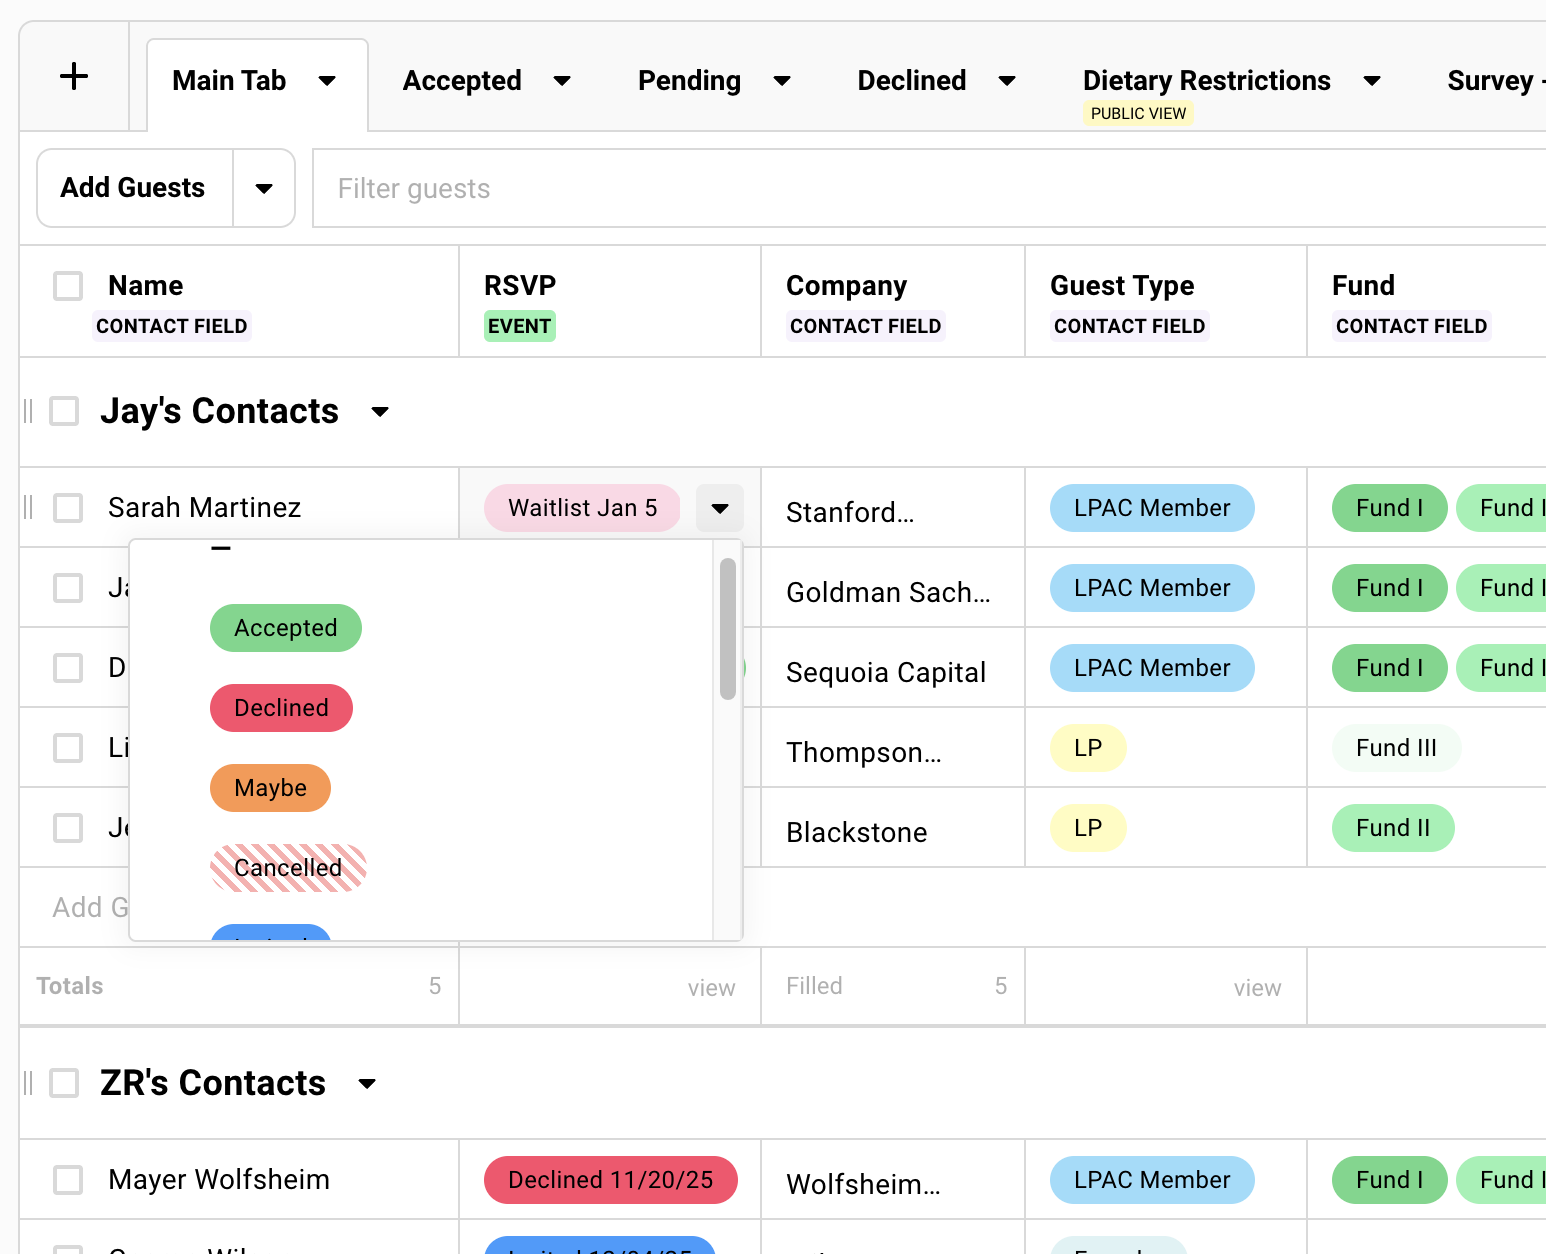
Manually Changing RSVP Status
Guests don’t always click buttons. They reply to your email. They text you. They tell you at coffee.
You can update their status manually.
When marking as Accepted:
- Send confirmation email (includes calendar invite by default)
- Send calendar invite only (system email)
- Don’t send anything
When marking as Declined:
- Option to send calendar deletion notice
Email-Related Statuses
Bounced
The email server rejected your message. Fix your guest’s email address in their contact profile and resend.
Failed
Something prevented sending. Check campaign details for specifics.
Blocked
Previous bounce detected. Gatsby blocks future sends to protect your sender reputation. You can clear this if you’ve verified the address.
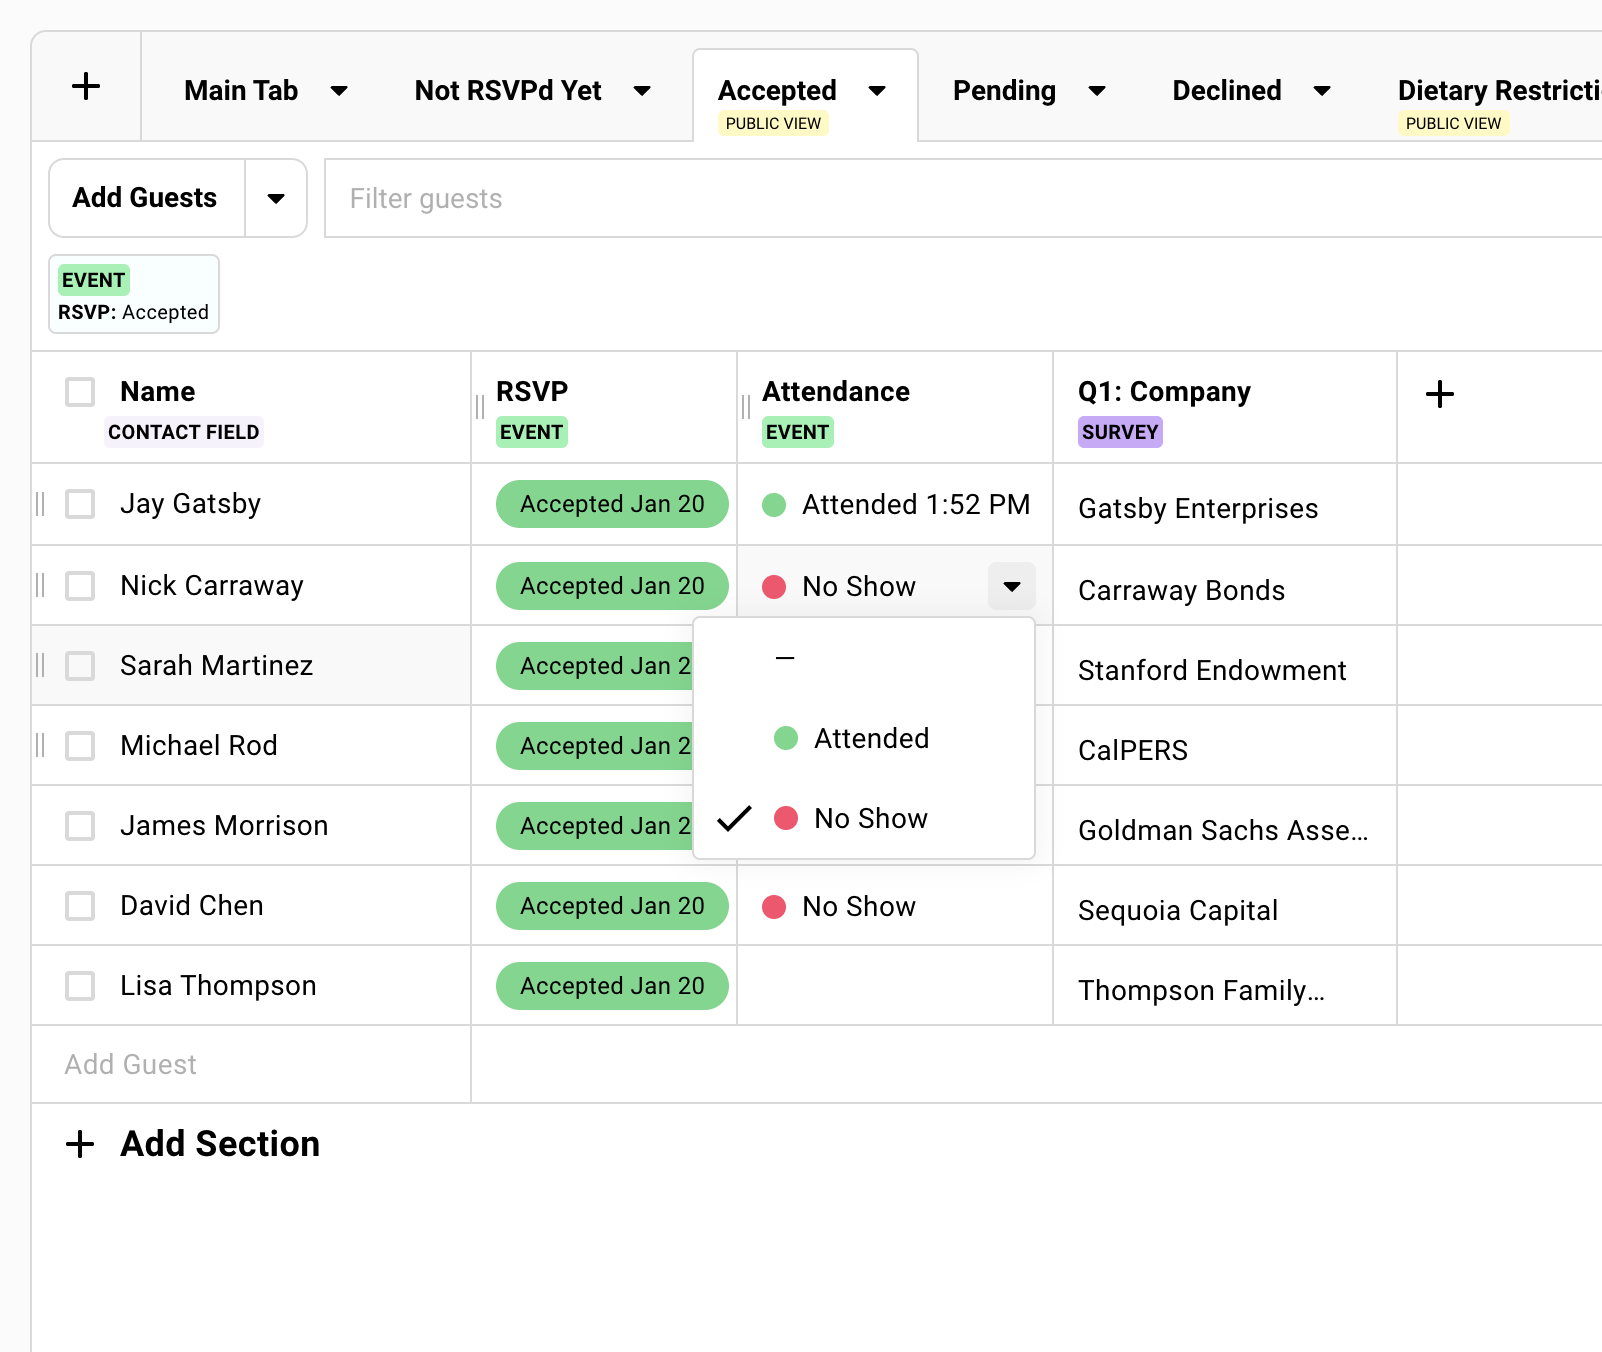
Attendance
Section titled “Attendance”RSVP tells you what someone planned. Attendance tells you who was actually there.
The Attendance column shows Attended, No Show, or blank. It populates automatically from check-in. You can also update it manually after the event.
This is what syncs to your CRM. This is what your follow-up emails should filter by. Your Salesforce records should reflect reality, not promises.
How Attendance Gets Recorded
Attendance populates automatically when you check in guests using Gatsby’s check-in tools or mobile app.
You can also update it manually after the event. Select guests. Edit Column Values. Set Attendance.
What this unlocks:
- Post-event segmentation. Thank-you emails to attendees. “Sorry we missed you” to no-shows.
- CRM accuracy. Your synced records show who actually came.
- Event intelligence. Track who consistently shows up versus who just RSVPs yes.
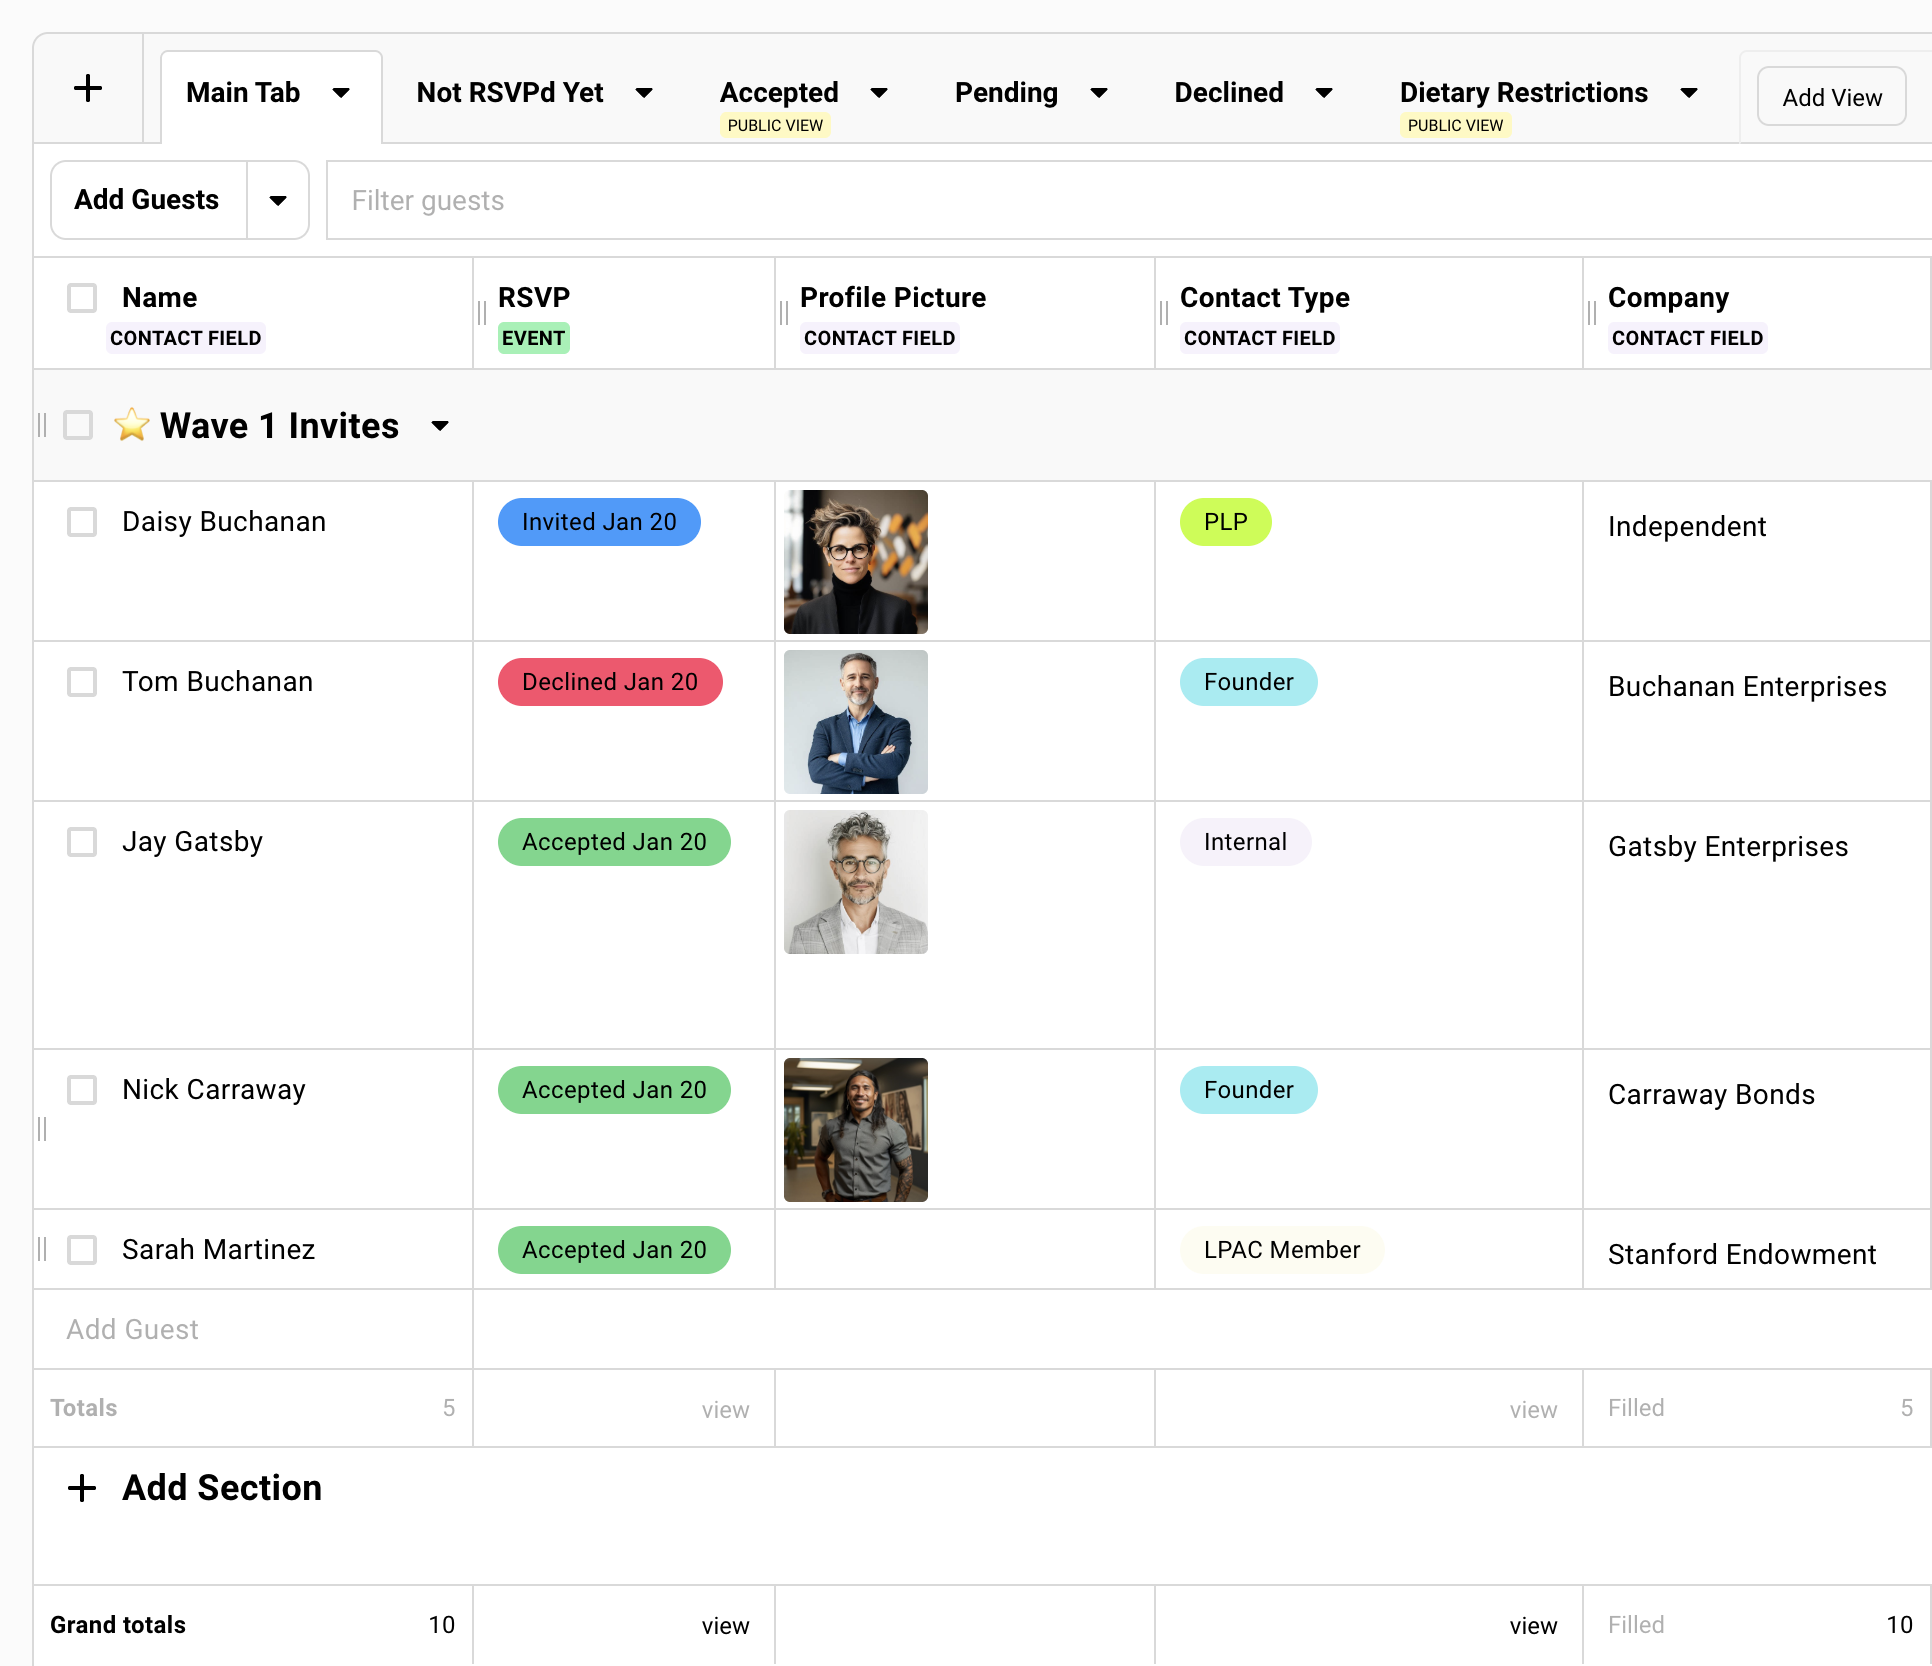
Creating Views
Section titled “Creating Views”Each tab across the top of your guest list is a view.
The main tab shows everyone by default. Add more tabs for specific purposes. Each saves its own column configuration, filters, and sections independently.
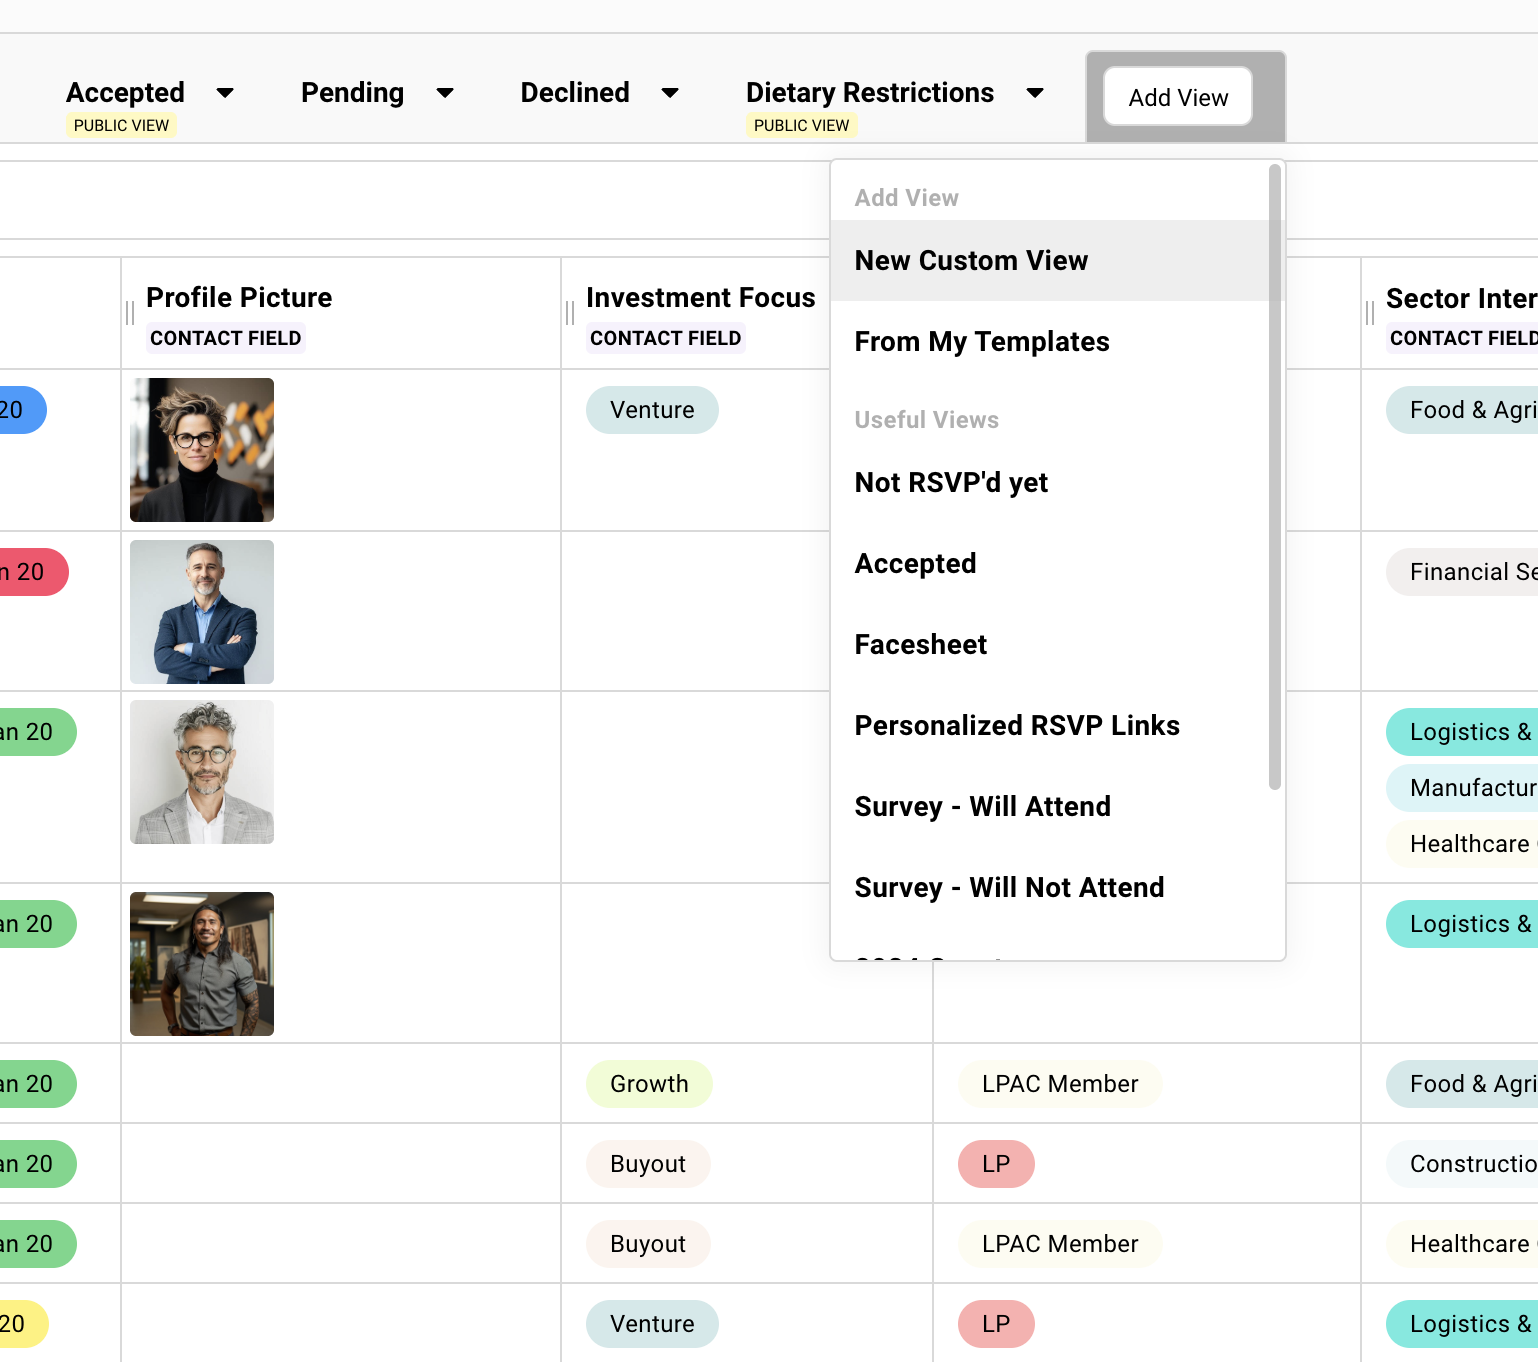
How to Create a View
-
Click Add View at the top of your guest list.
-
Choose from a template or start fresh.
-
Configure columns, filters, and sections.
-
The view saves automatically.
Saving View Templates
Built a view you’ll reuse?
Click the dropdown arrow next to the tab name. Select Save as View Template.
Your view becomes available as a template when creating views in other events.
Columns
Section titled “Columns”Your guest list can show dozens of data points. You don’t need all of them visible at once.
The Columns button (top right) opens a drawer where you choose what’s visible and available to your views. Each view saves its own column configuration.
Contact Fields vs Event Data
Two types of data live on your guest list.
Contact-level data belongs to the person. It follows them across events.
- Email, name, company, position
- Dietary restrictions
- Tags
- Custom contact fields
Update it once. It updates everywhere.
Event-level data belongs to this specific event and doesn’t carry over to others.
- RSVP status
- Attendance
- Survey responses
- Seating assignments
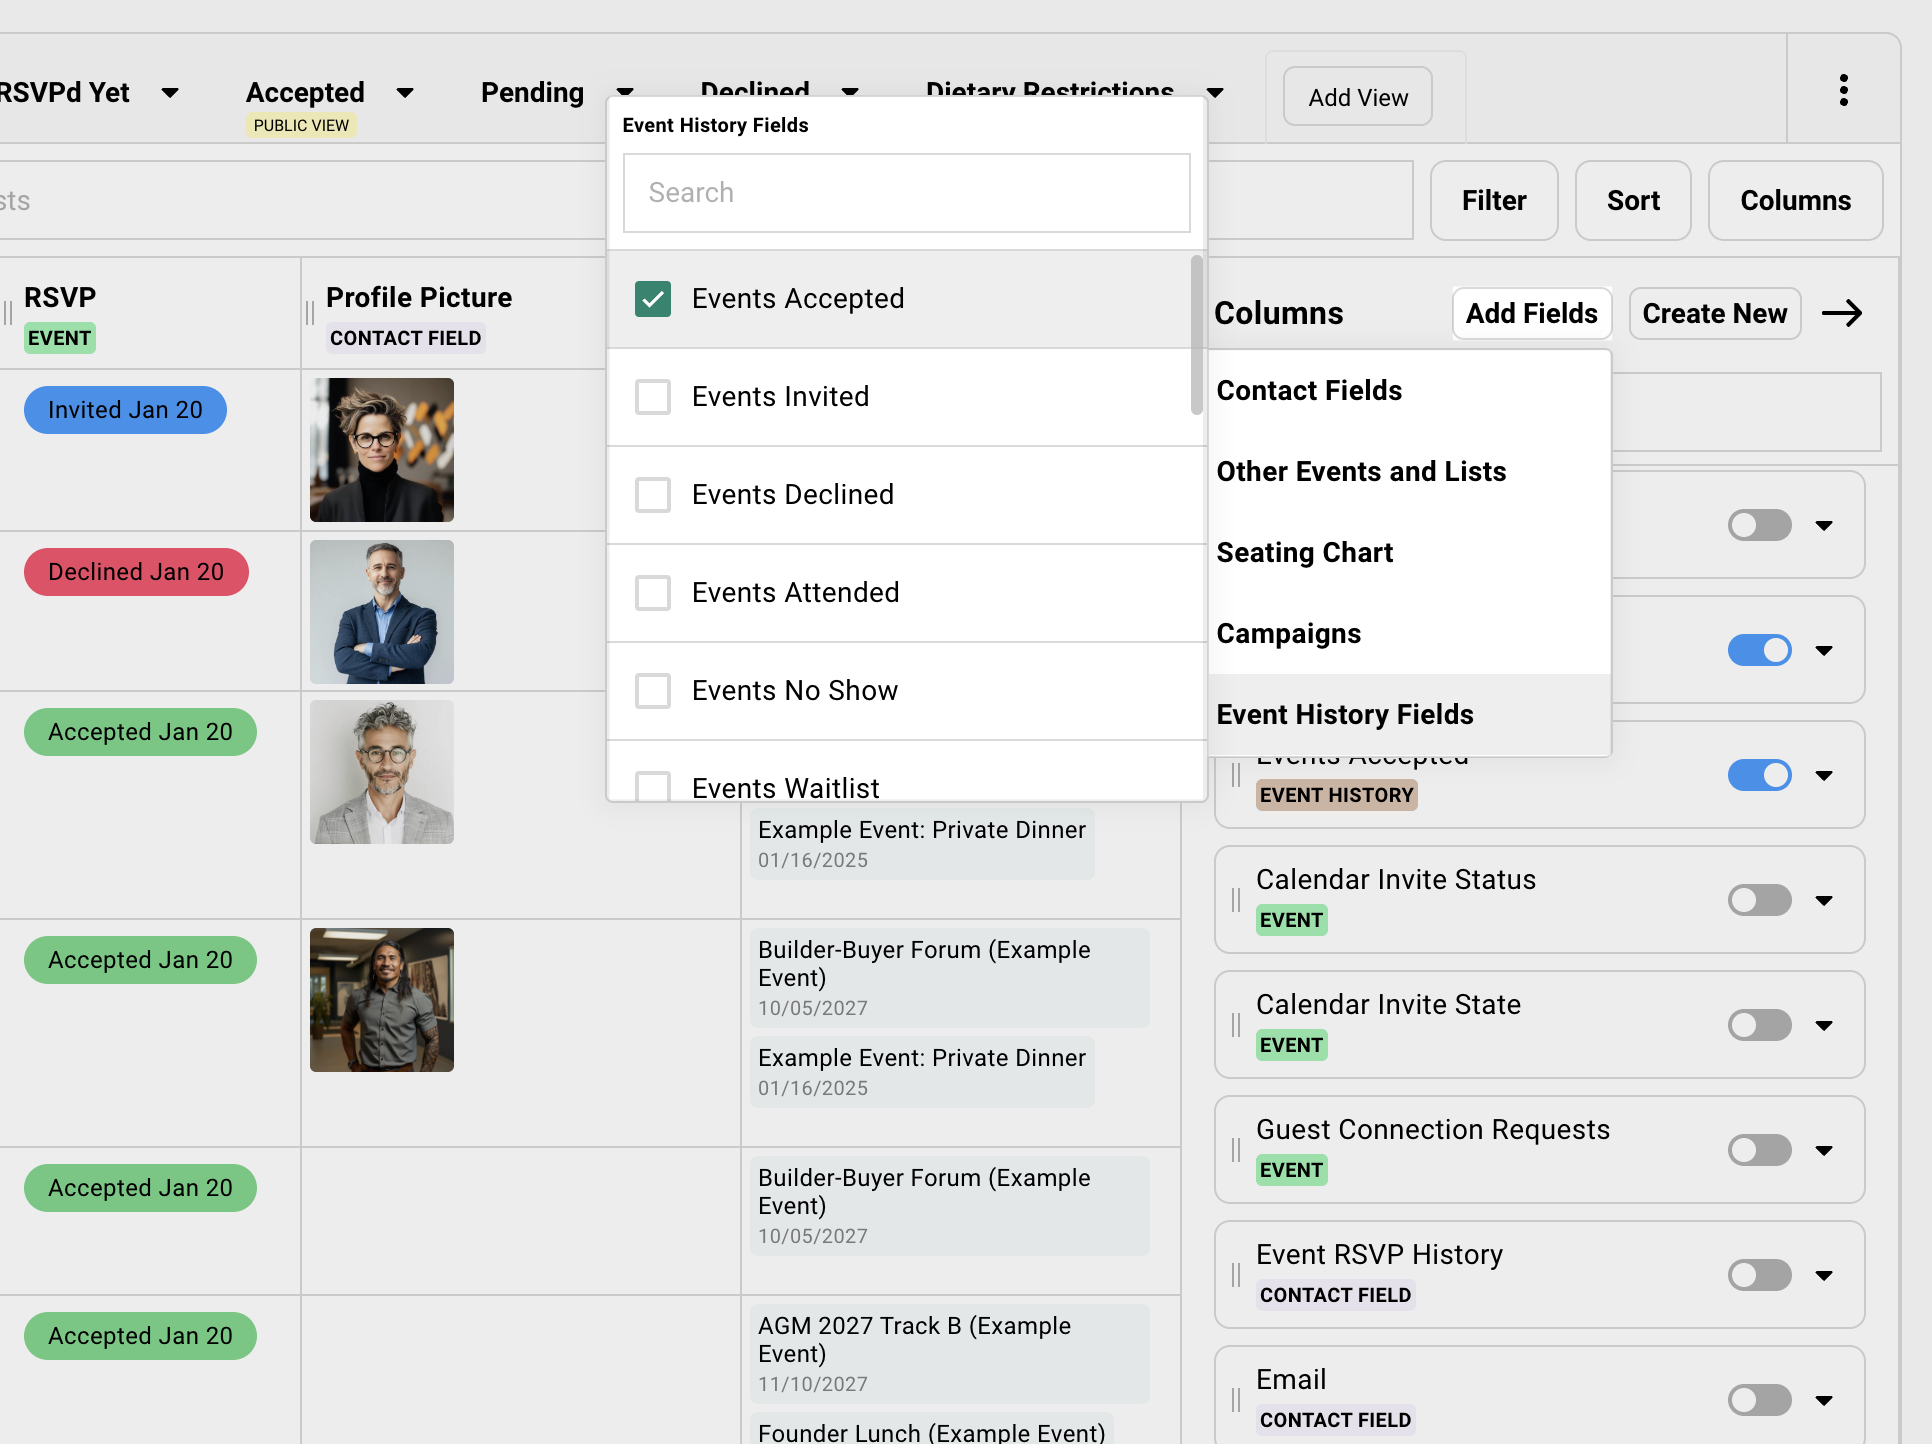
Column Sources
Click Add Fields in the columns drawer.
Contact Fields
Data that lives with the person. Standard fields plus custom contact fields your team has created.
Other Events/Lists
Pull data from elsewhere. See someone’s RSVP from a sub-event. Check their attendance at your previous dinner.
Seating Chart
Table and seat assignments.
Campaigns
Email engagement data. Last email sent. Whether they opened a specific campaign.
Event History
Aggregate data: total events invited, accepted, attended, and more.
Sort by “Total Events Attended” when building your guest list. Your most engaged contacts should be your first invites. They warm up your sender reputation and generate early momentum.
Creating Custom Columns
Need to track something specific to this event?
-
In the Columns drawer, click Create New.
-
Choose the field type:
Text, Number, Single select, Multi-select, User, Date, Time, or Date and Time.
-
Name your field and configure options.
Custom columns are event-specific. The data stays with this event.
Survey responses appear as columns. When you add questions to your registration form, each question becomes an available column.
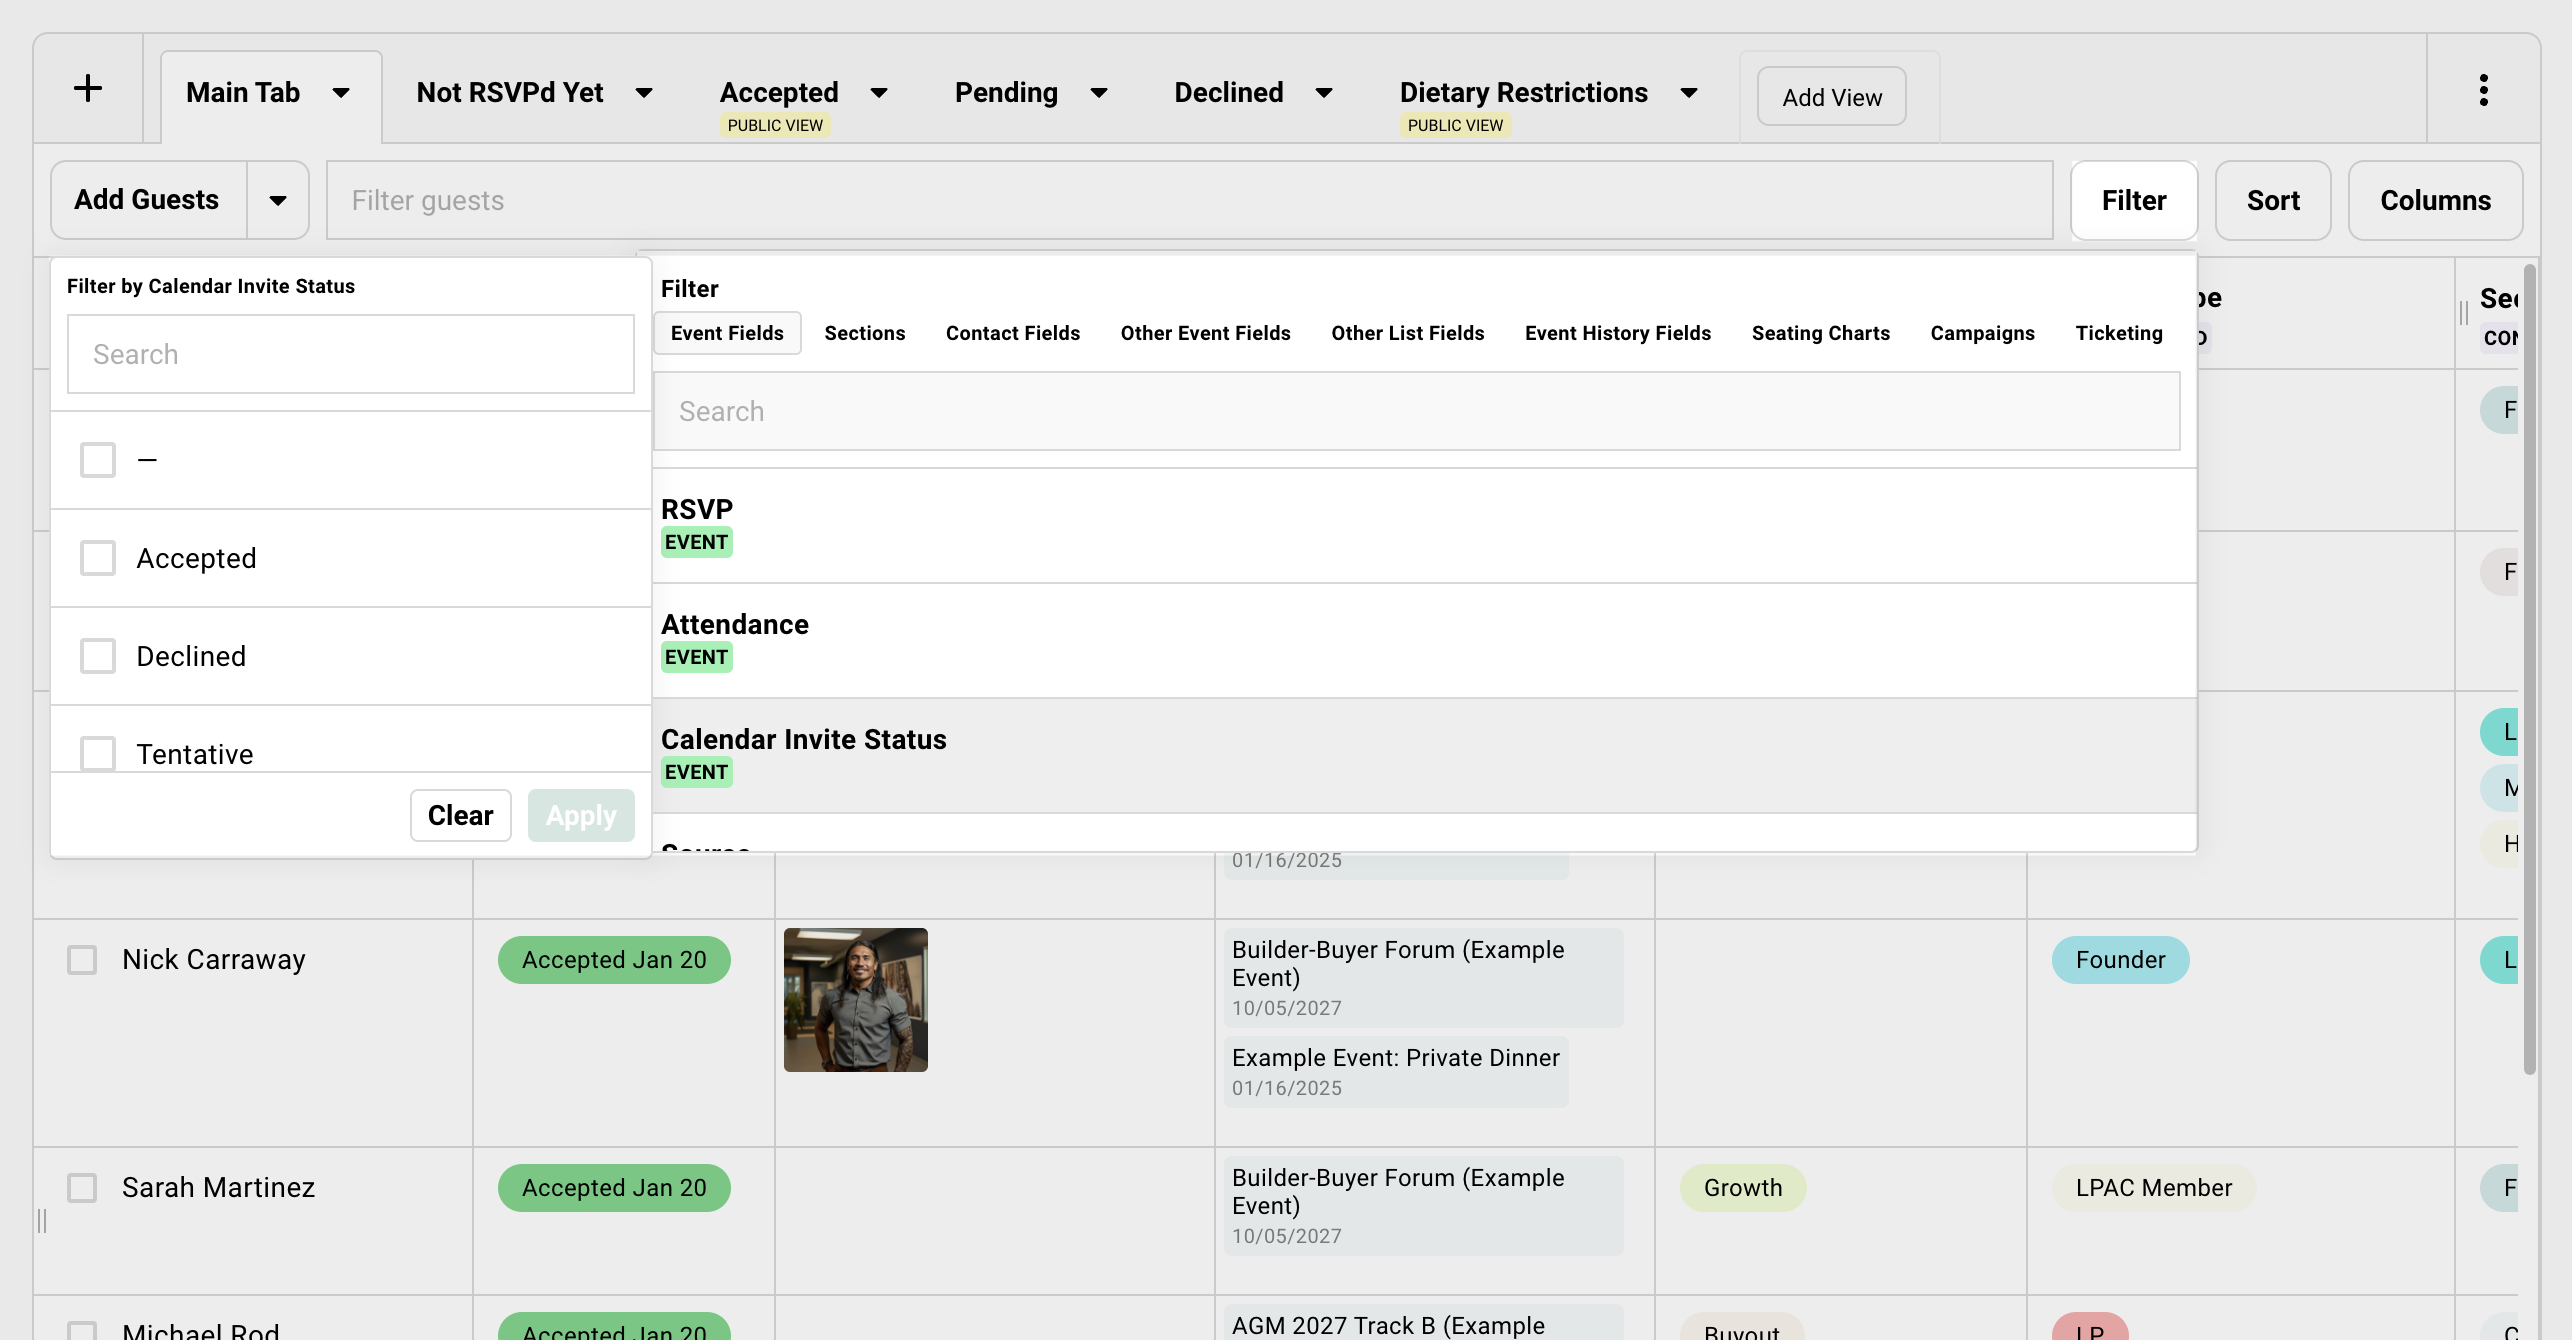
Filters
Section titled “Filters”The Filter button (top right) shows only guests who match your criteria.
Filter by RSVP status, attendance, contact fields, event history, campaign engagement, sections, seating assignments, or data from other events.
Setting Up Filters
Click Filter. Choose a category. Select your criteria. Click Apply.
Active filters show as chips at the top. Click any chip to edit or remove.
Filters are view-specific. Your “Catering” view can filter to Accepted guests while your “Follow-Up” view filters to non-responders.
Most common use: filter by RSVP status to see only confirmed guests.
Sections
Section titled “Sections”Sections organize guests within a view. Think of them as folders or workflow stages.
Every view has a default bucket at the top. Newly added guests land there. You create named sections for everything else.
Common uses: Wave 1 and Wave 2 sections for staged invitations. Internal Team for testing.
Using Sections
Click Add Section. Name it.
To move guests: Select them. Click Move to Section. Choose the destination.
Workflow tip: Use sections to organize work. Then use bulk edit to save that organization to a custom field. The section is temporary. The field persists. Now you can filter by that segment in future events.
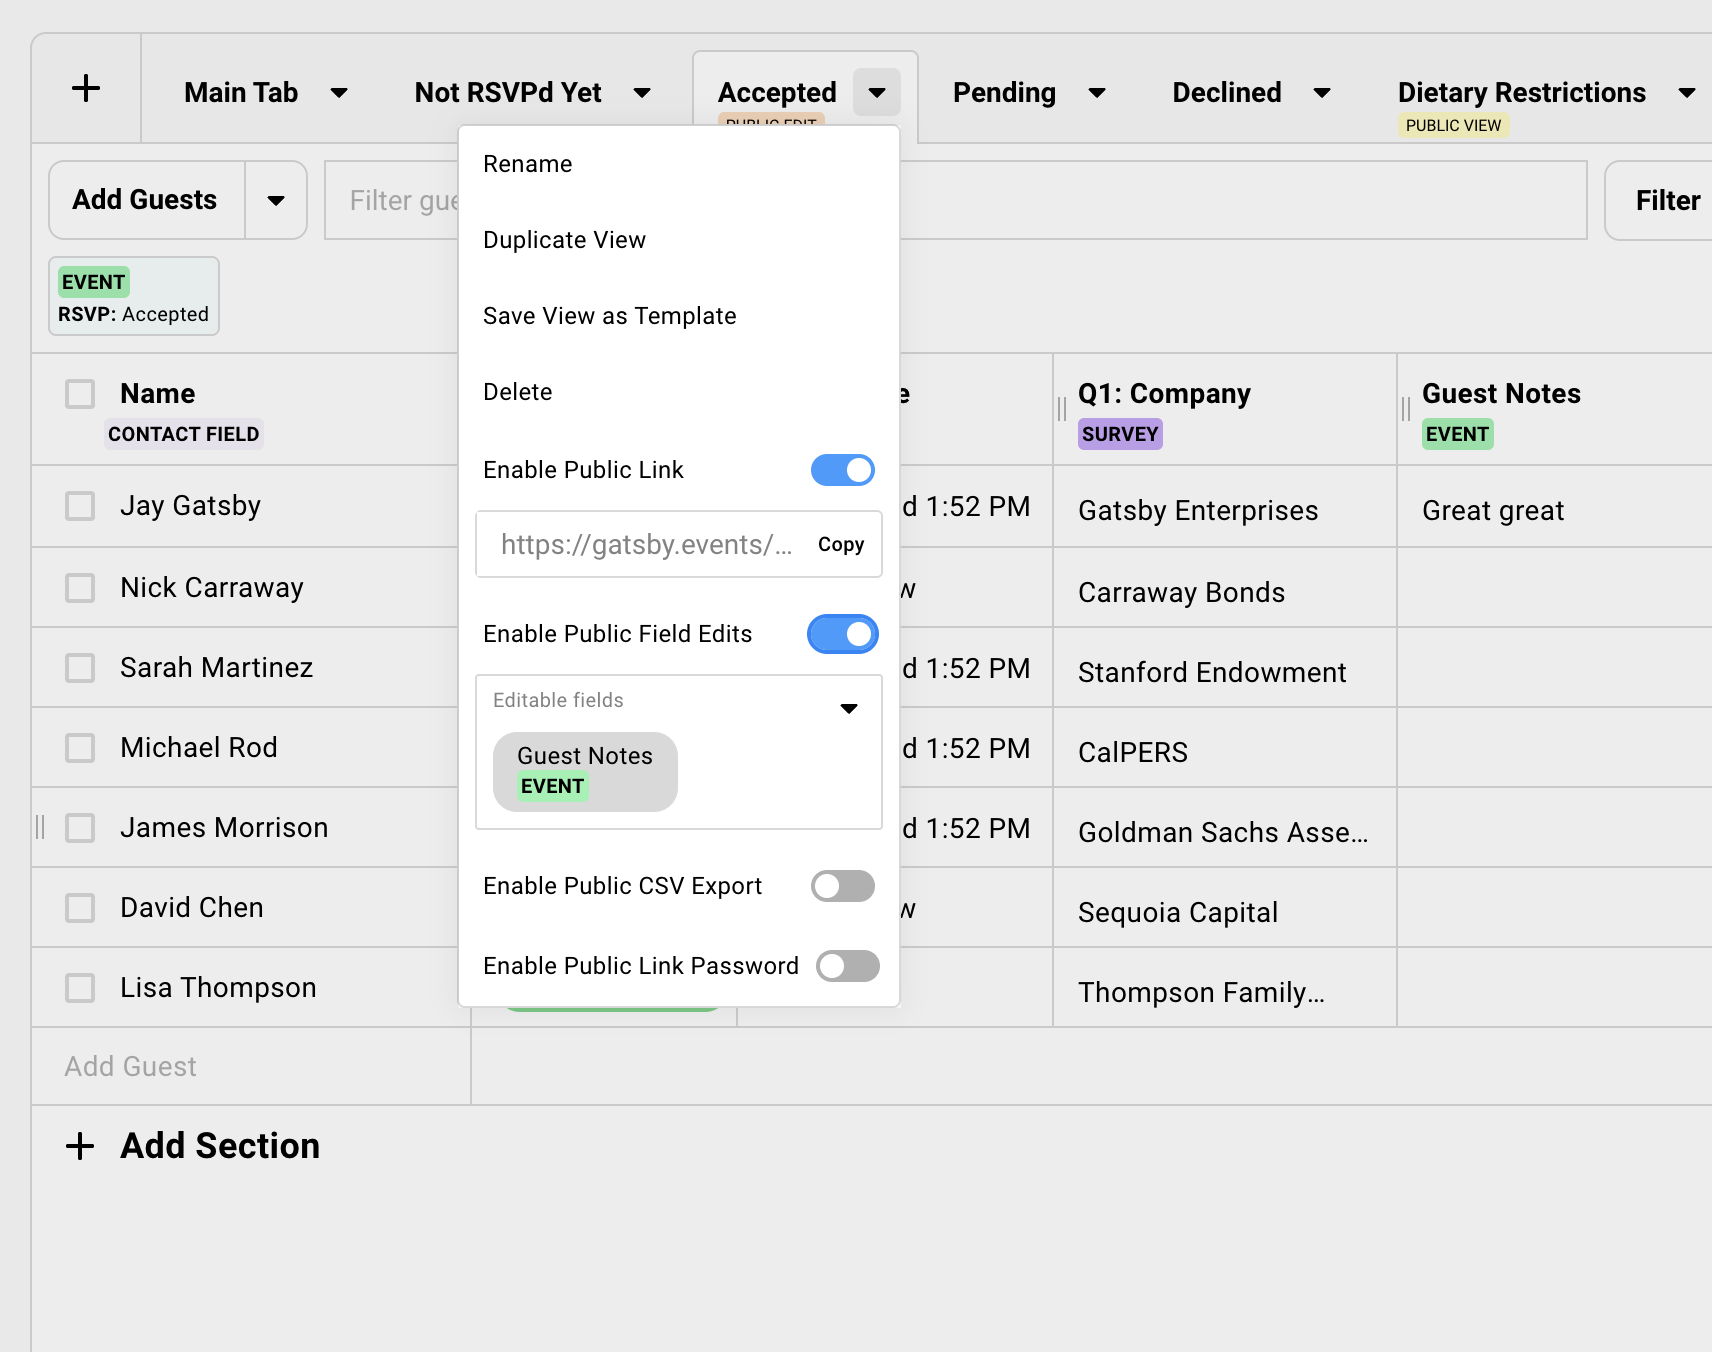
Sharing Views
Section titled “Sharing Views”Share a view-only link to any guest list view.
The recipient sees exactly what you’ve configured. Nothing more. No login required.
No access to other views. No ability to see hidden columns. No access to contact profiles.
How to Share a View
Click the dropdown arrow next to the tab name. Select Enable Public Link.
Copy Link
Get the shareable URL.
Enable Public Field Editing
Let recipients edit specific columns. Useful for notes and working with co-hosts.
Enable Exporting
Let recipients download as a spreadsheet. Useful for sponsors and co-hosts.
Password Protect
Require a password to access the view.
Recipients see a read-only version unless you enable editing. They can only export columns visible in that view.
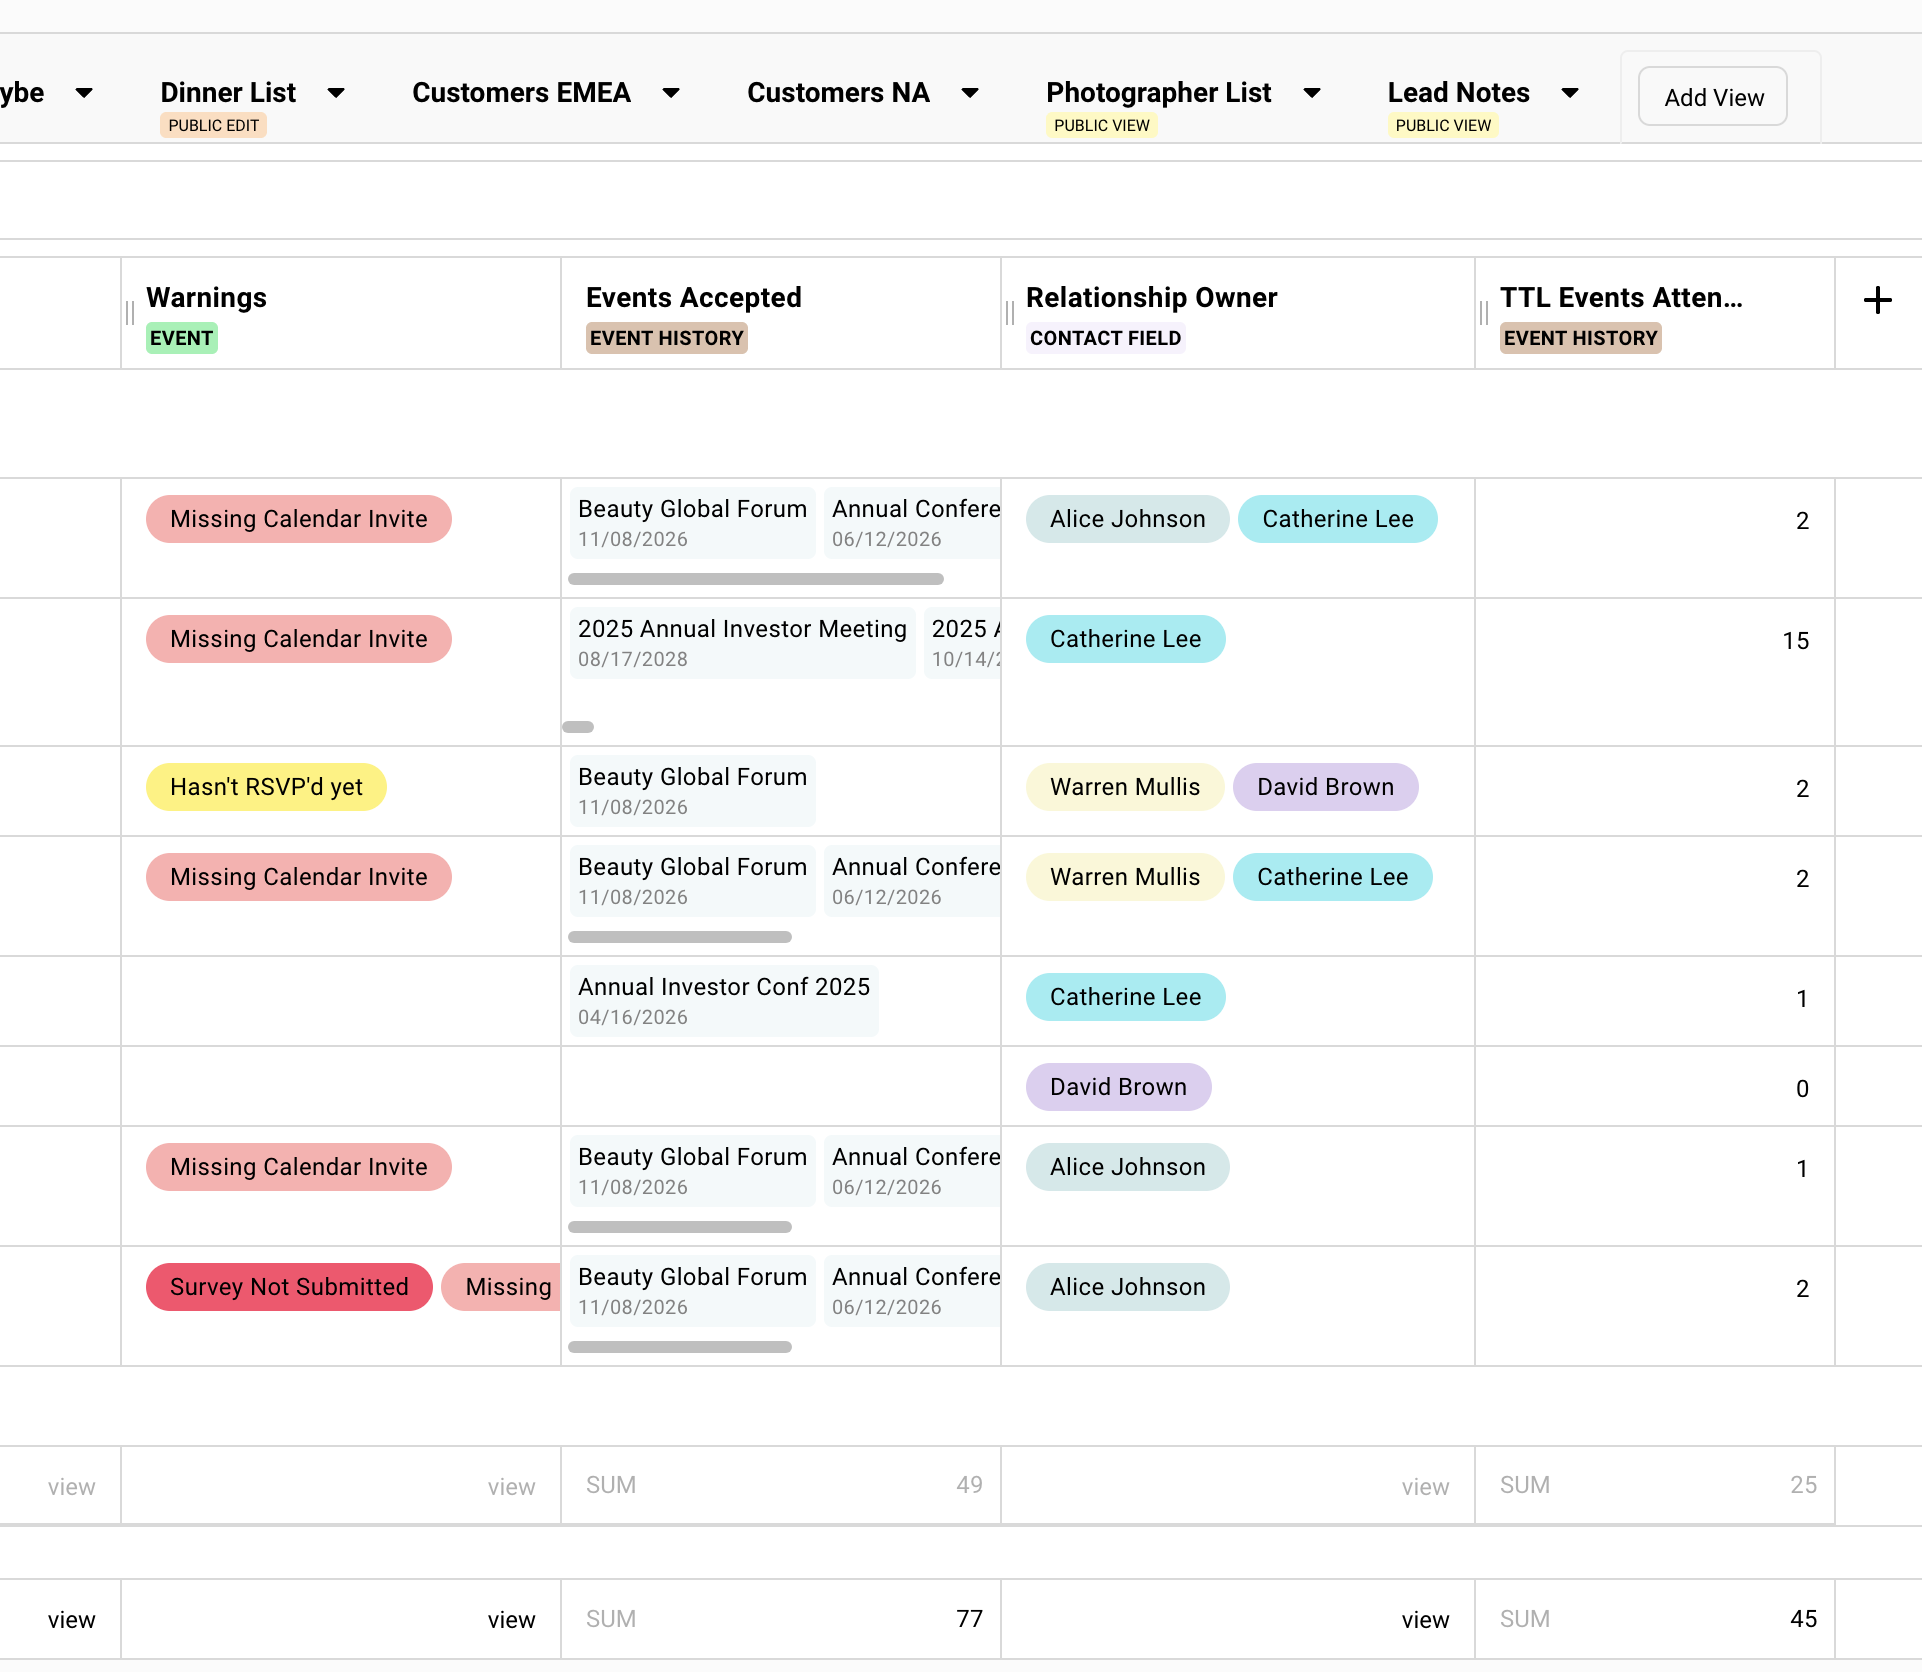
Key Columns
Section titled “Key Columns”These columns surface information you’d otherwise miss. Enable them from Columns → Add Fields.
Warnings Column
Gatsby flags problems automatically.
Email issues (blocks sending):
| Warning | Meaning |
|---|---|
| Missing Email | No email address. Common for plus-ones. |
| Invalid Email | Format is wrong. |
| Email Blocked | Previous bounce. Gatsby protects your sender reputation. |
| Bounced / Failed | Recent send failed. Check campaign. |
Registration issues:
| Warning | Meaning |
|---|---|
| Survey Not Submitted | Has Accepted status but didn’t fill out survey questions. |
| Missing Calendar Invite | Accepted but never got the invite. |
| Outdated Calendar Invite | Event details changed since they got the invite. |
Predictive flags:
These are signals, not verdicts. Use them to focus your follow-up energy.
| Warning | Meaning |
|---|---|
| Unlikely to RSVP | Invited 3+ times. Never responded. |
| Unlikely to Attend | Accepted 3+ times. Never showed. |
| Unlikely to Accept | Invited 3+ times. Always declined. |
Calendar Invite State
Shows whether guests have the current calendar invite.
- Blank — Haven’t received an invite
- Up to date — Have the current version
- Out of date — Event details changed
Filter by “Out of date” after you change event details.
Event History
Found under Add Fields → Event History.
- Total events invited / accepted / attended
- Events they’ve attended
- Events they’ve been invited to
- And more
Filter for “TTL Events Attended: > 3 events” to find your most engaged contacts.
Last Sent Campaign
Found under Add Fields → Campaigns.
Shows the most recent email each guest received. Sort by this to see where everyone is in your outreach sequence.
Name campaigns sequentially. Invite, Follow-up 1, Follow-up 2. This column shows exactly where each guest is in your sequence.
Common Questions
Section titled “Common Questions” What if a guest replies by email instead of clicking the RSVP button?
Click their RSVP status field and select the appropriate status. When marking as Accepted, choose whether to send a confirmation email.
If I delete a view, do I lose my guests?
No. Deleting a view removes that configuration. Your guests and their data stay on the guest list.
How do I know if someone opened my invitation email?
Add campaign columns. Under Columns → Add Fields → Campaigns, add “Opened” or “[Campaign Name]” to see who opened specific emails. (Email Open tracking must be turned on in your Team Settings.)
Can I see a guest's history with our events?
Click their name to open their contact profile. The activity tab shows every event they’ve been invited to, their RSVP status, and attendance. Or add Event History columns to see aggregate data on your guest list.
How do I share the guest list with people who aren't Gatsby users?
Guest List Views work with non-Gatsby users.
You create custom views for your guest list. You configure which columns to show/hide. Then you get a link to share with that person.
In [Guest List] » Click the dropdown next to the view name » Click Enable Public Link.
Can't see who brought Plus Ones
Add Plus Ones column. Guest list » Columns » Add Fields » Plus Ones. This displays the name of the person who invited the Plus One.
Bulk operations
Select multiple guests » Click Adjust Column Values in the green action bar.
Can I export to Excel?
Yes, via CSV. Guest List » Select Guests » More Options » Export to CSV.
Exports visible columns in your current view with any active filters applied. Open in Excel, Google Sheets, or any spreadsheet app.
Accidentally deleted important guests
Restore Deleted Guests from the Add Guests dropdown. Select the guests you want back, then restore.
Prevention: Use filters or sections to hide guests instead of deleting. Keeps them in your database for future events.
Need to change event date/time/location
Edit event details » Click Save » Calendar invite updates can be sent automatically or shared later.
Check “Unshared Event Updates” on dashboard if you need to send updates.